|
|
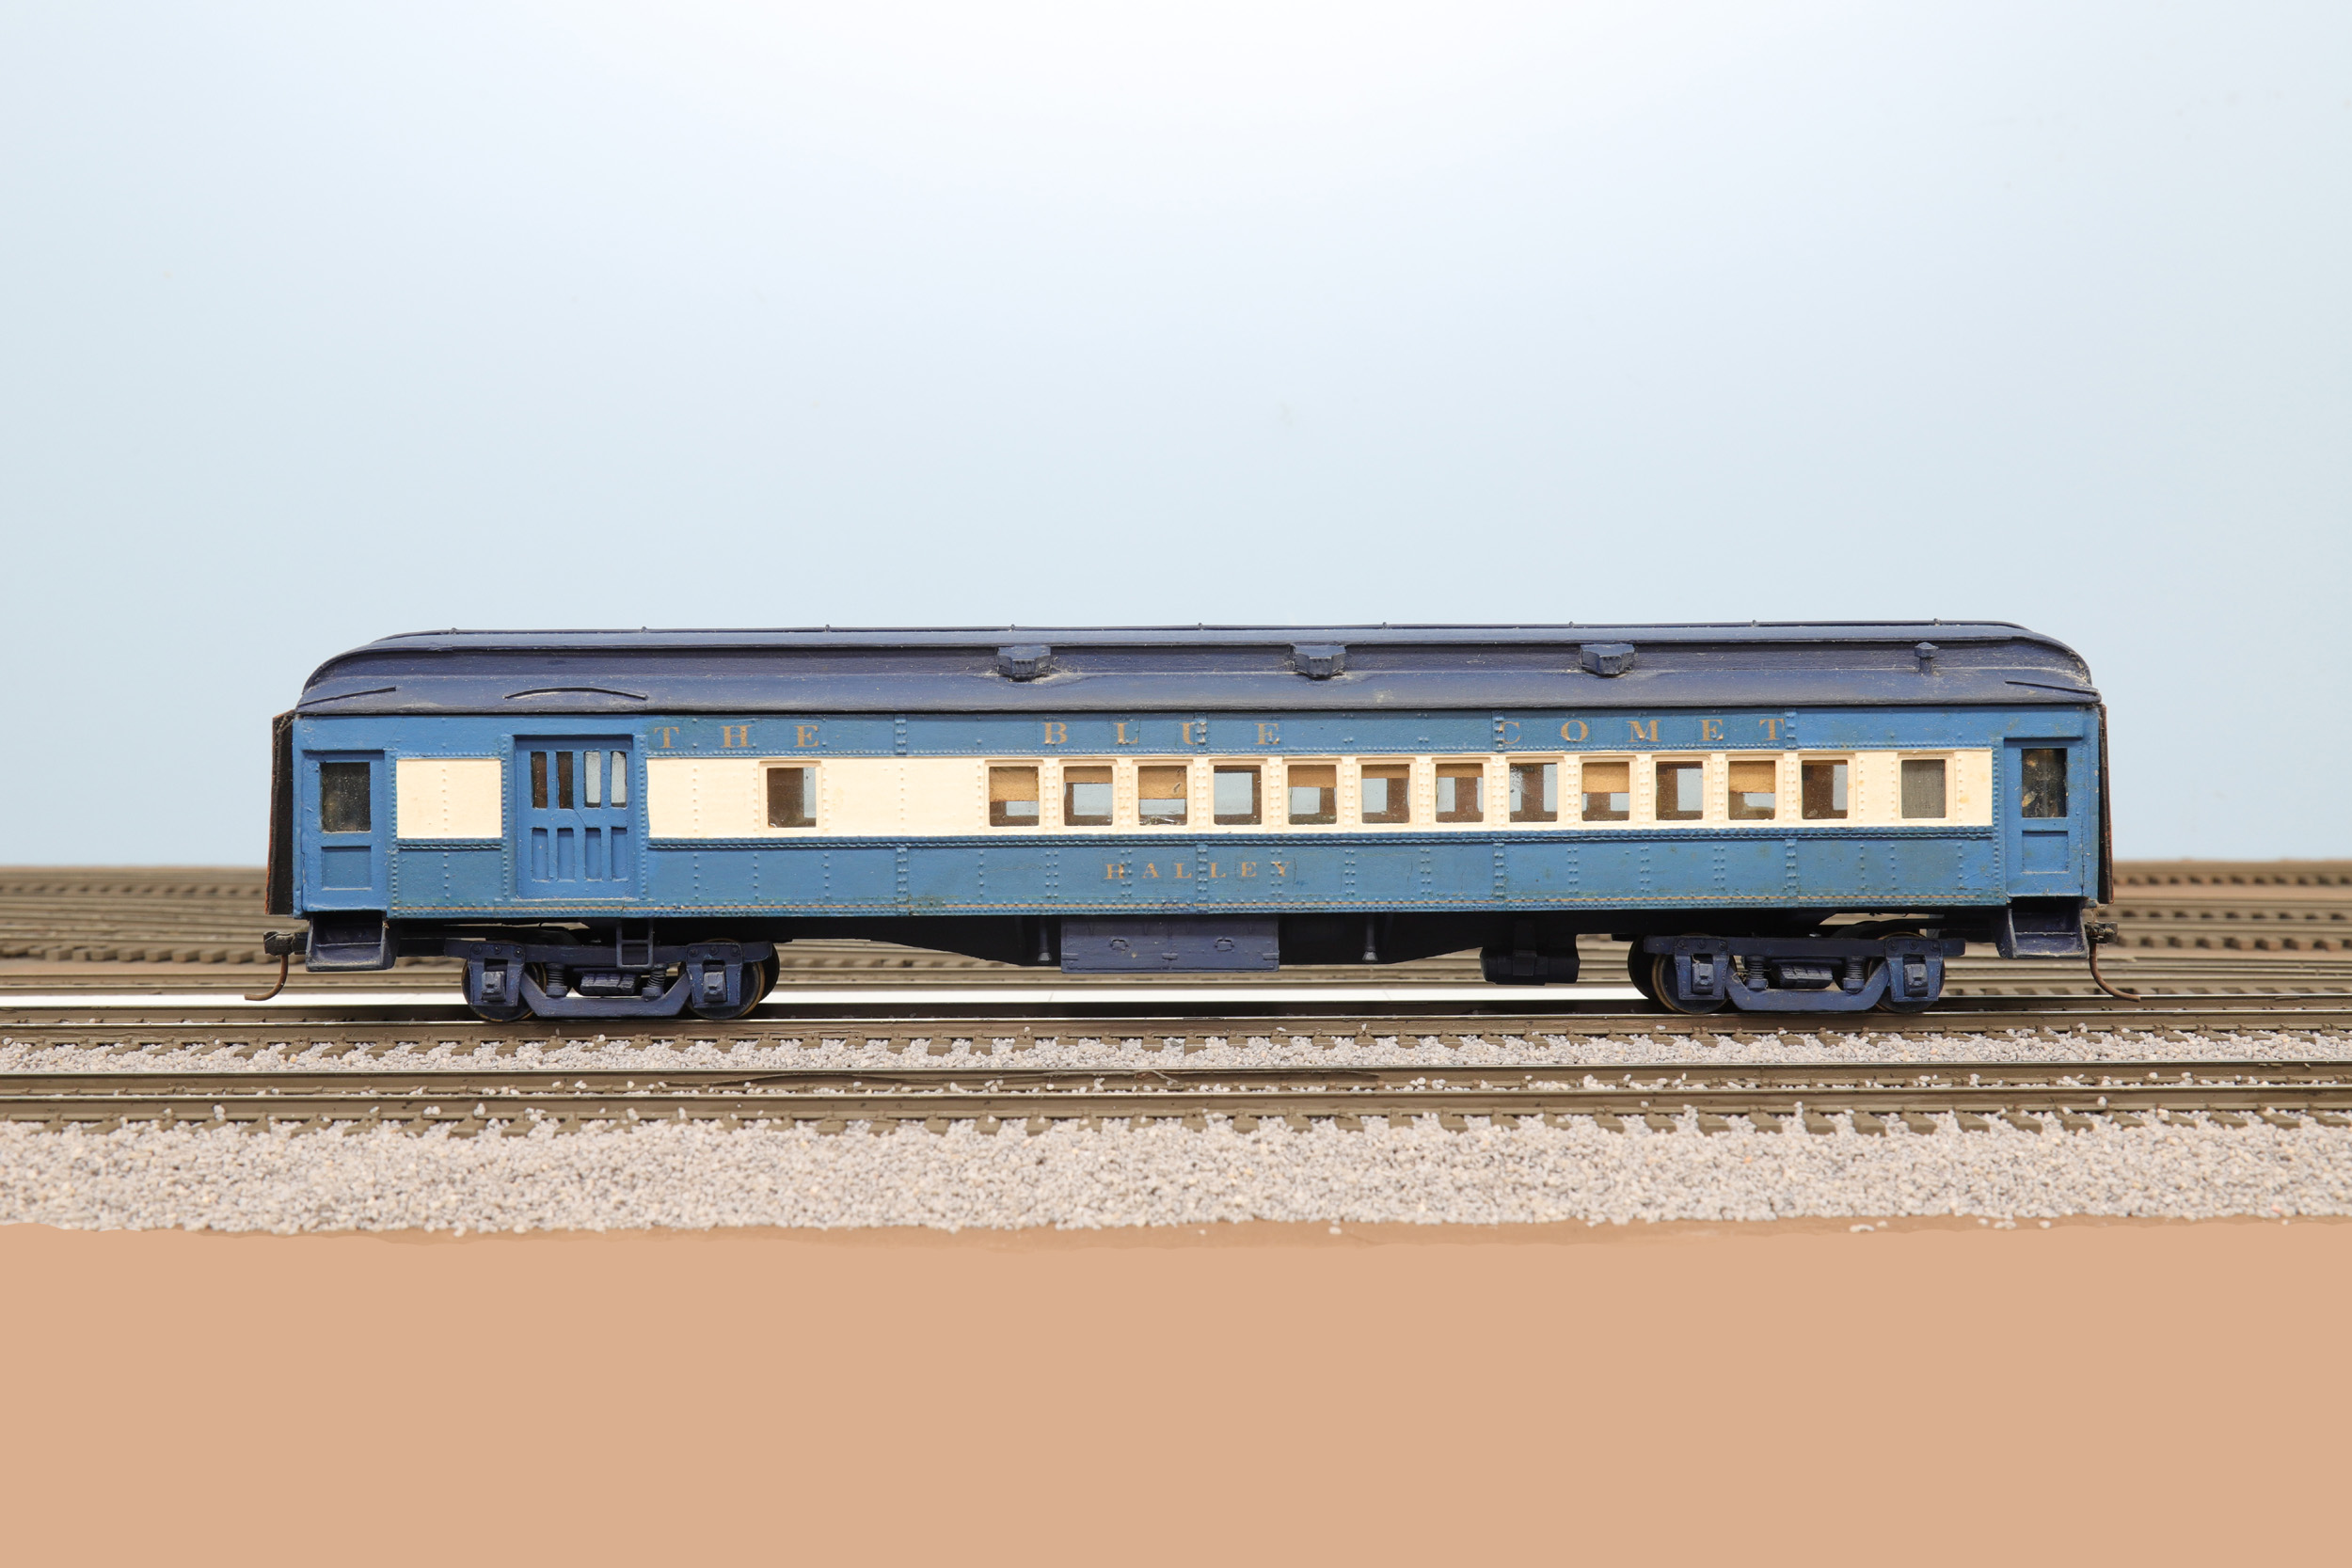
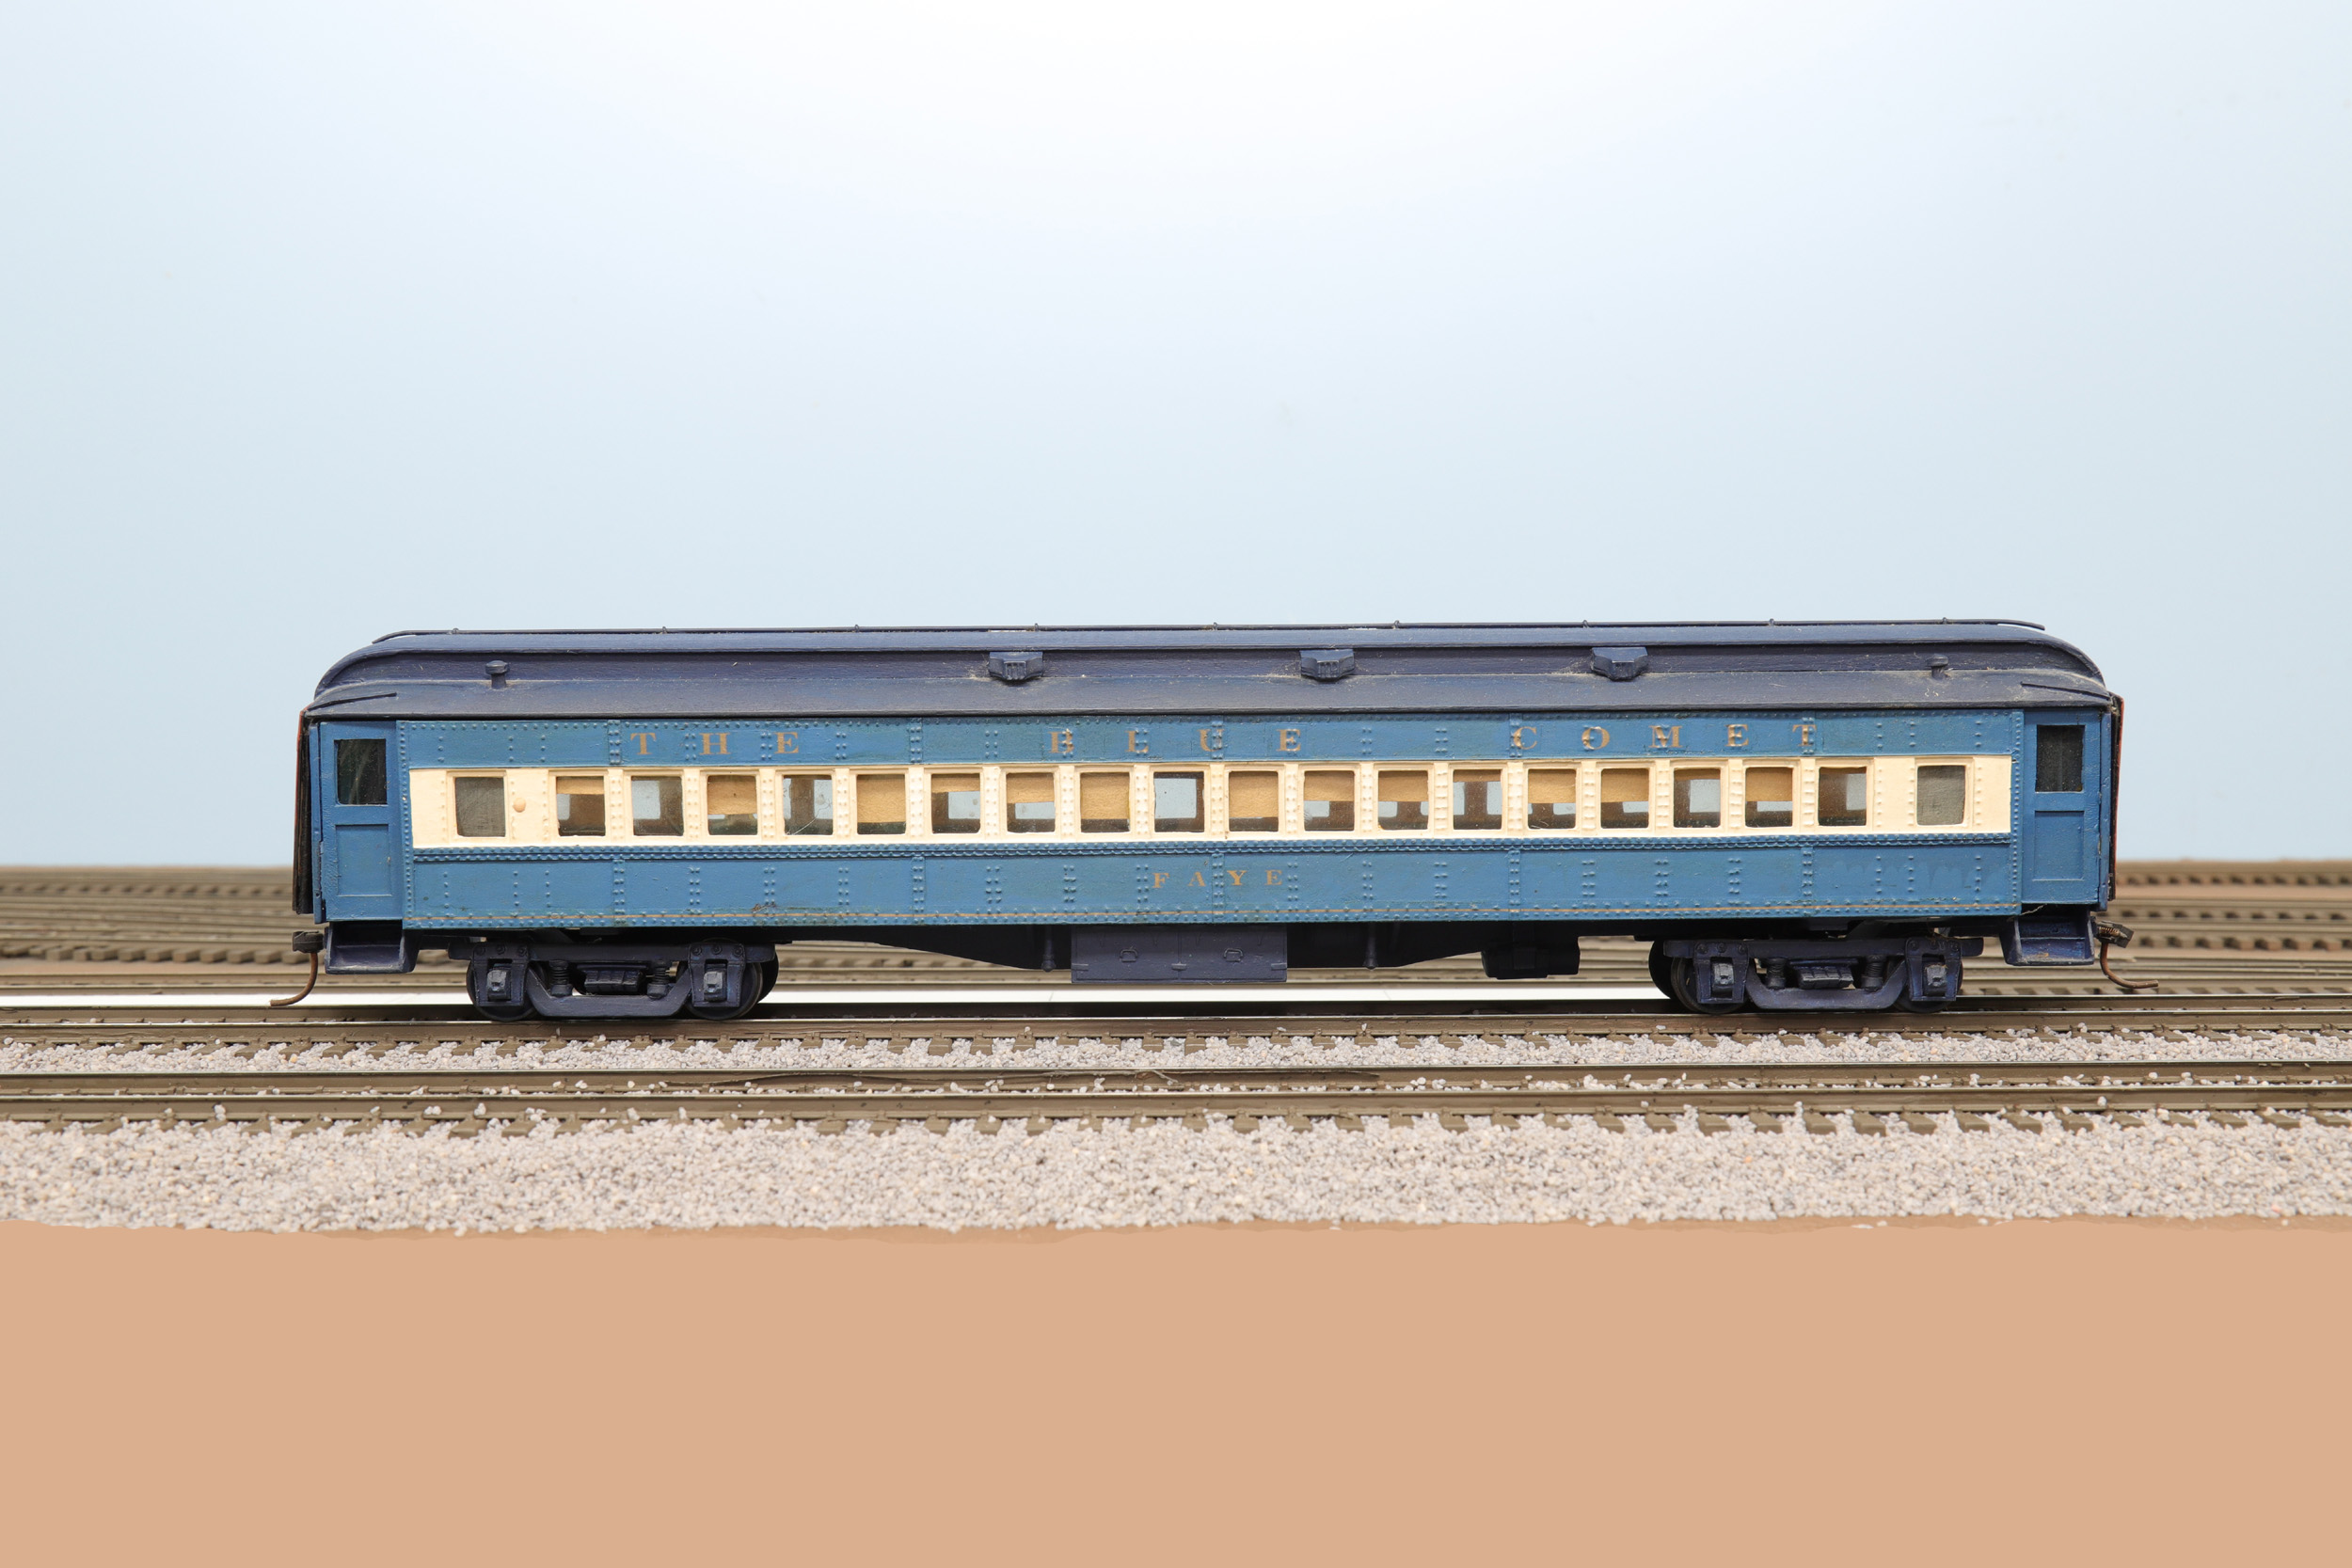
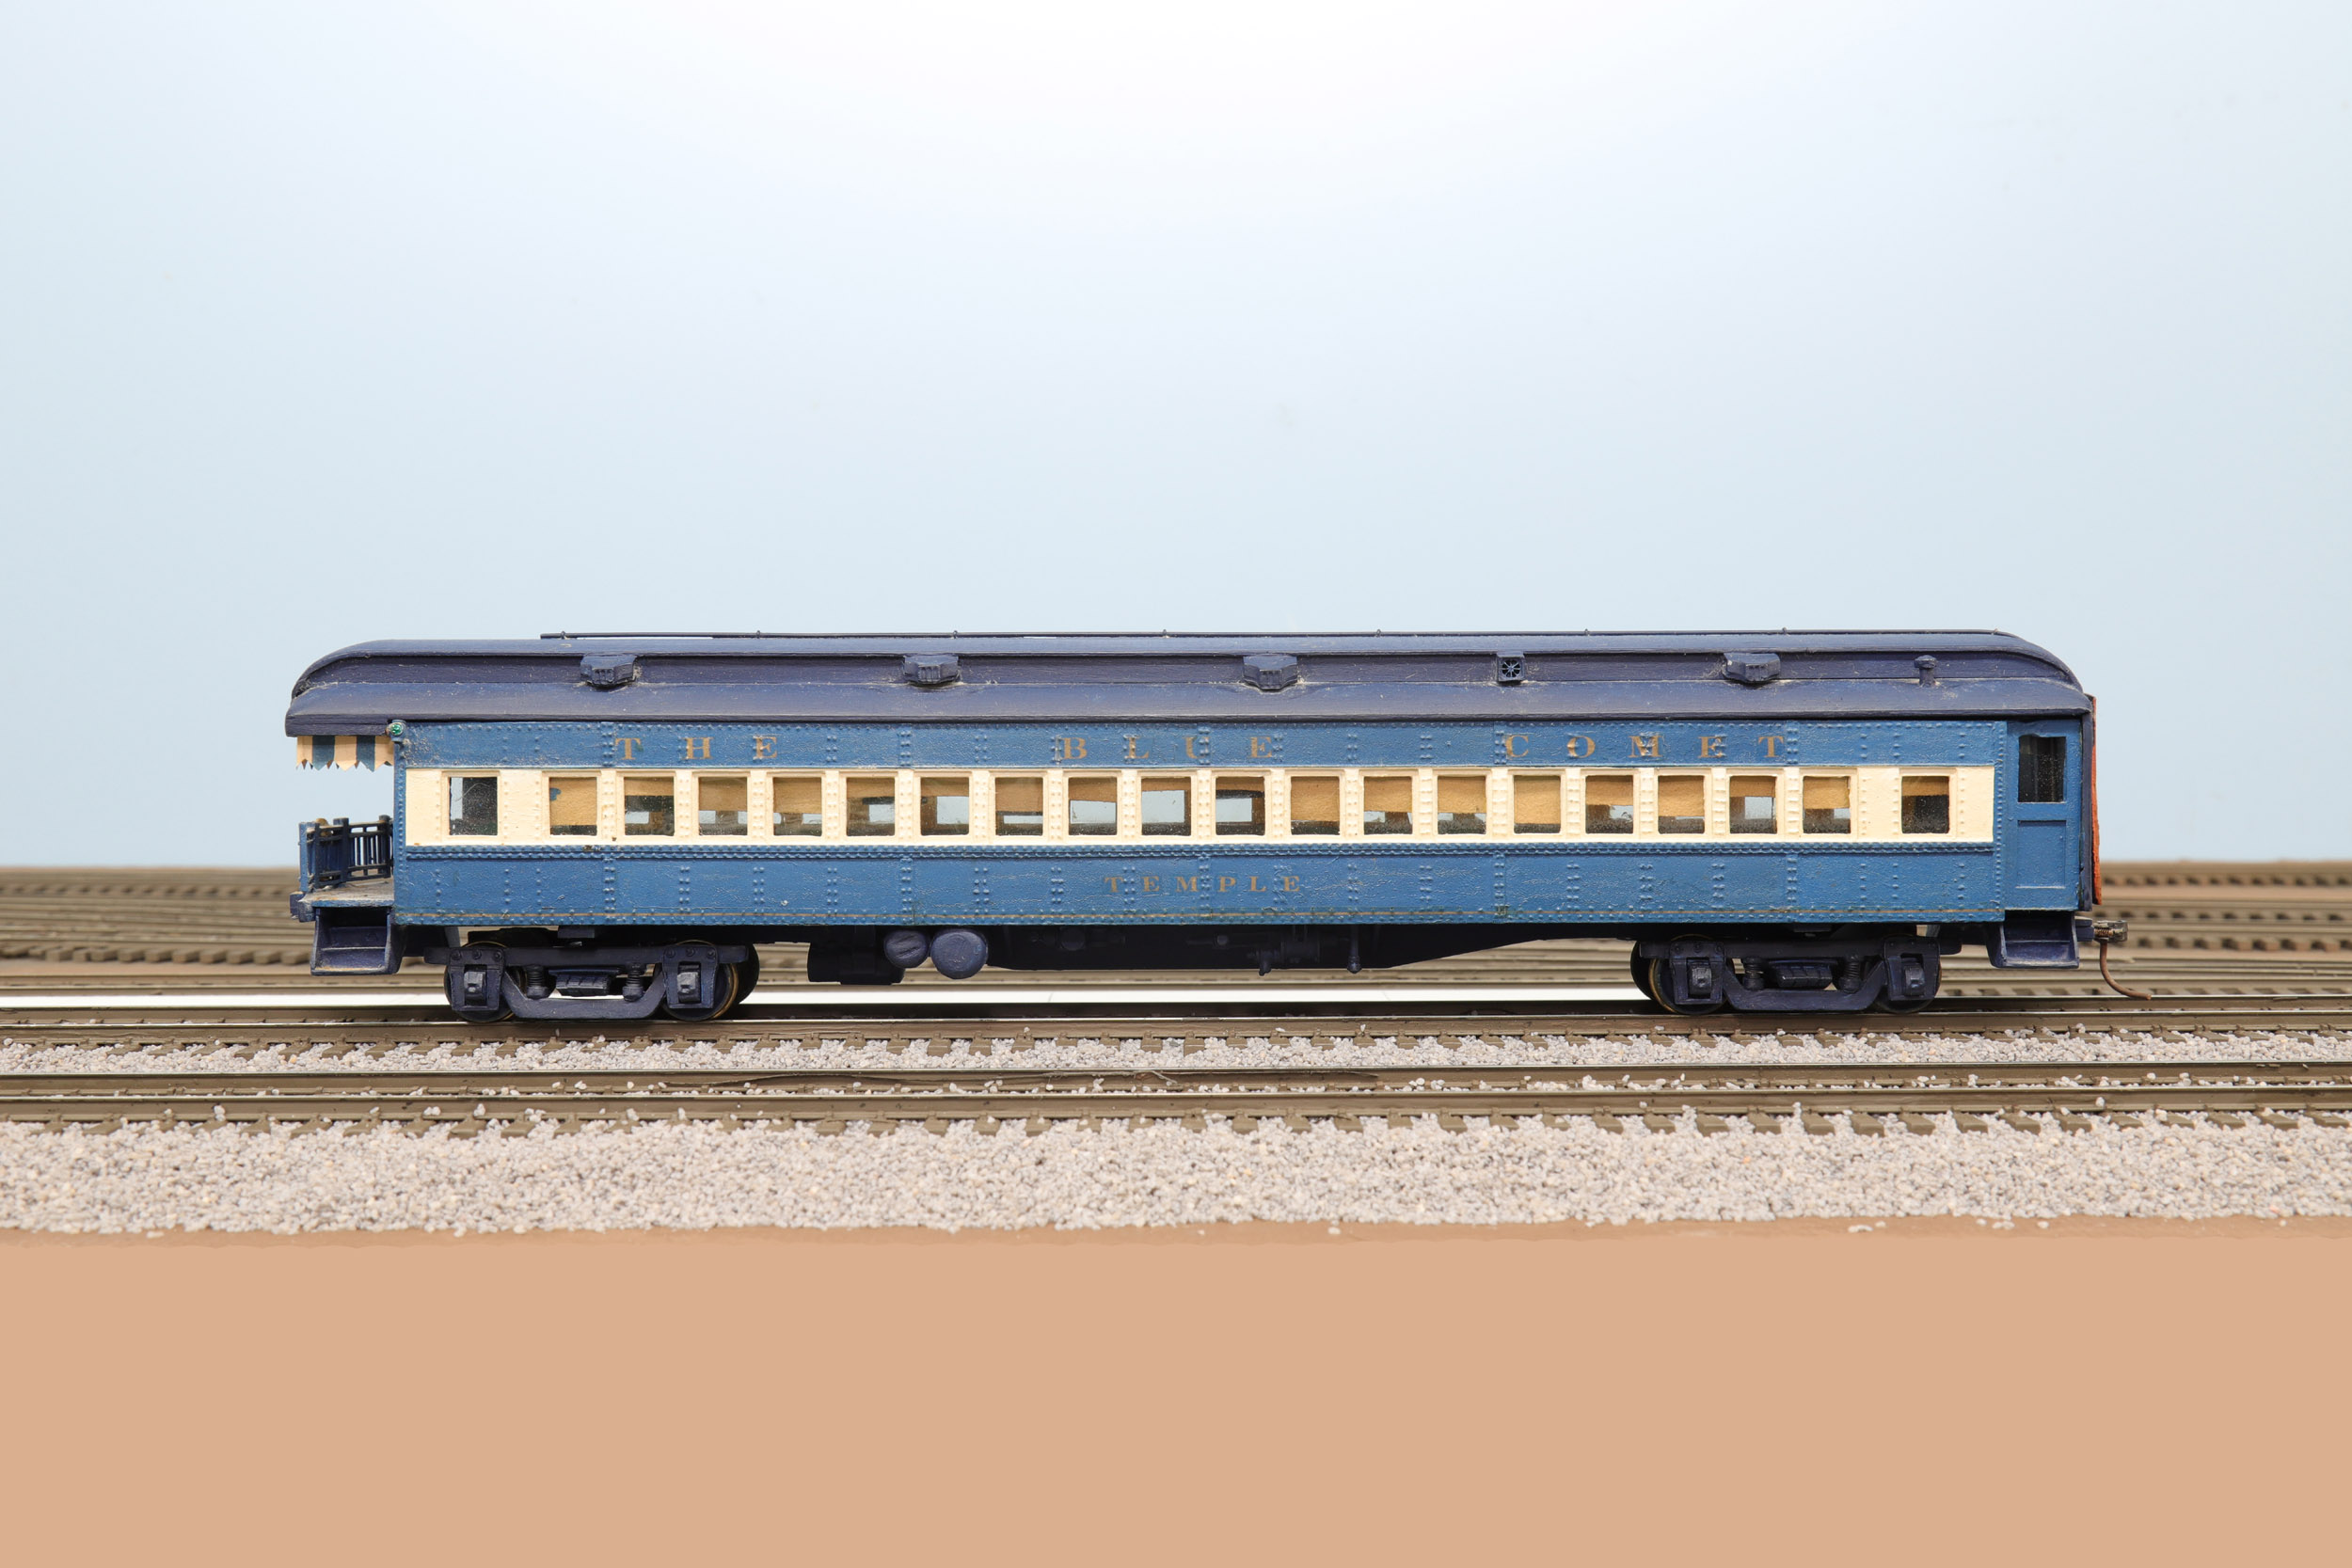
This
is a custom made S Scale Central Railroad of New Jersey Blue Comet train
built by the late Frank Titman I bought on 1-4-21. Frank was by far 1 of the
most prolific custom builders in S Scale. I am not quite calling this 1 of a
kind because Frank built another Blue Comet locomotive that I know exists,
and may become mine at some point. I am reasonably sure there are not any
more Frank built Blue Comet cars. Still it is a rare model I think is
important in S Scale history. This was Frank’s personal train he built for
himself. I consider the loco and 5 cars as one model. There will not likely
ever be more cars, certainly not built by Frank. Some of my build decisions
will be based on that fact. I
am not particularly a CNJ fan but I do like things built by Frank Titman. If
I was going to have something CNJ what is more iconic than owning the Blue
Comet? American
Flyer by Lionel made a VERY nice Blue Comet train but unfortunately none had
scale wheels. I was not overly interested in taking on more projects to get
scale wheels installed maybe on just some more cars. They would not match
anyway. So mine is the only known S Scale Blue Comet with scale wheels. |
|


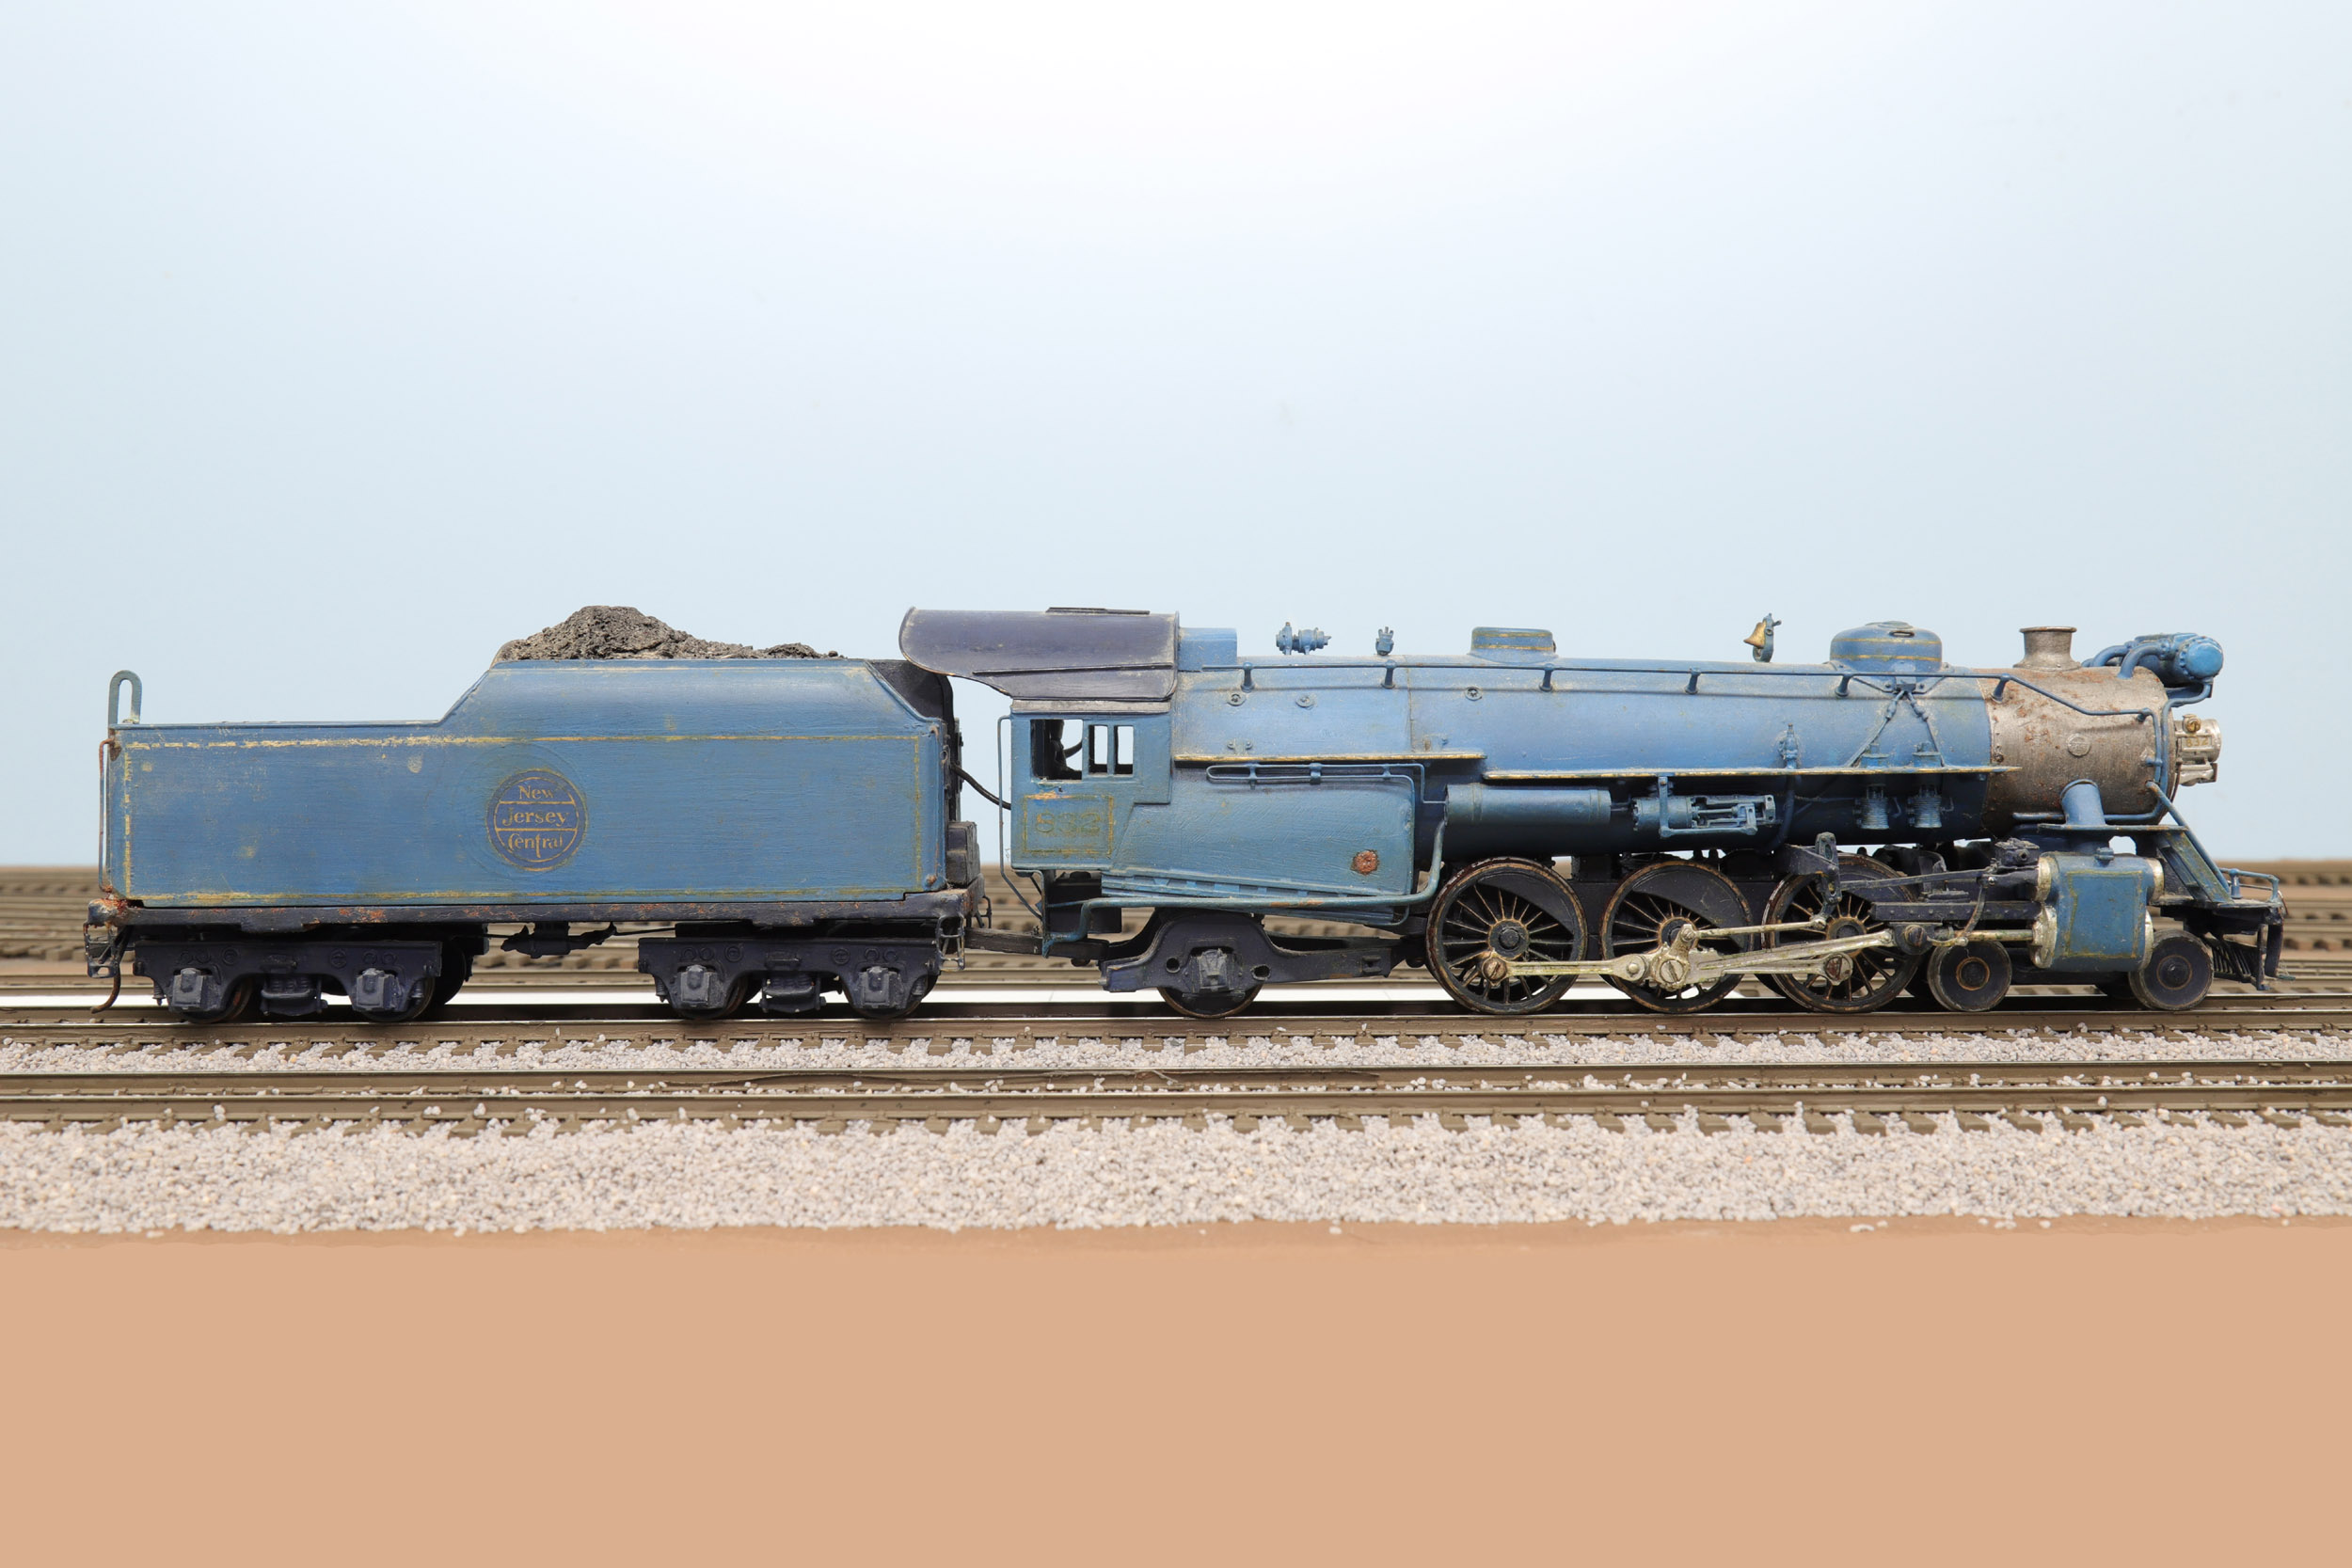
The
loco was unfortunately stored in a bad environment causing significant damage
to the paint. The cars are in fair condition and need some work but the loco
needs total restoration. I am trying to keep this in as original condition as
possible. I hope to catch the sprit of Frank and return this train to its
former glory. Since I don’t know all what the loco was made from I have great
hesitation of how to strip the paint.
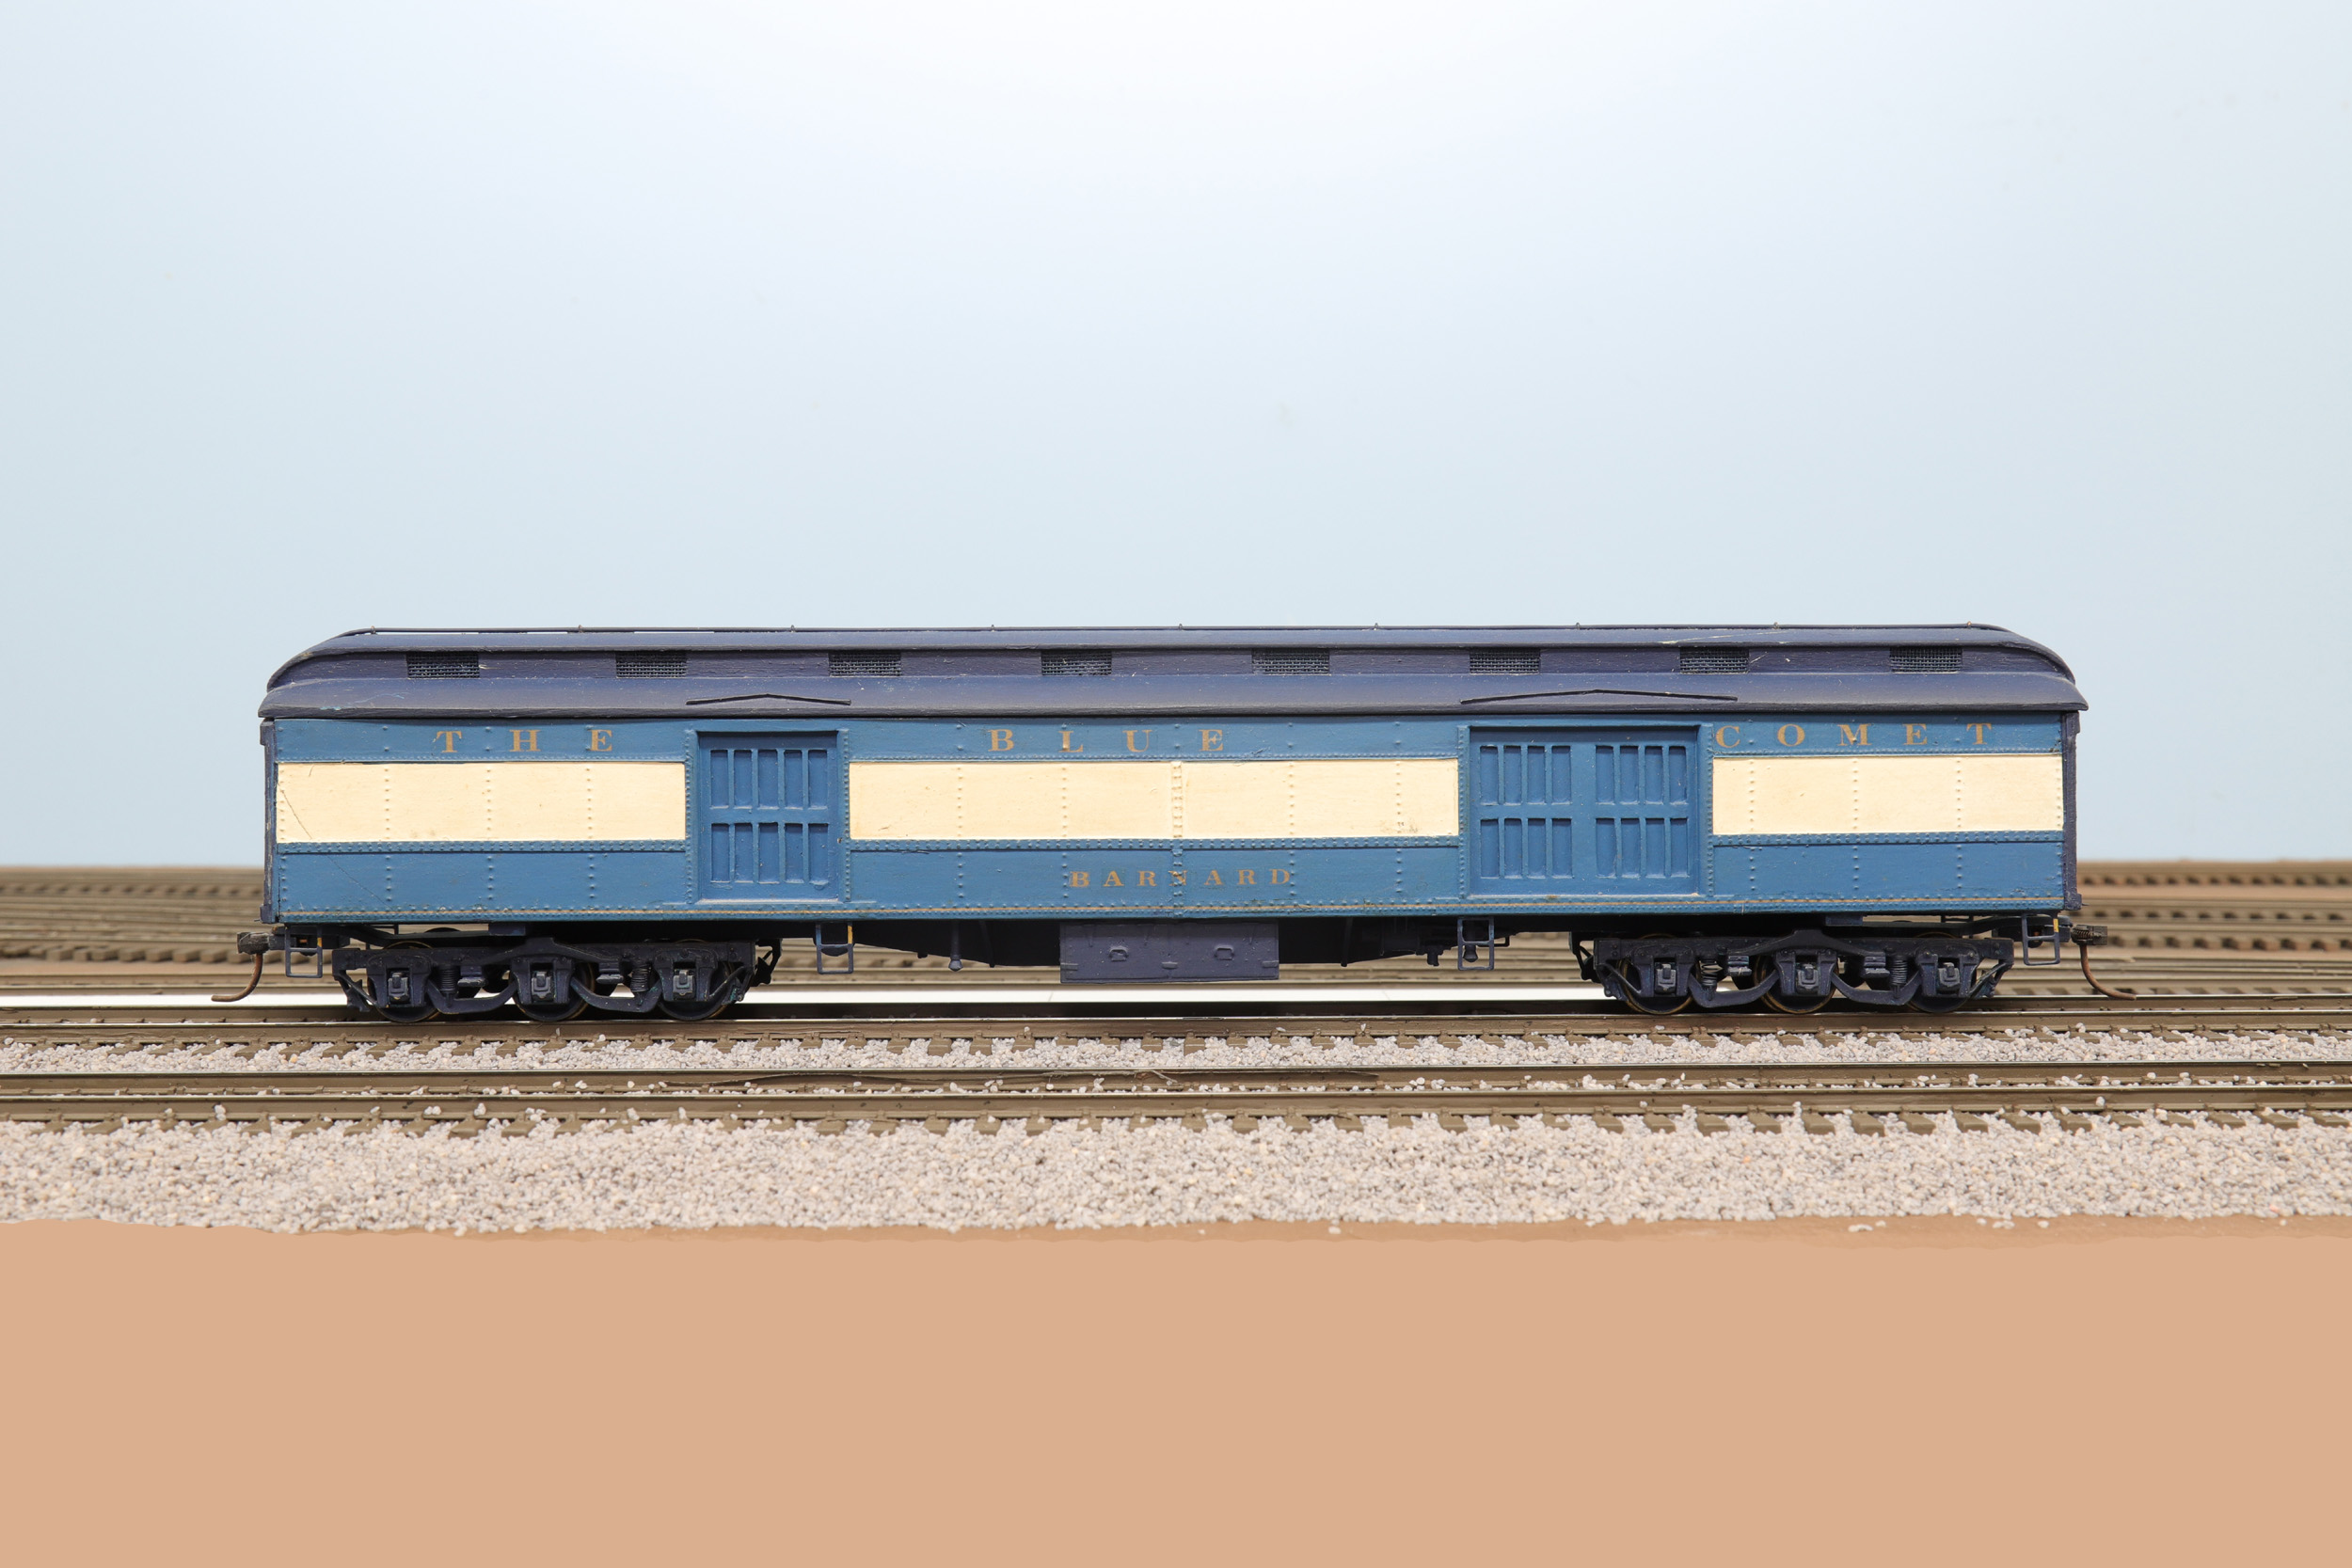
The
cars were TrainStuff kits that were made by Don
Thompson and his company before S Helper Service. The sides are polyester that
is likely very brittle by now. There is no replacing a shattered car side at
this point. I am probably replacing all the wheels with NWSL 36” code 110.
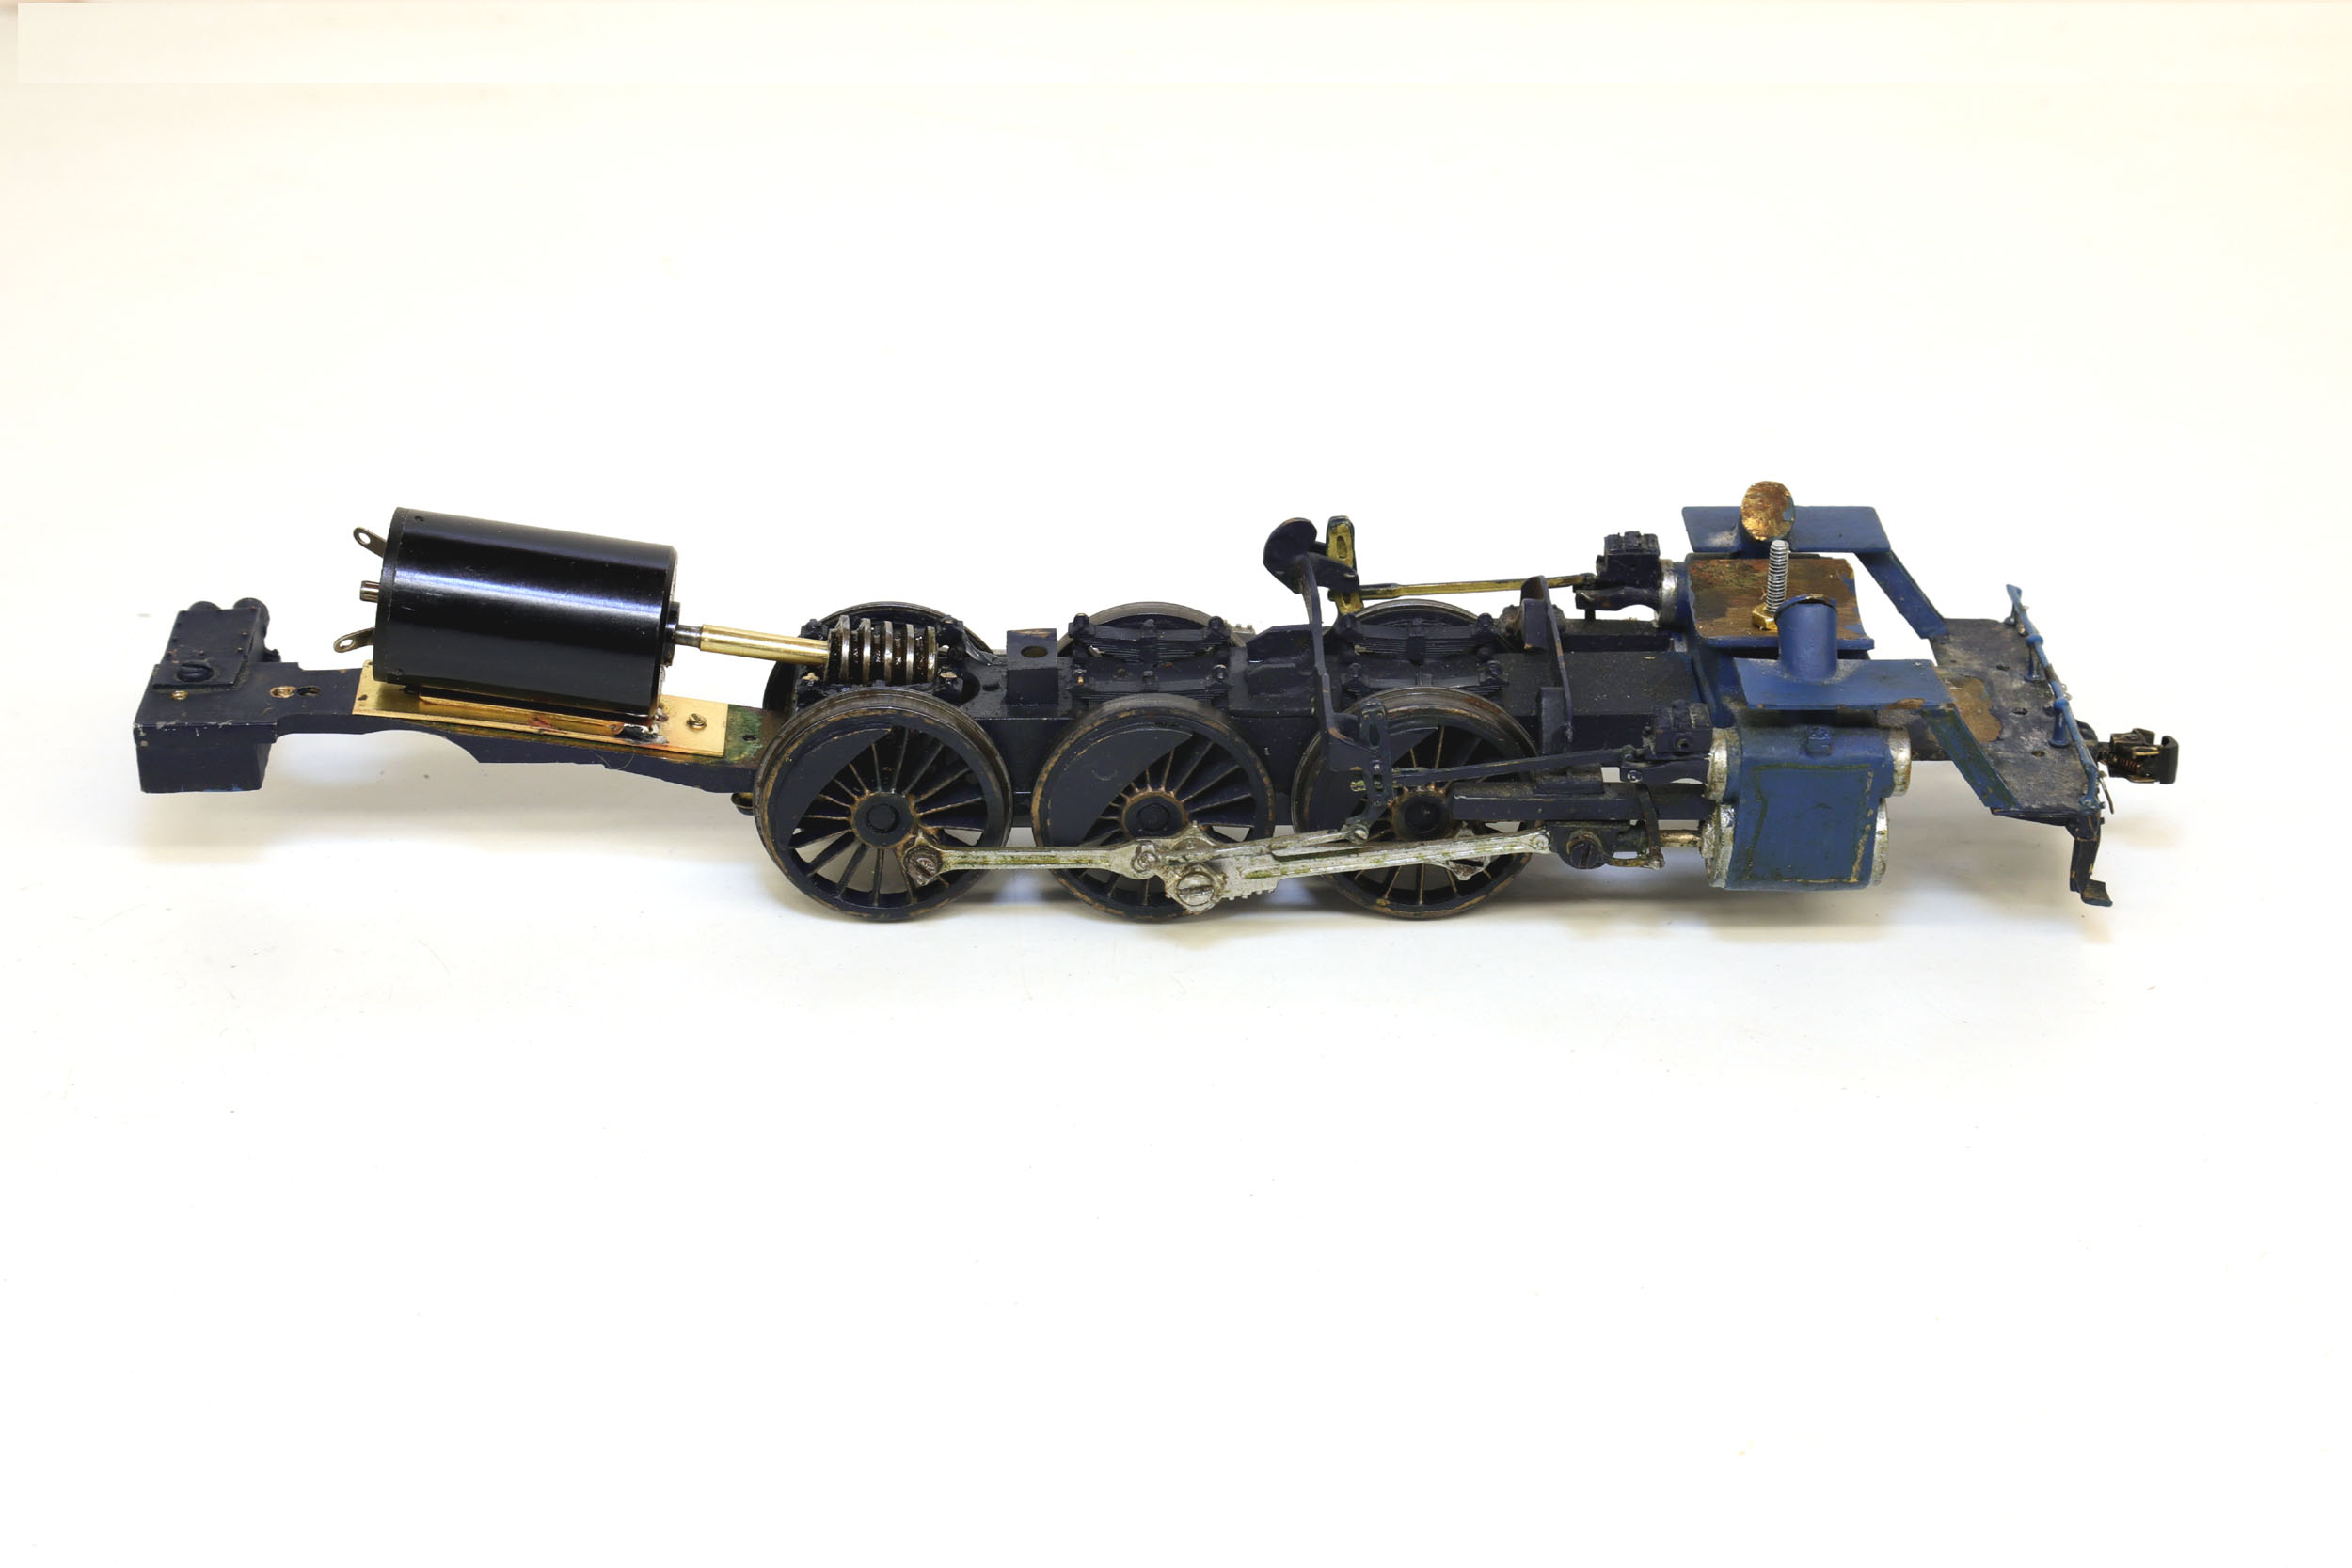
The
loco is built in typical Frank Titman style starting with a few American Flyer
parts and finishing with lots of S Scale Loco and Supply parts. It is mixed
materials but a large amount of it is brass. However this loco is significantly
heavier than my other Frank built locos. It is made to pull 5 light cars but
could probably pull a much longer train.
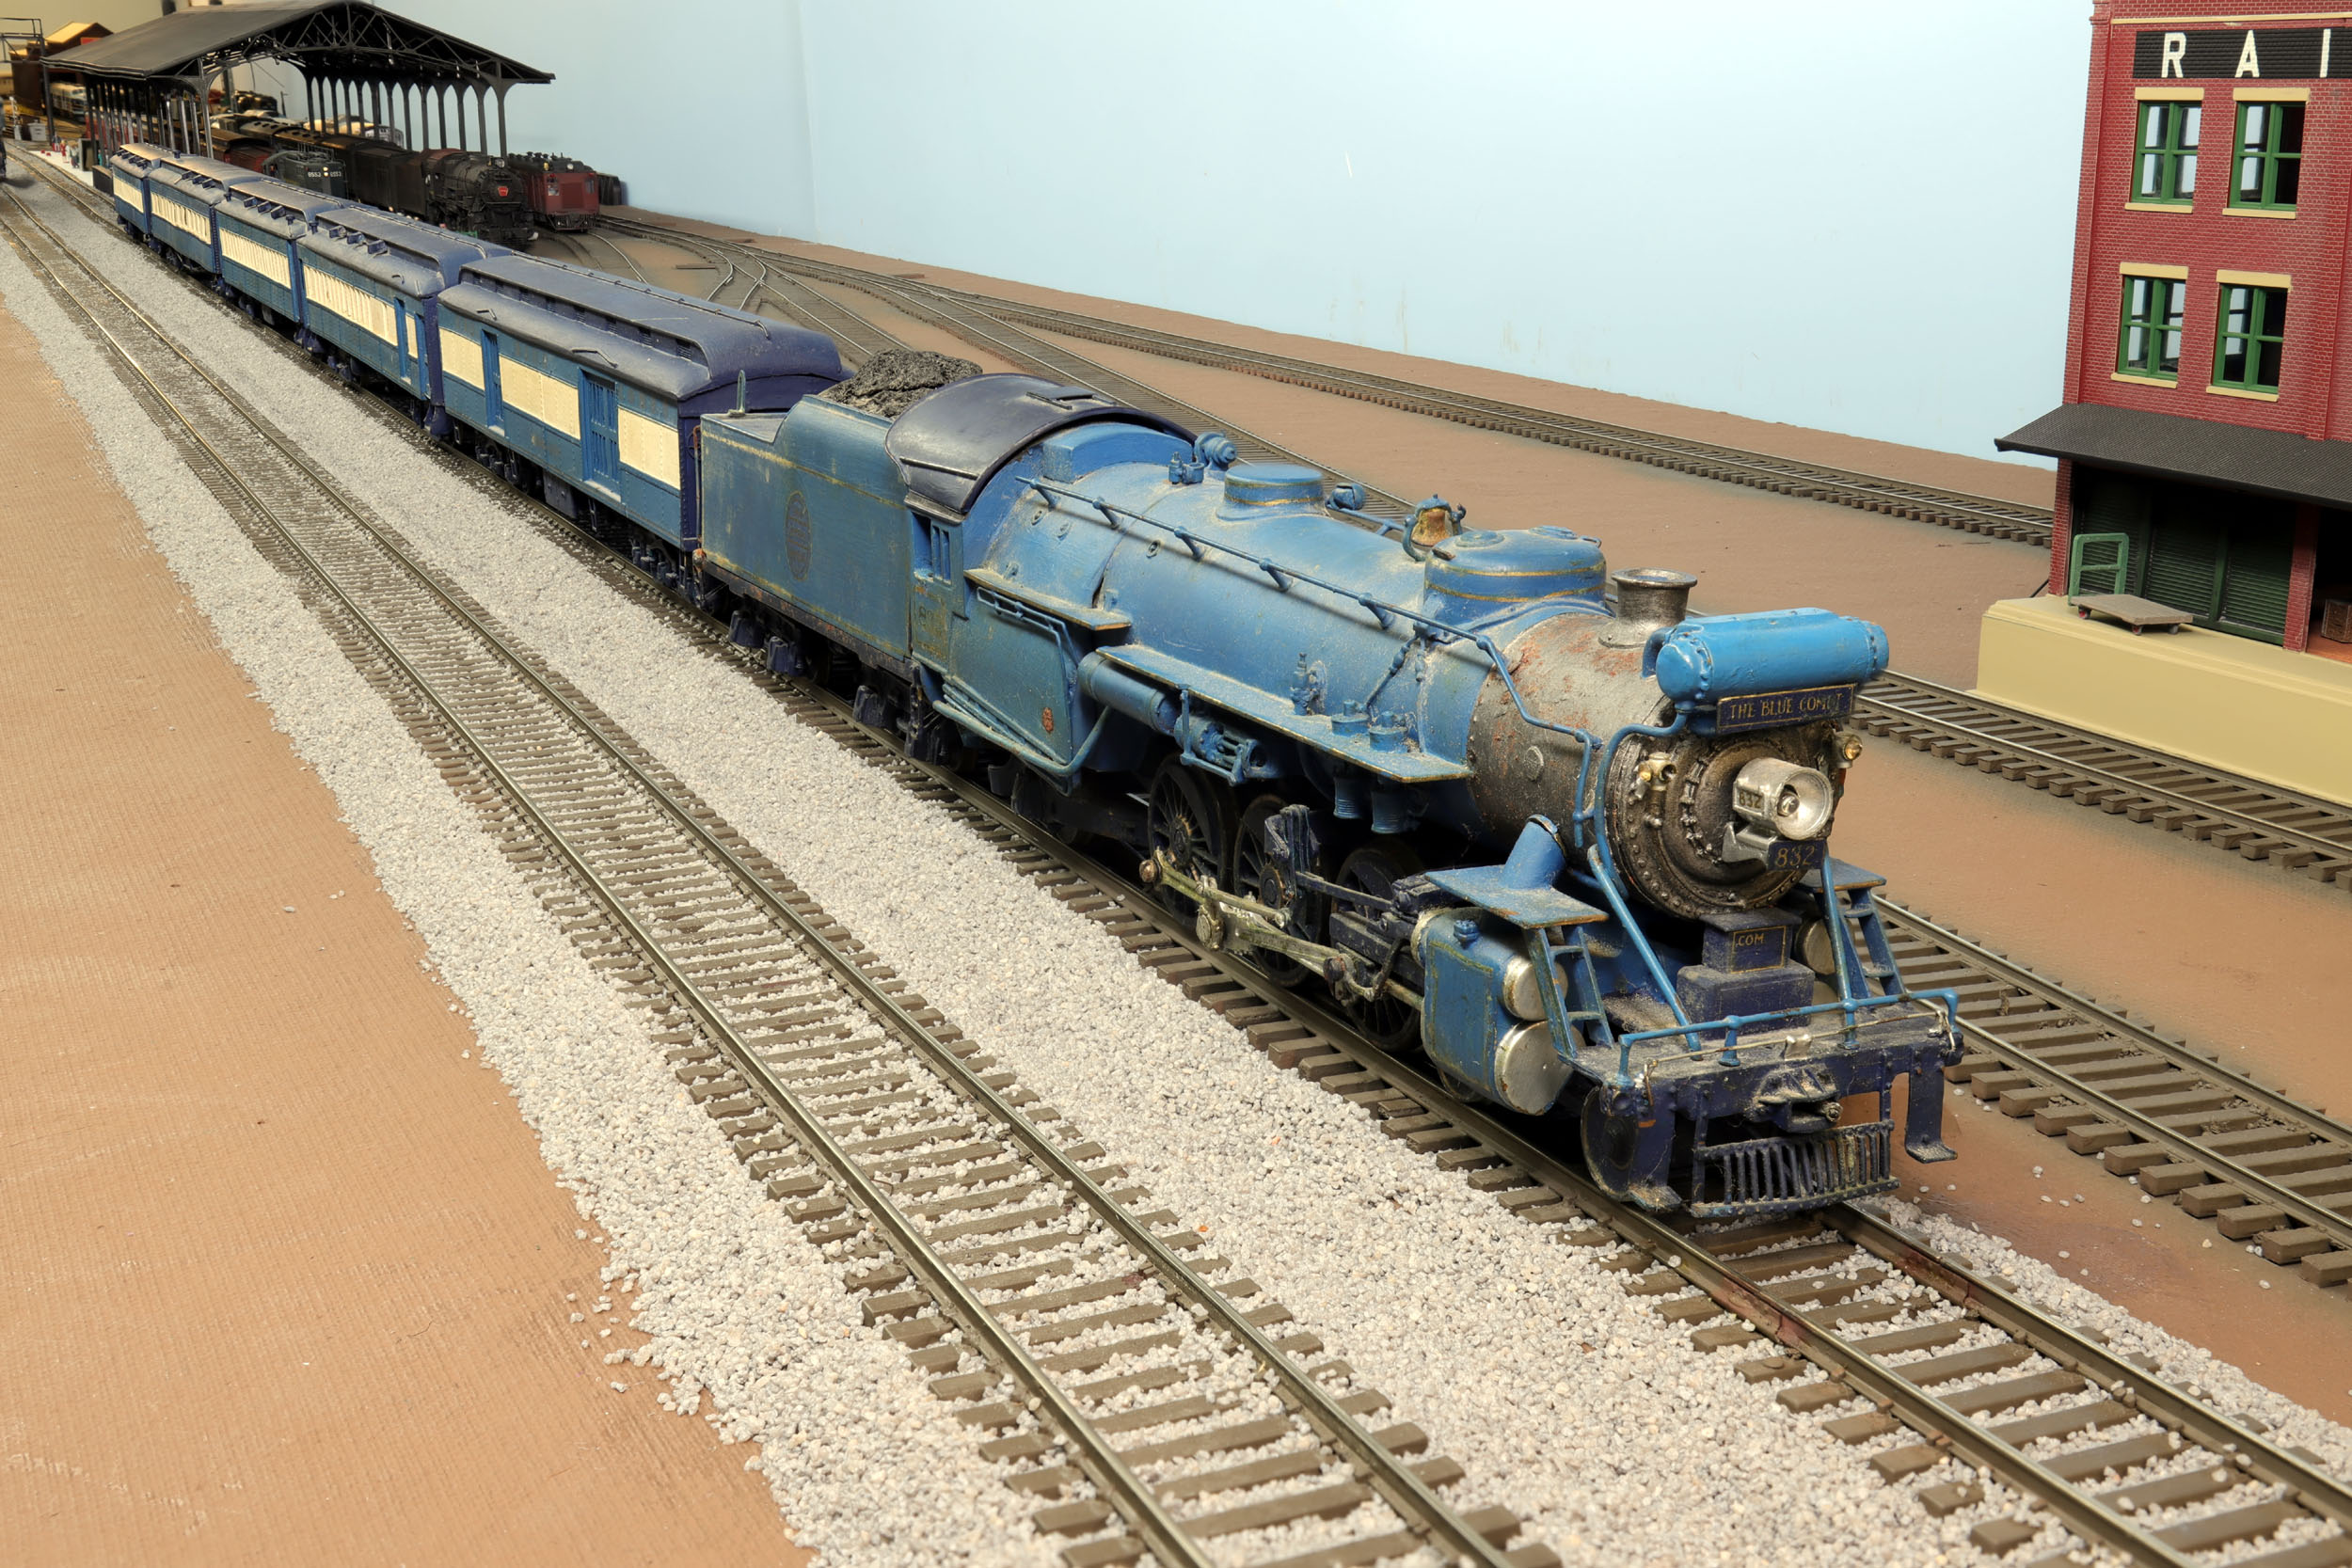
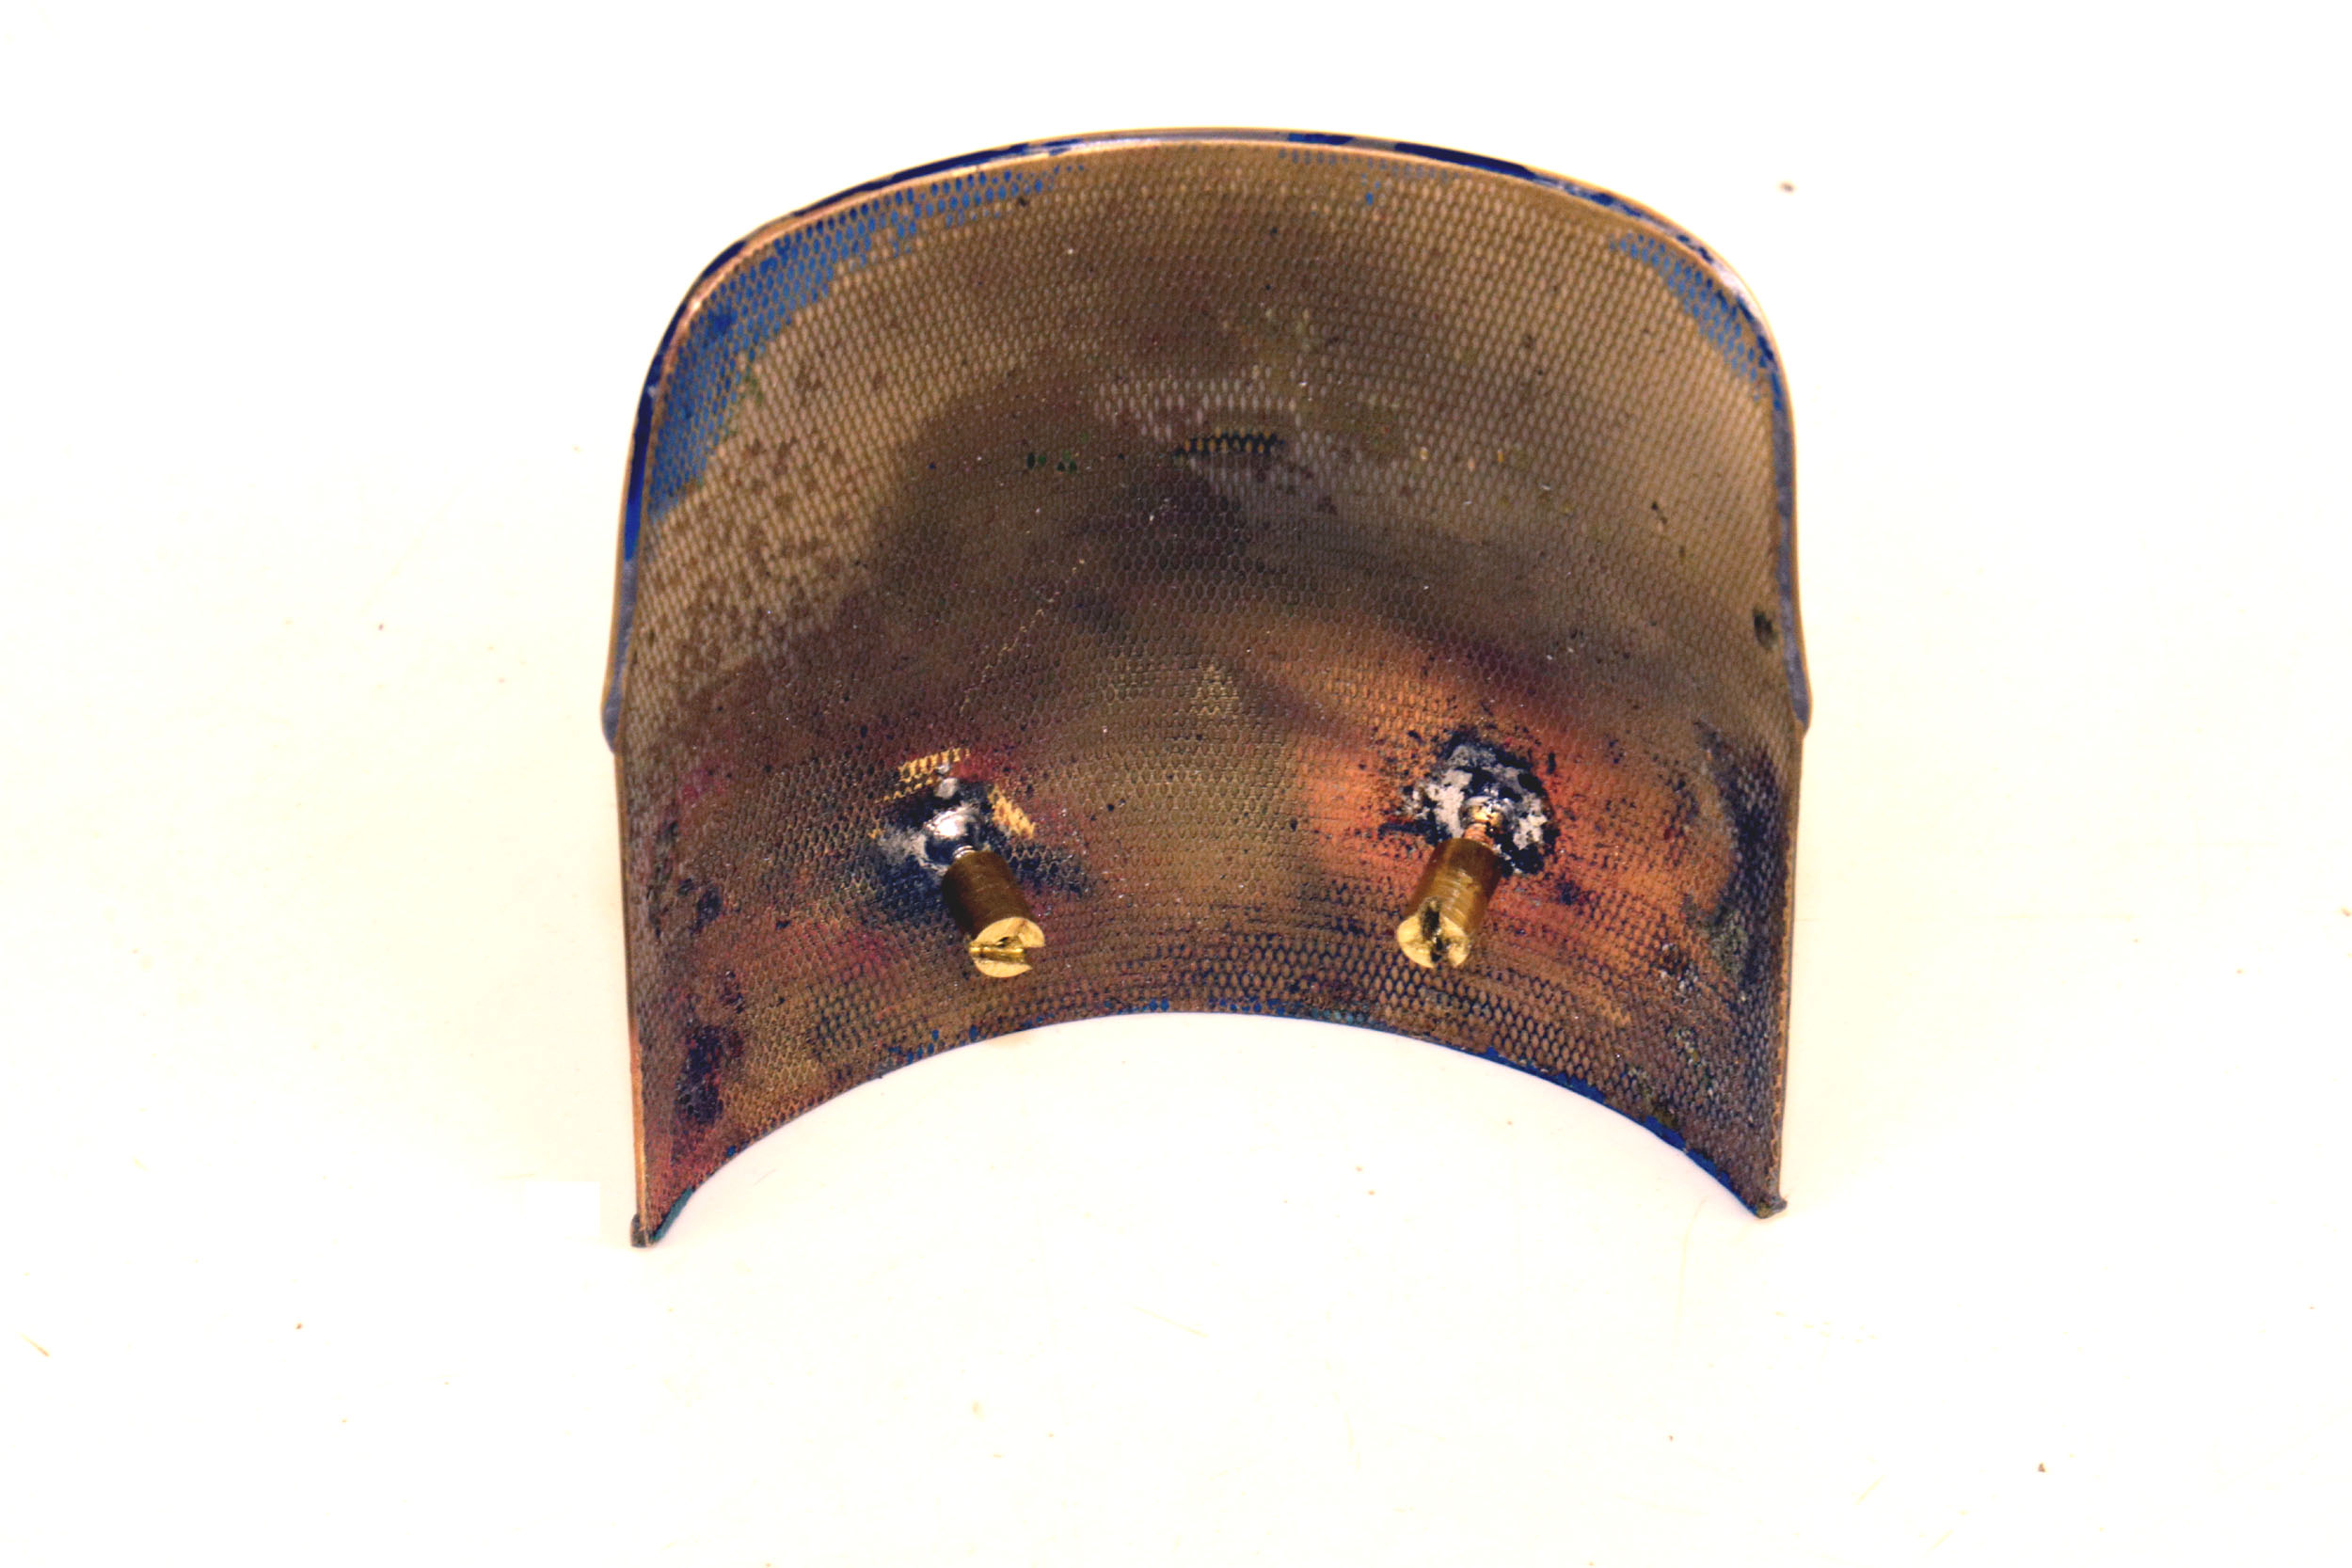
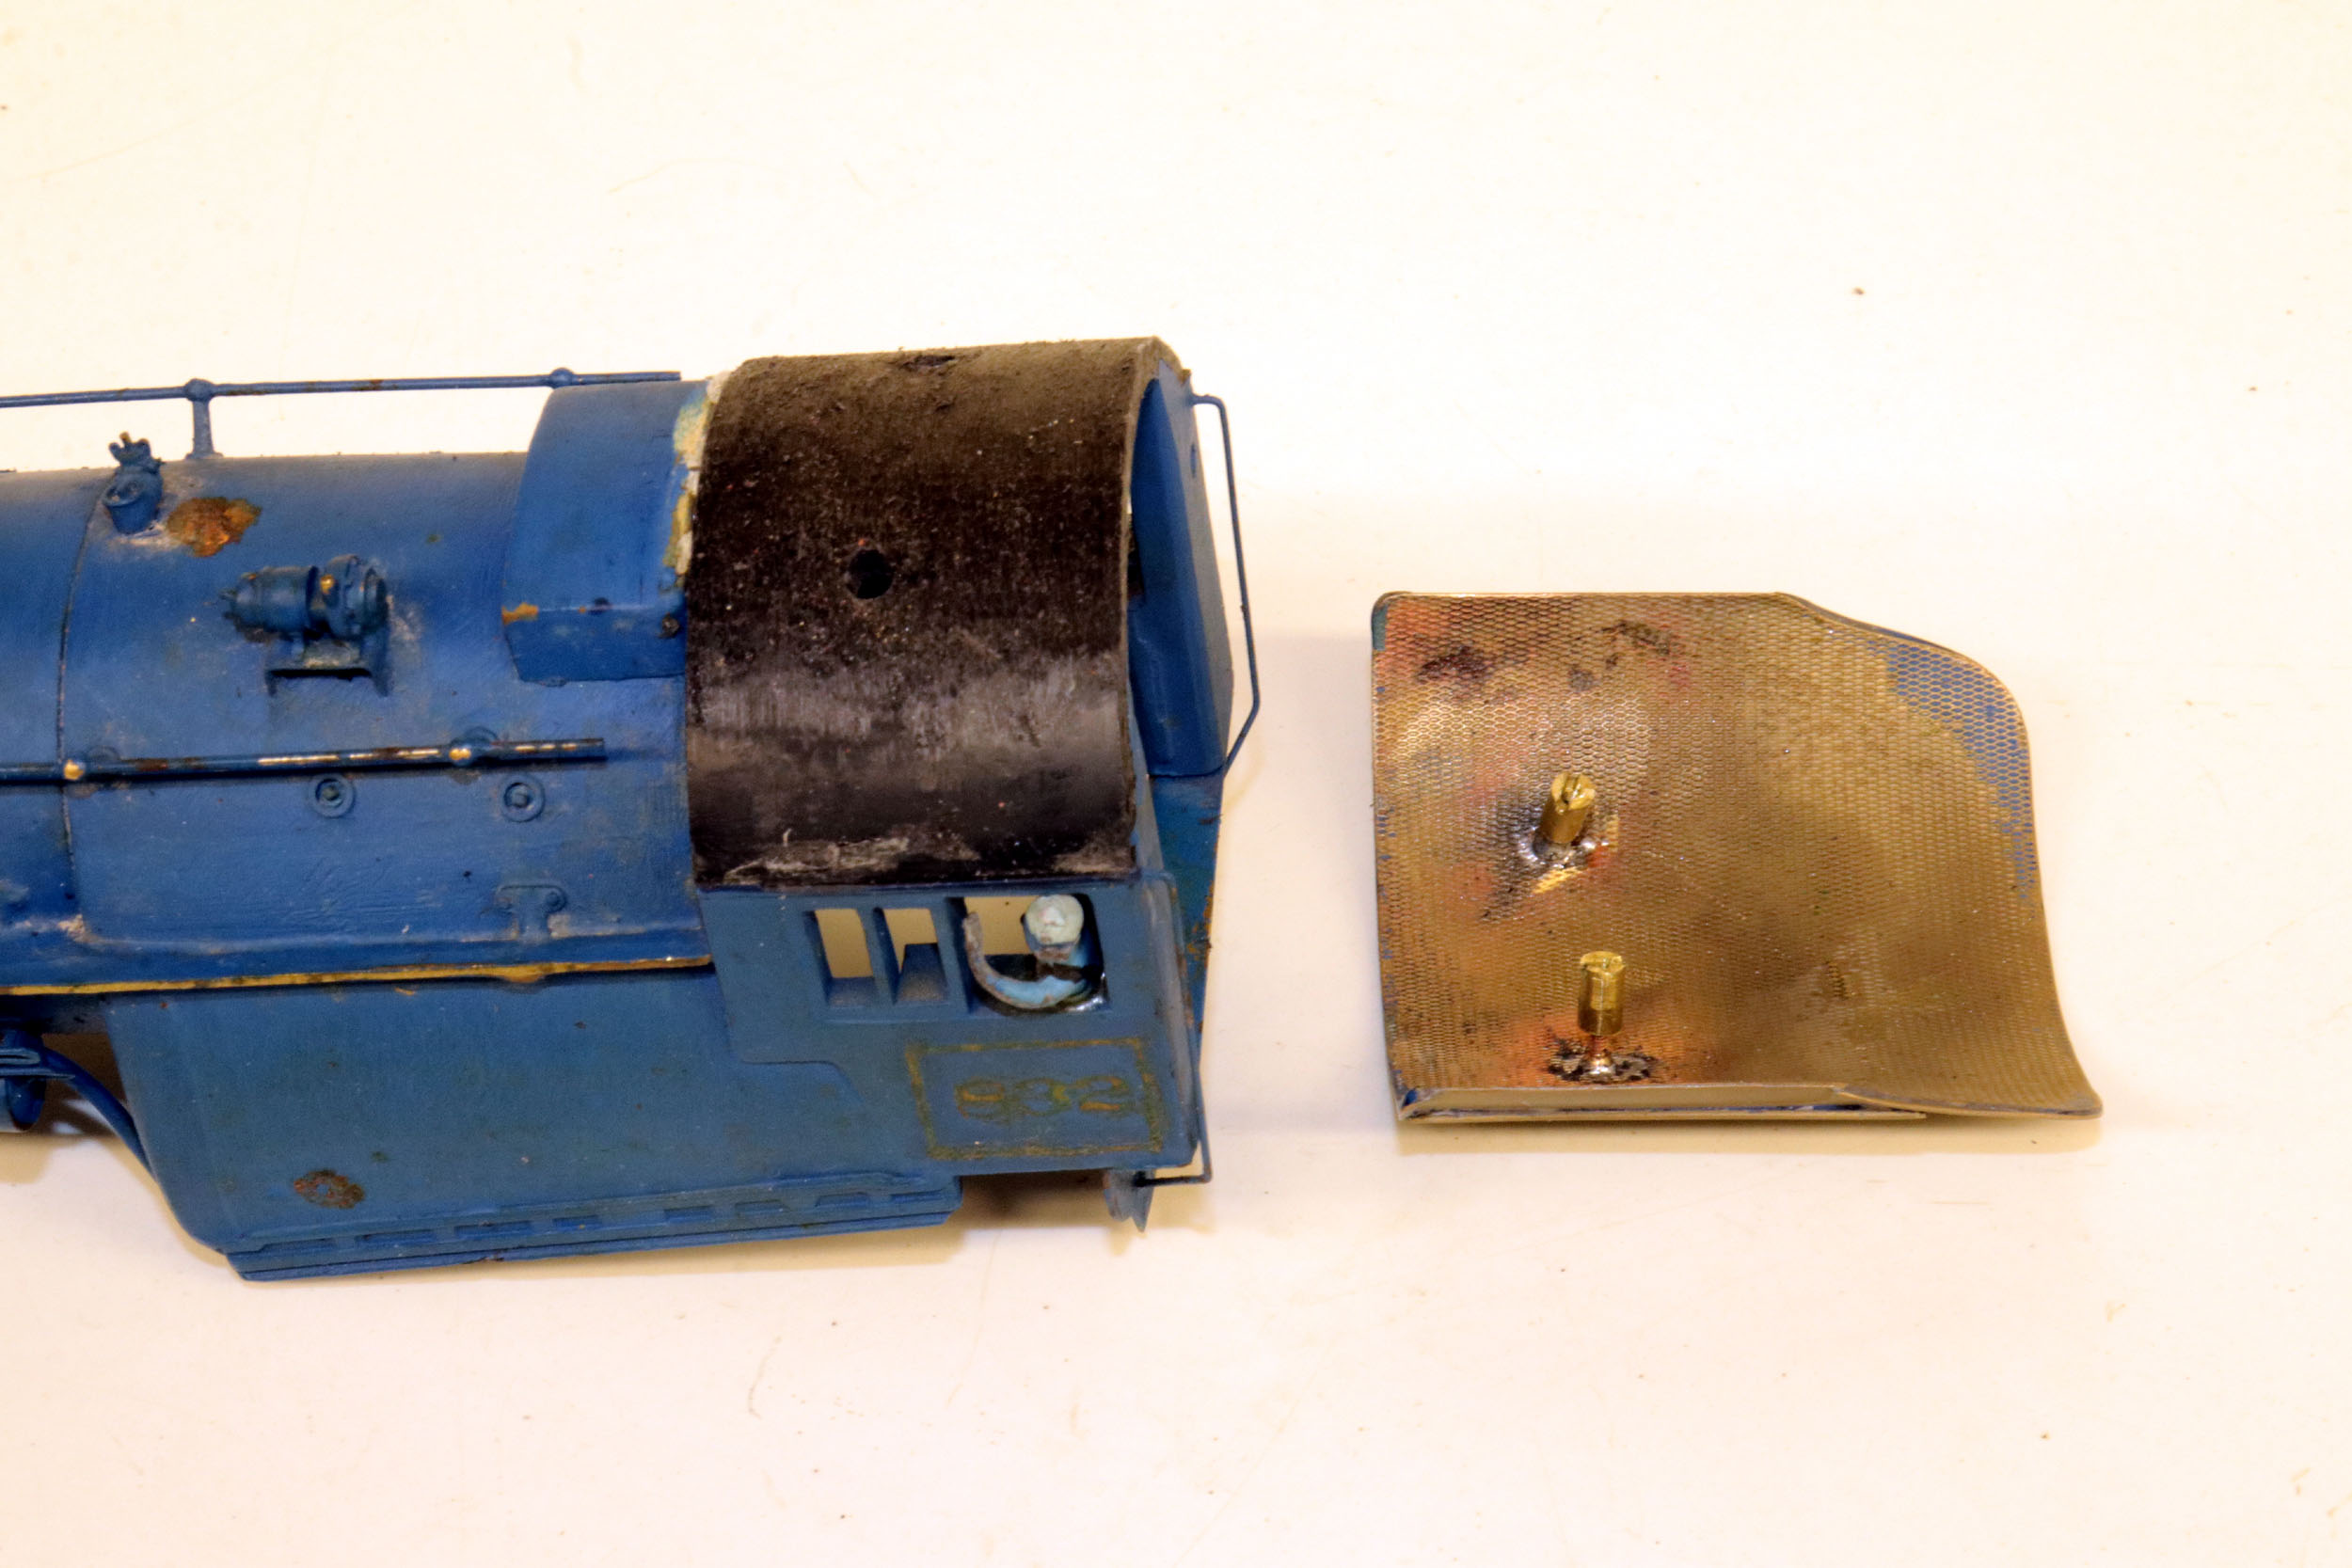
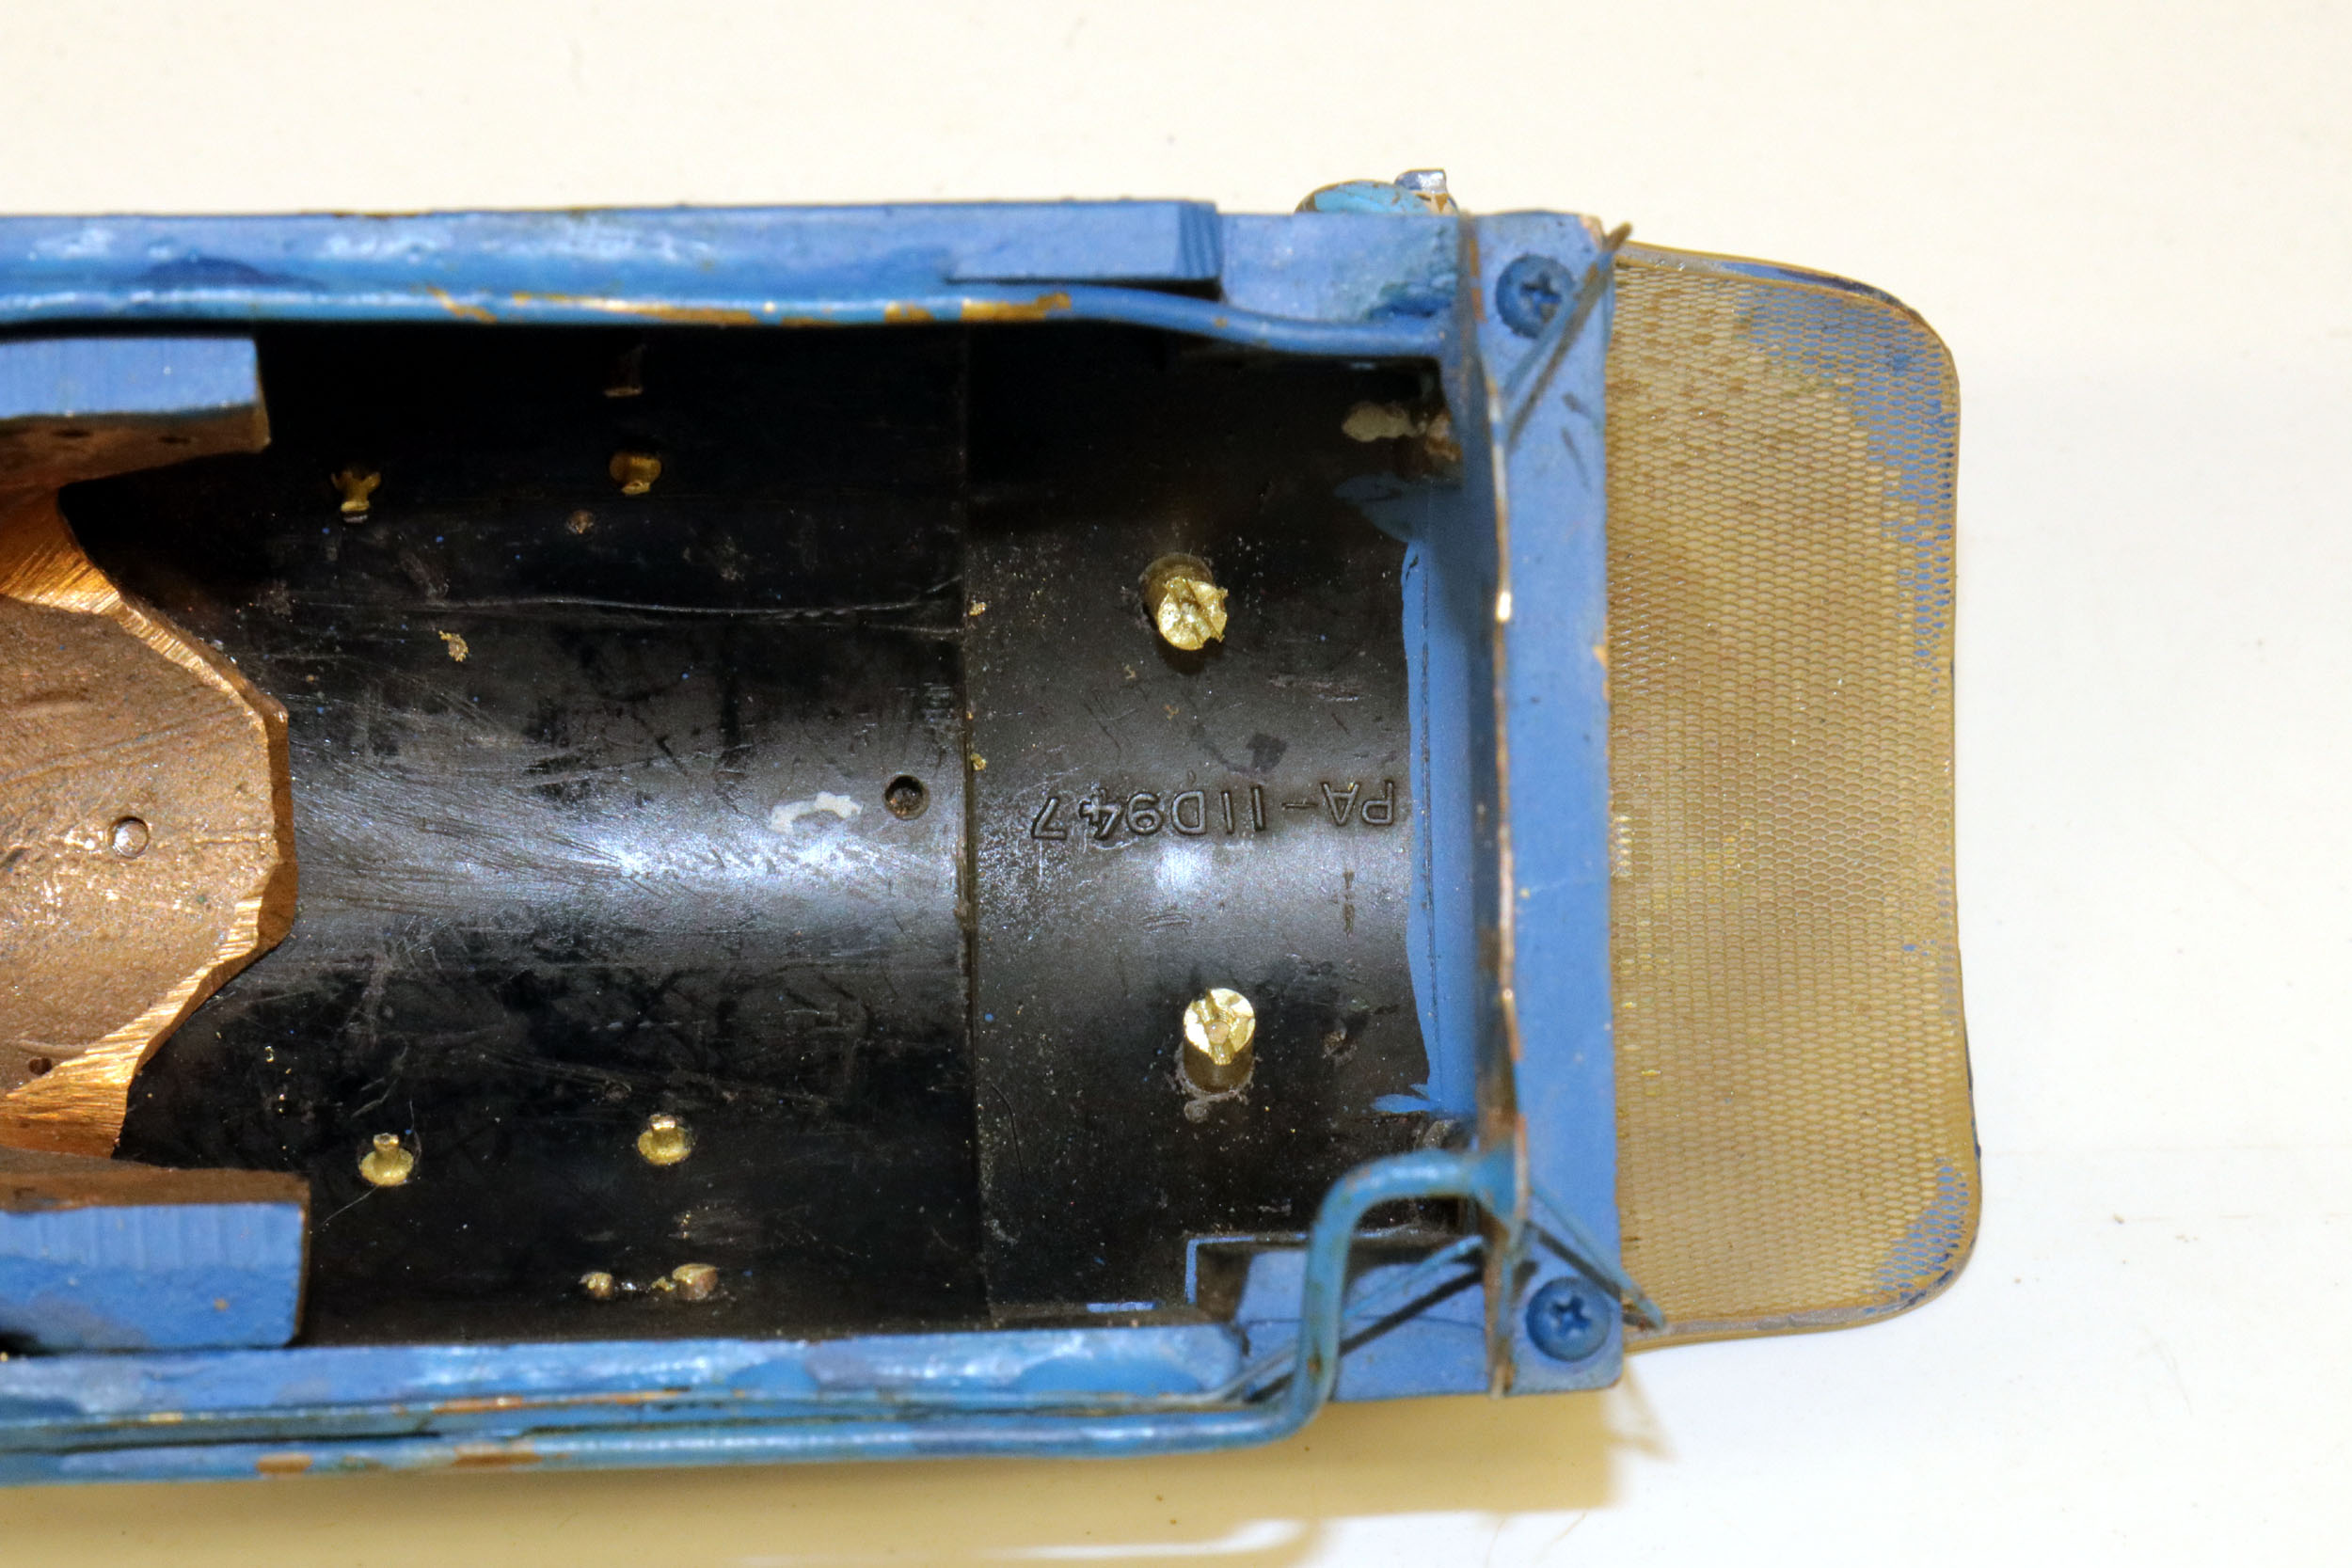
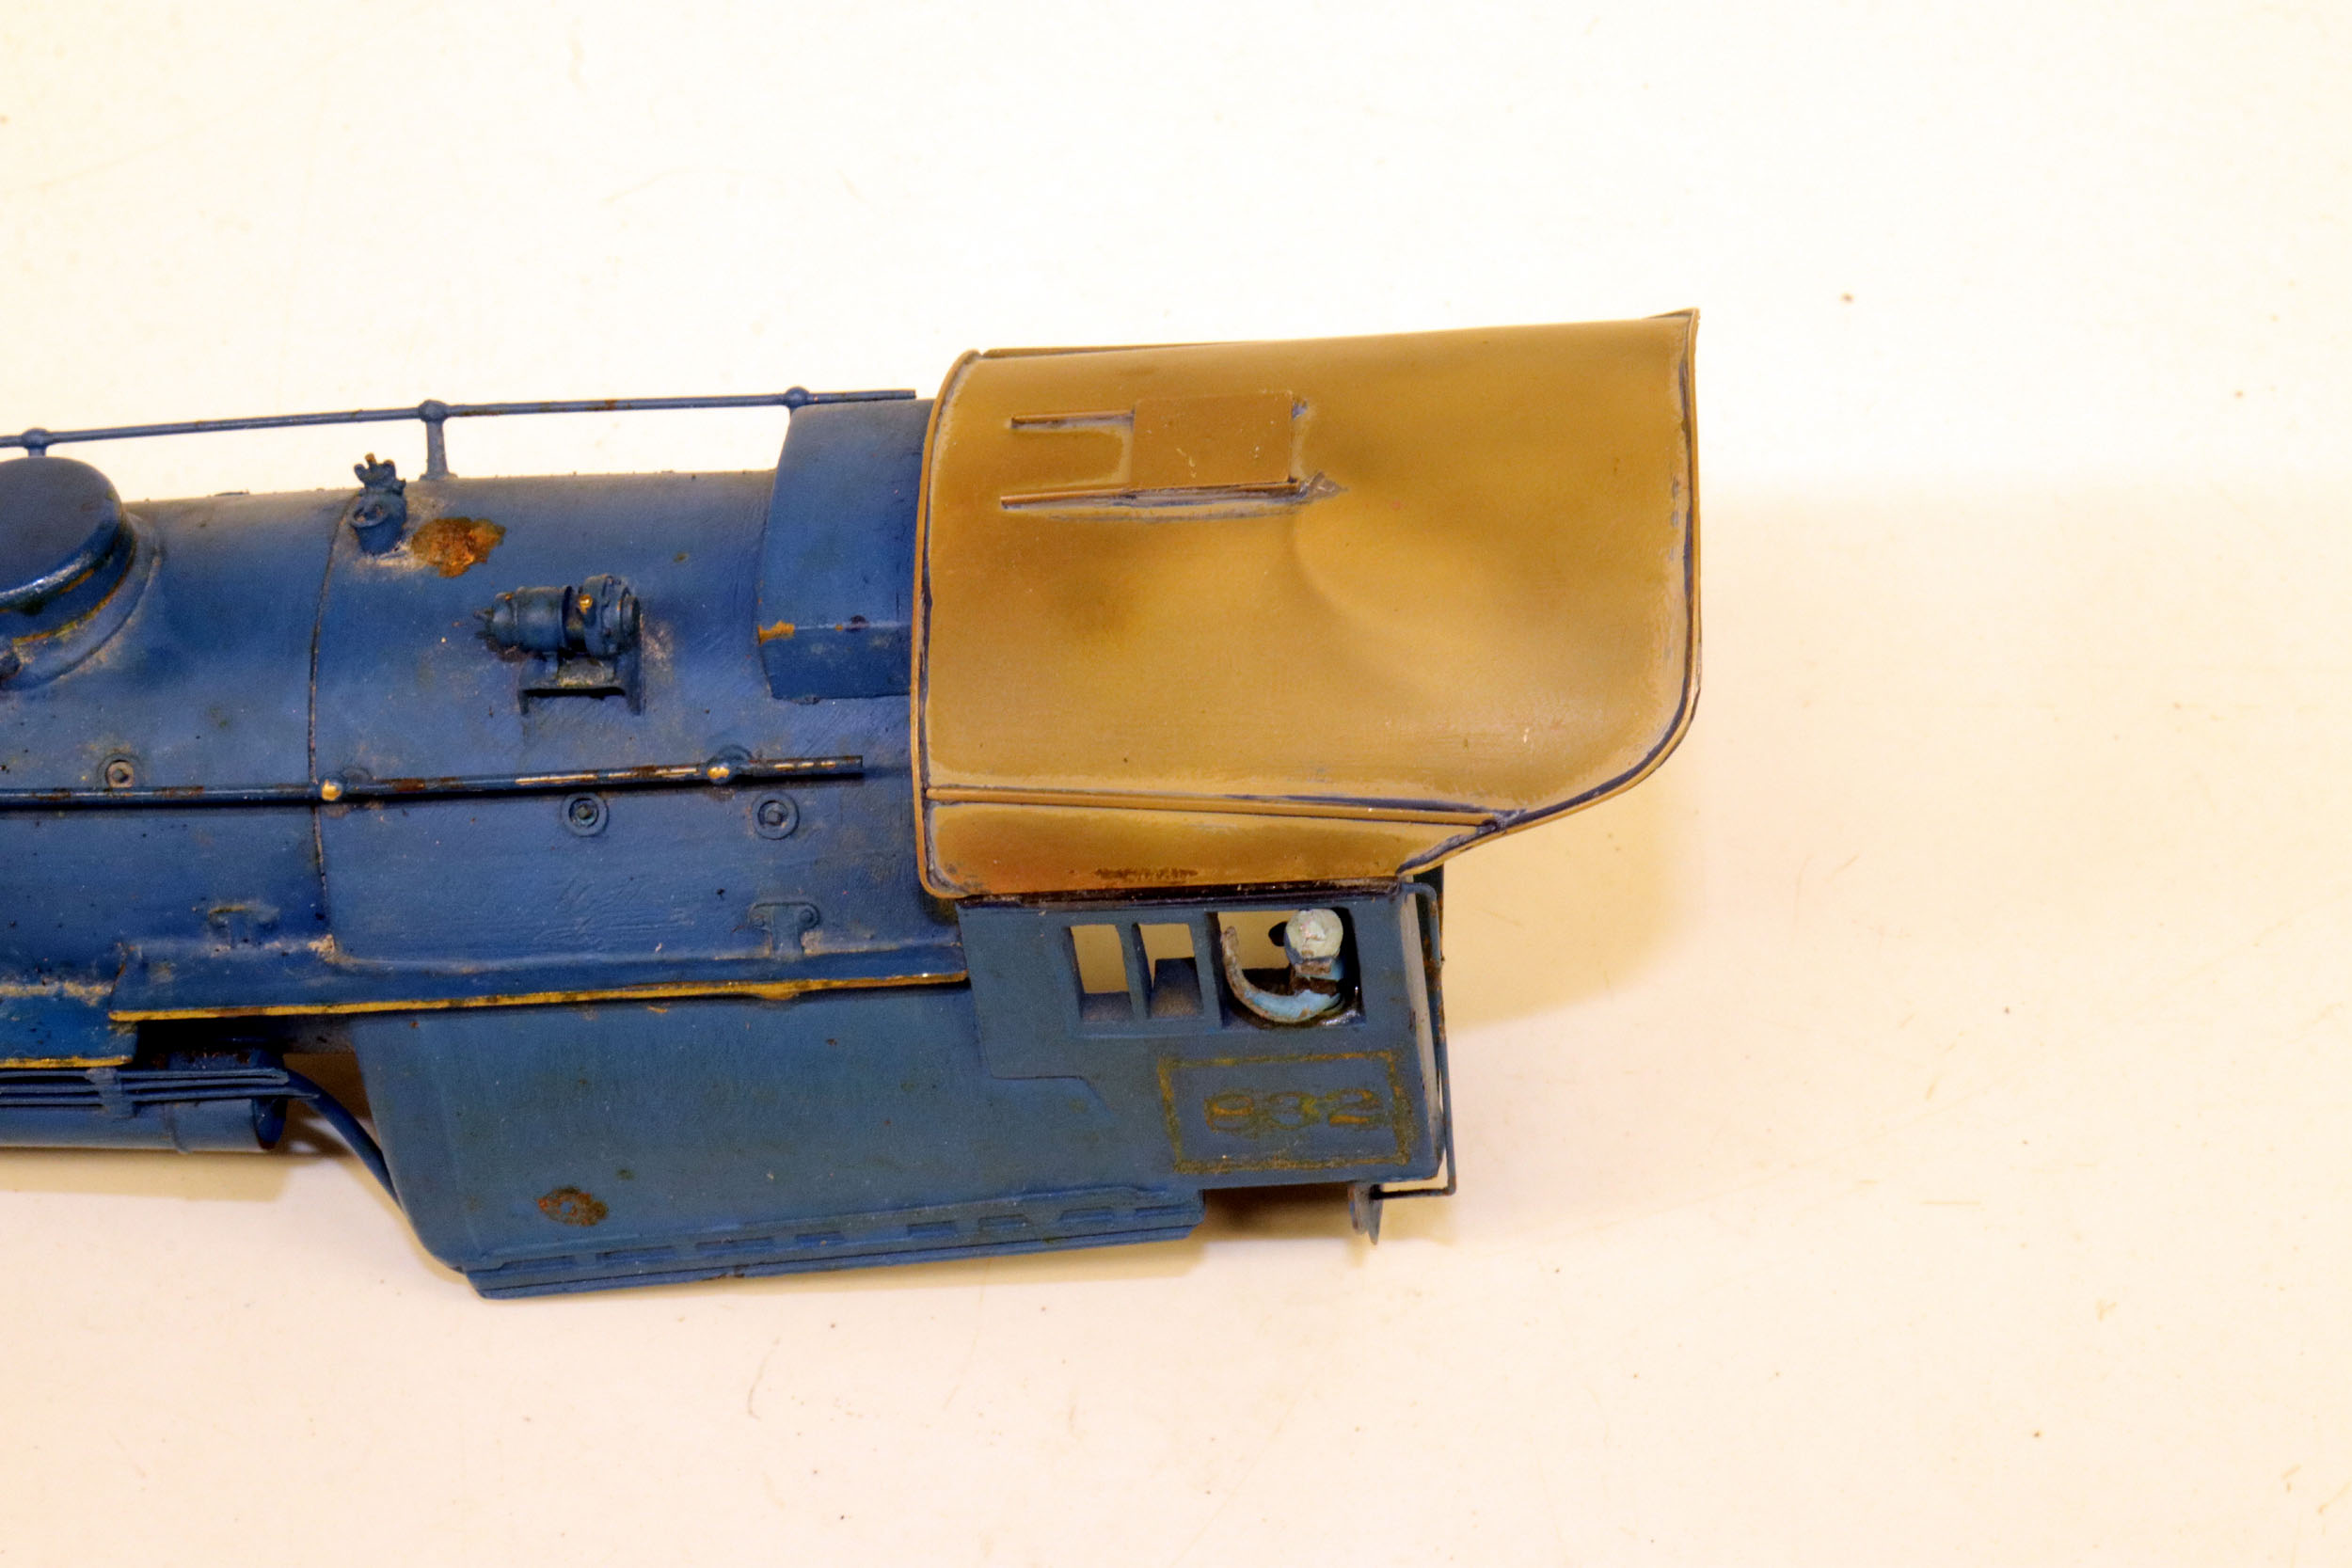
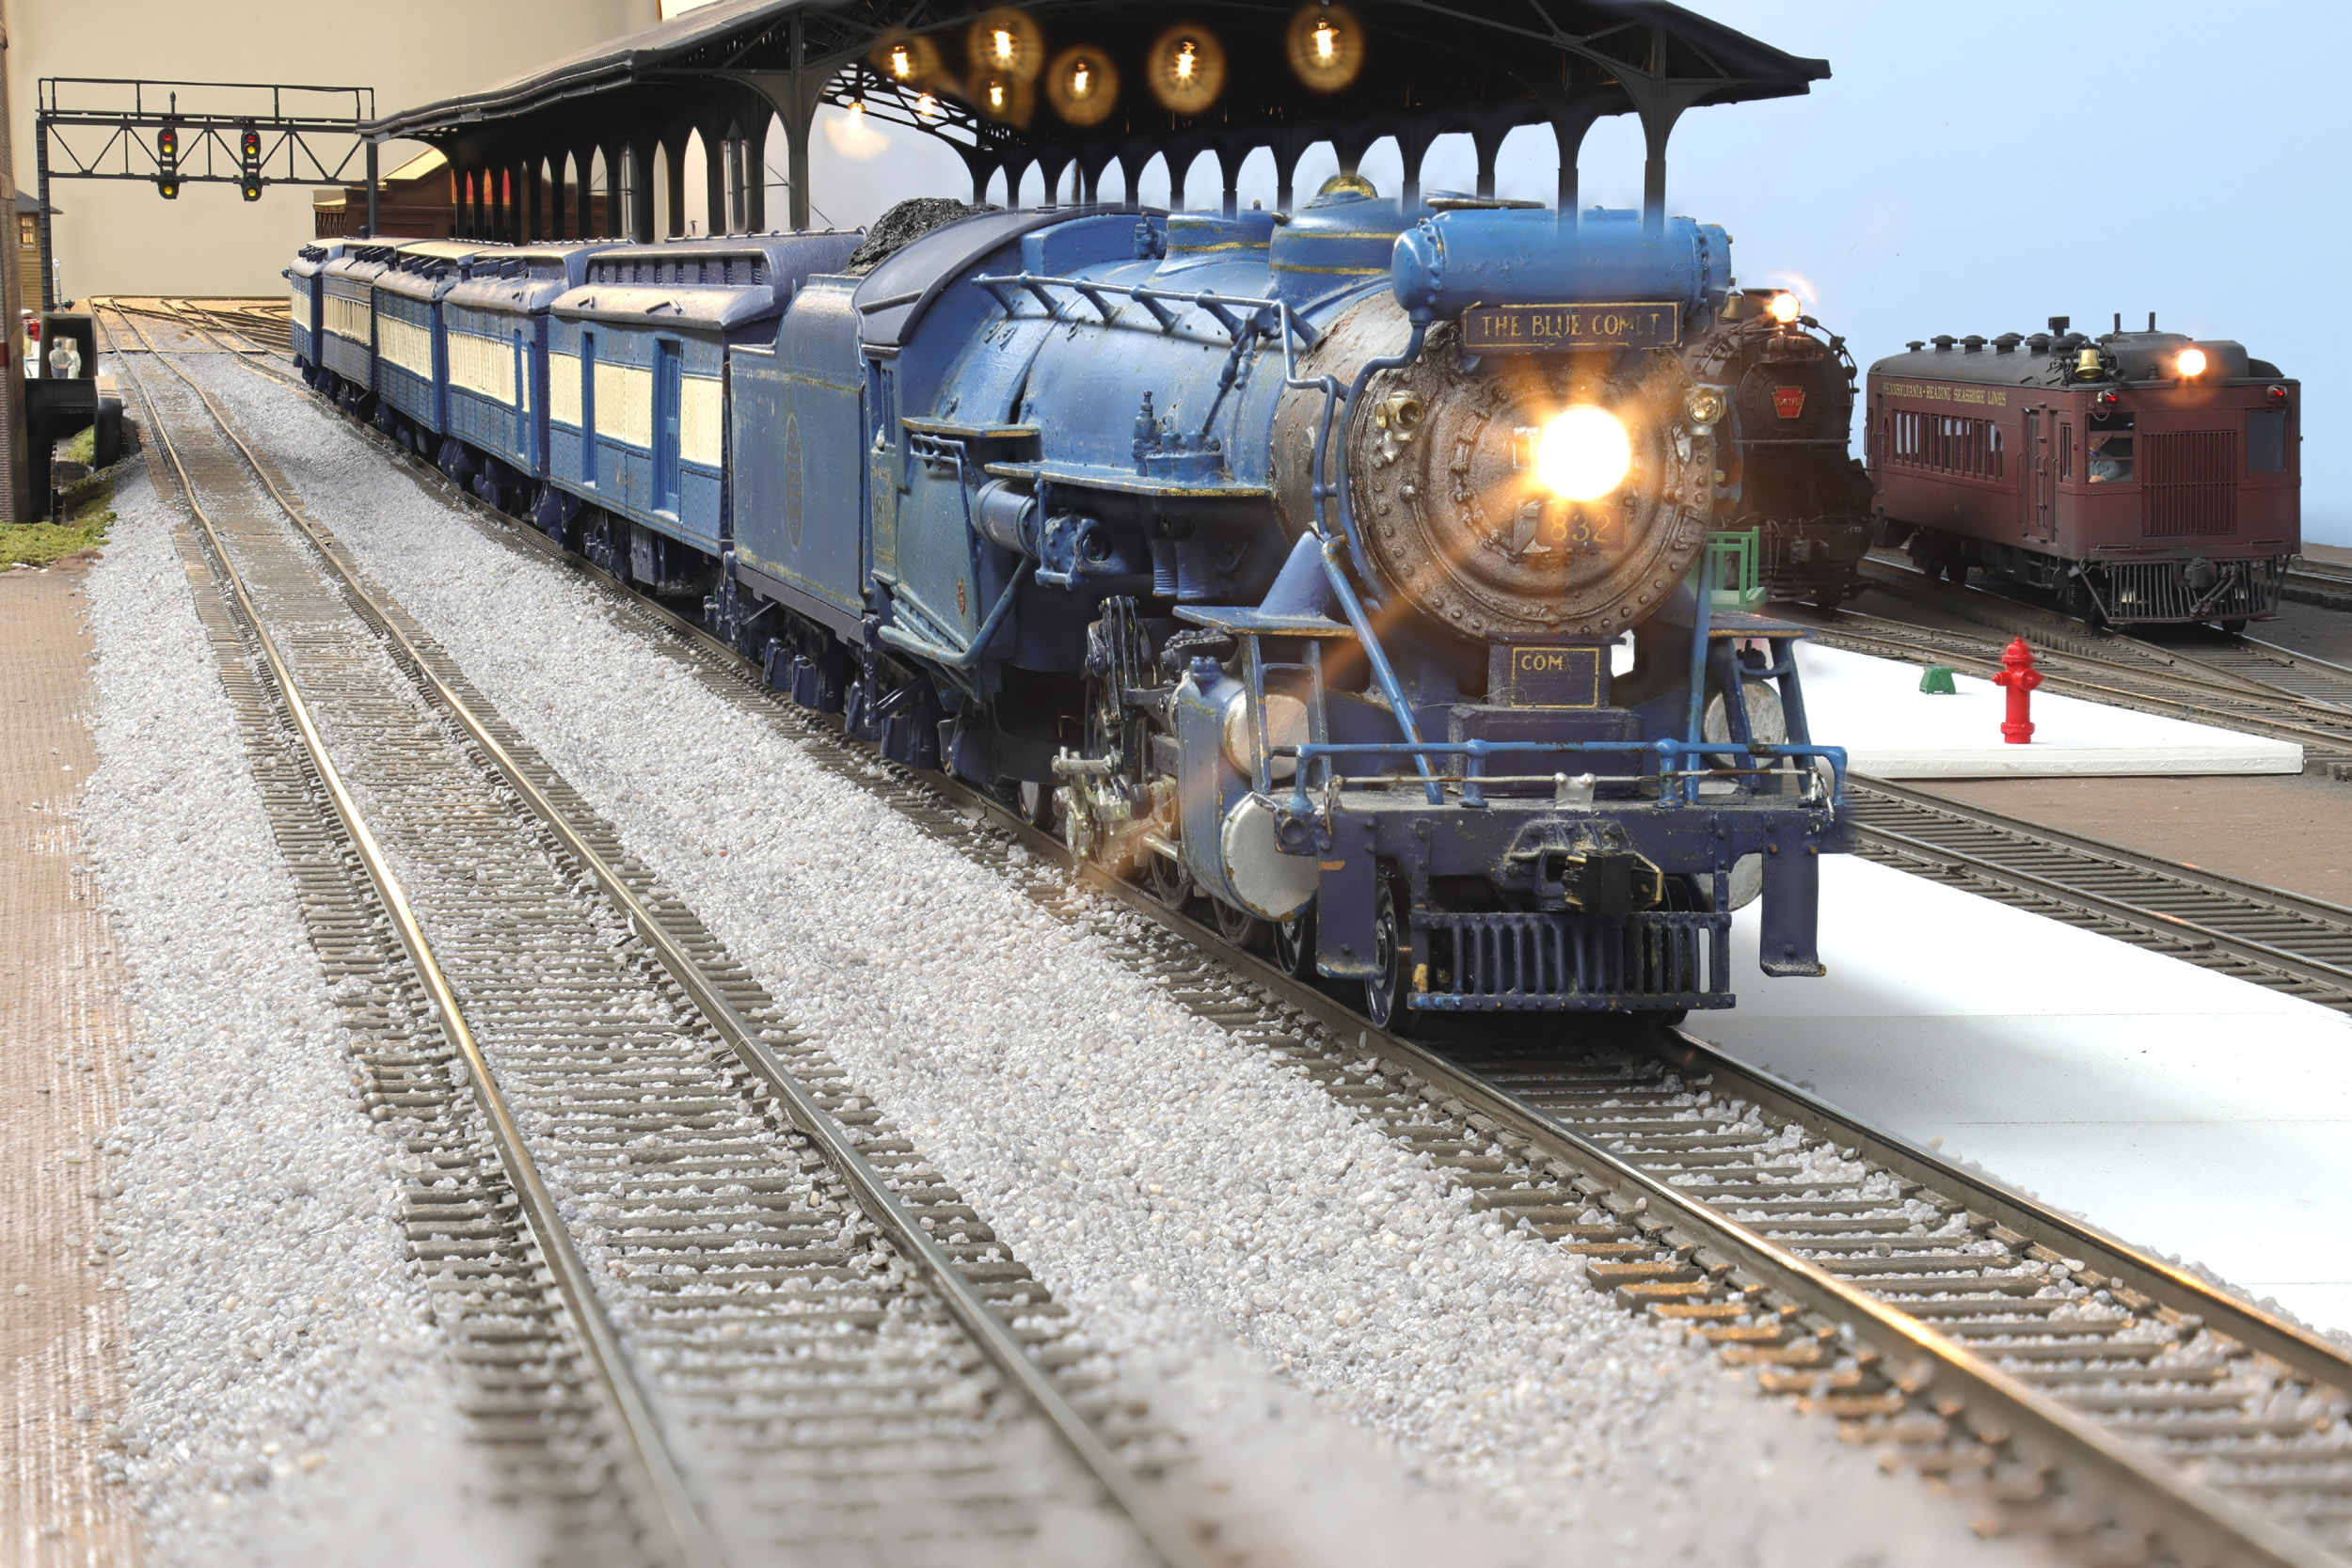
This
photos show all the work that has to be done. This will be by far the most
ornate steam loco I have ever painted. I nudged Tru Color into making a Blue
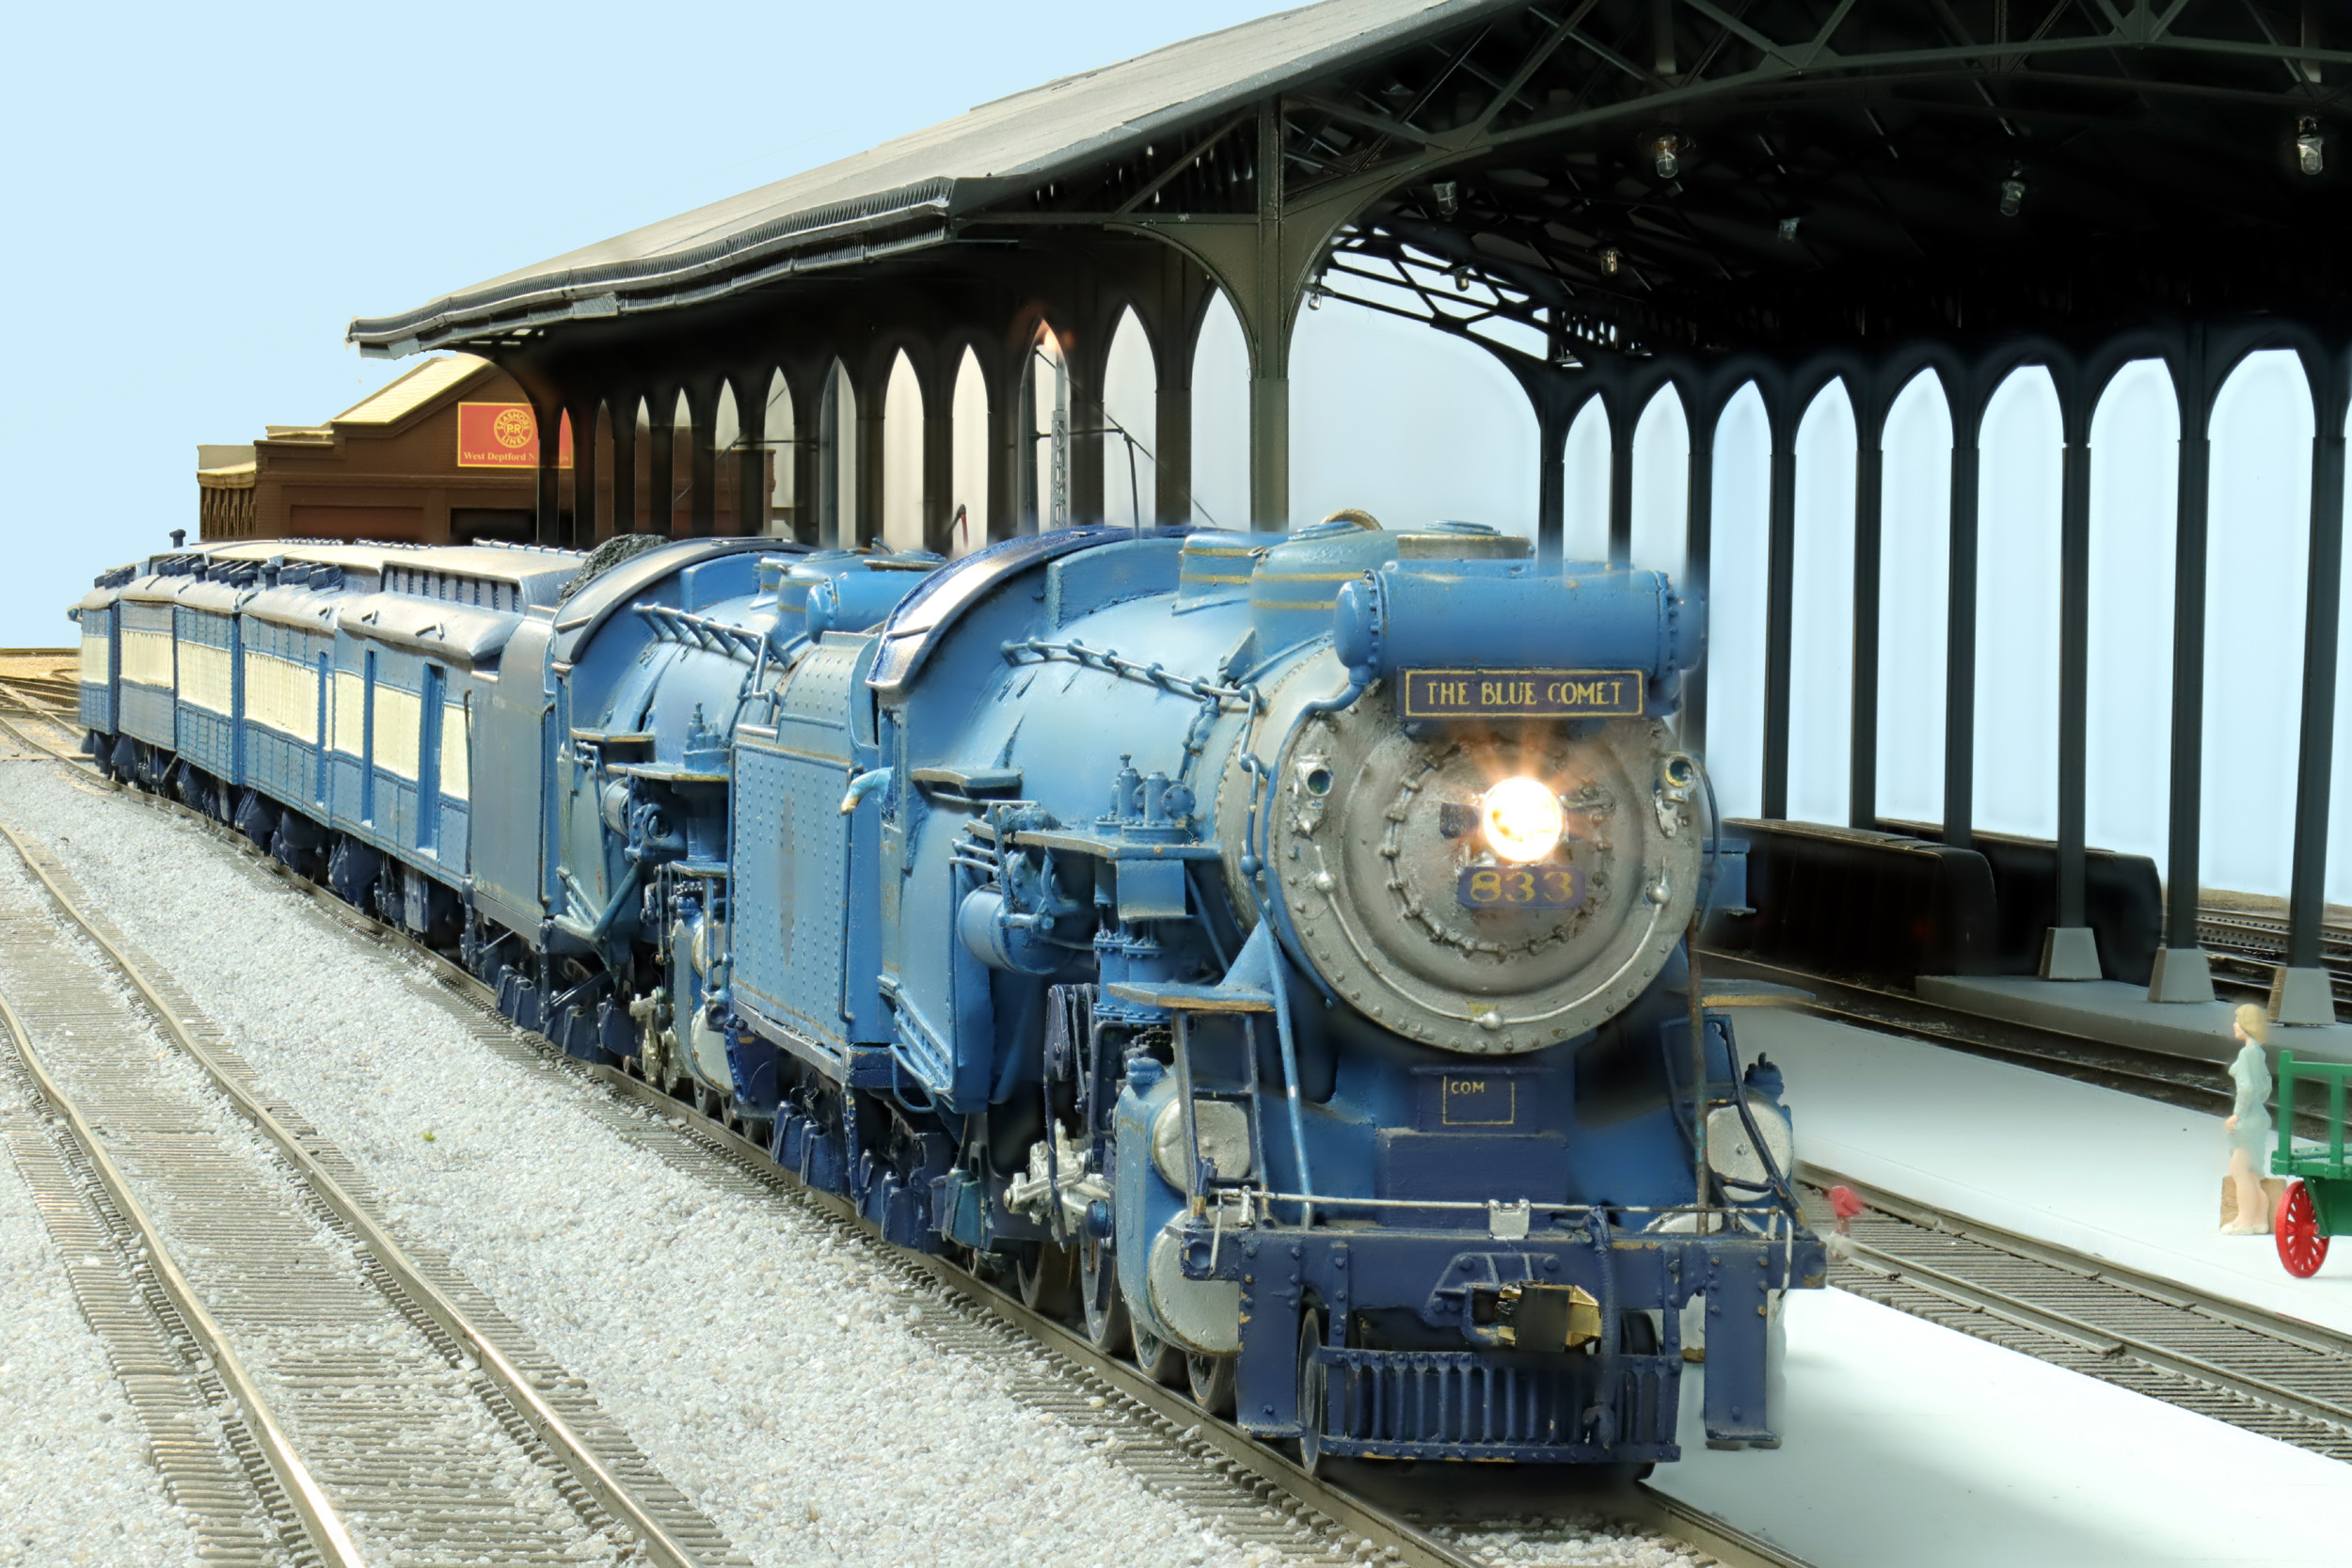
Comet blue paint. I hope it is close to what is here.
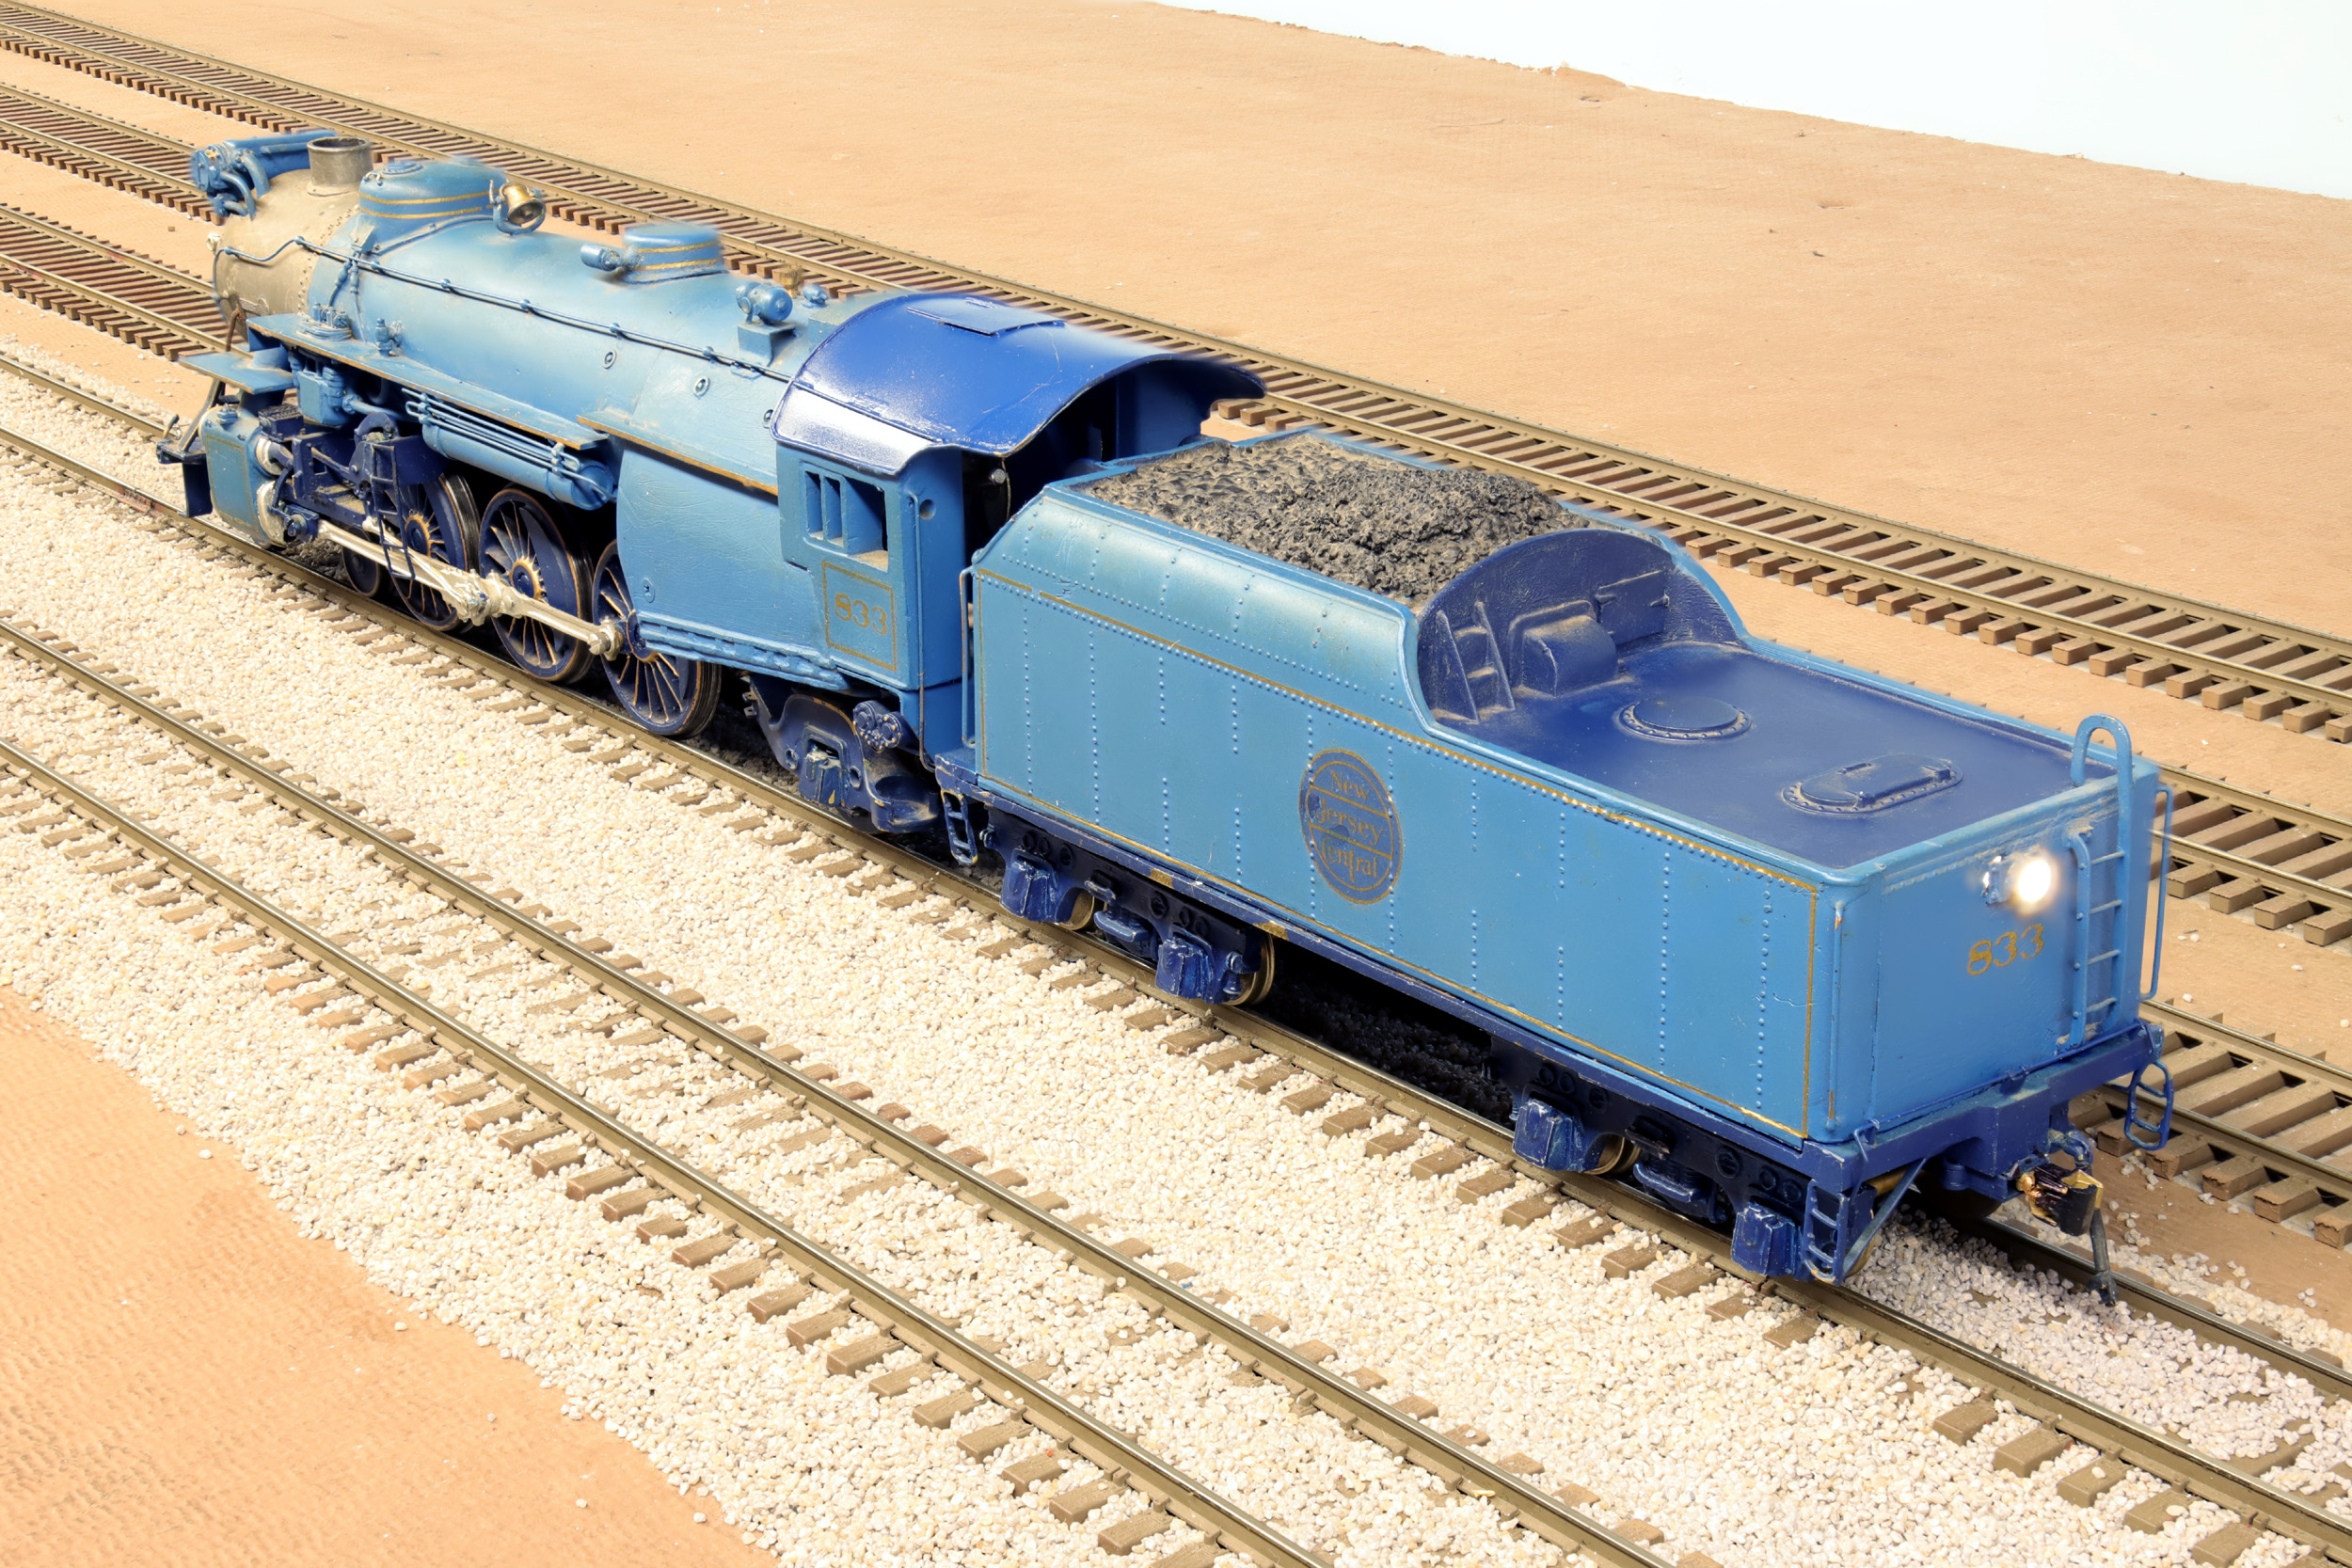
832
Photos
taken 1-13-21


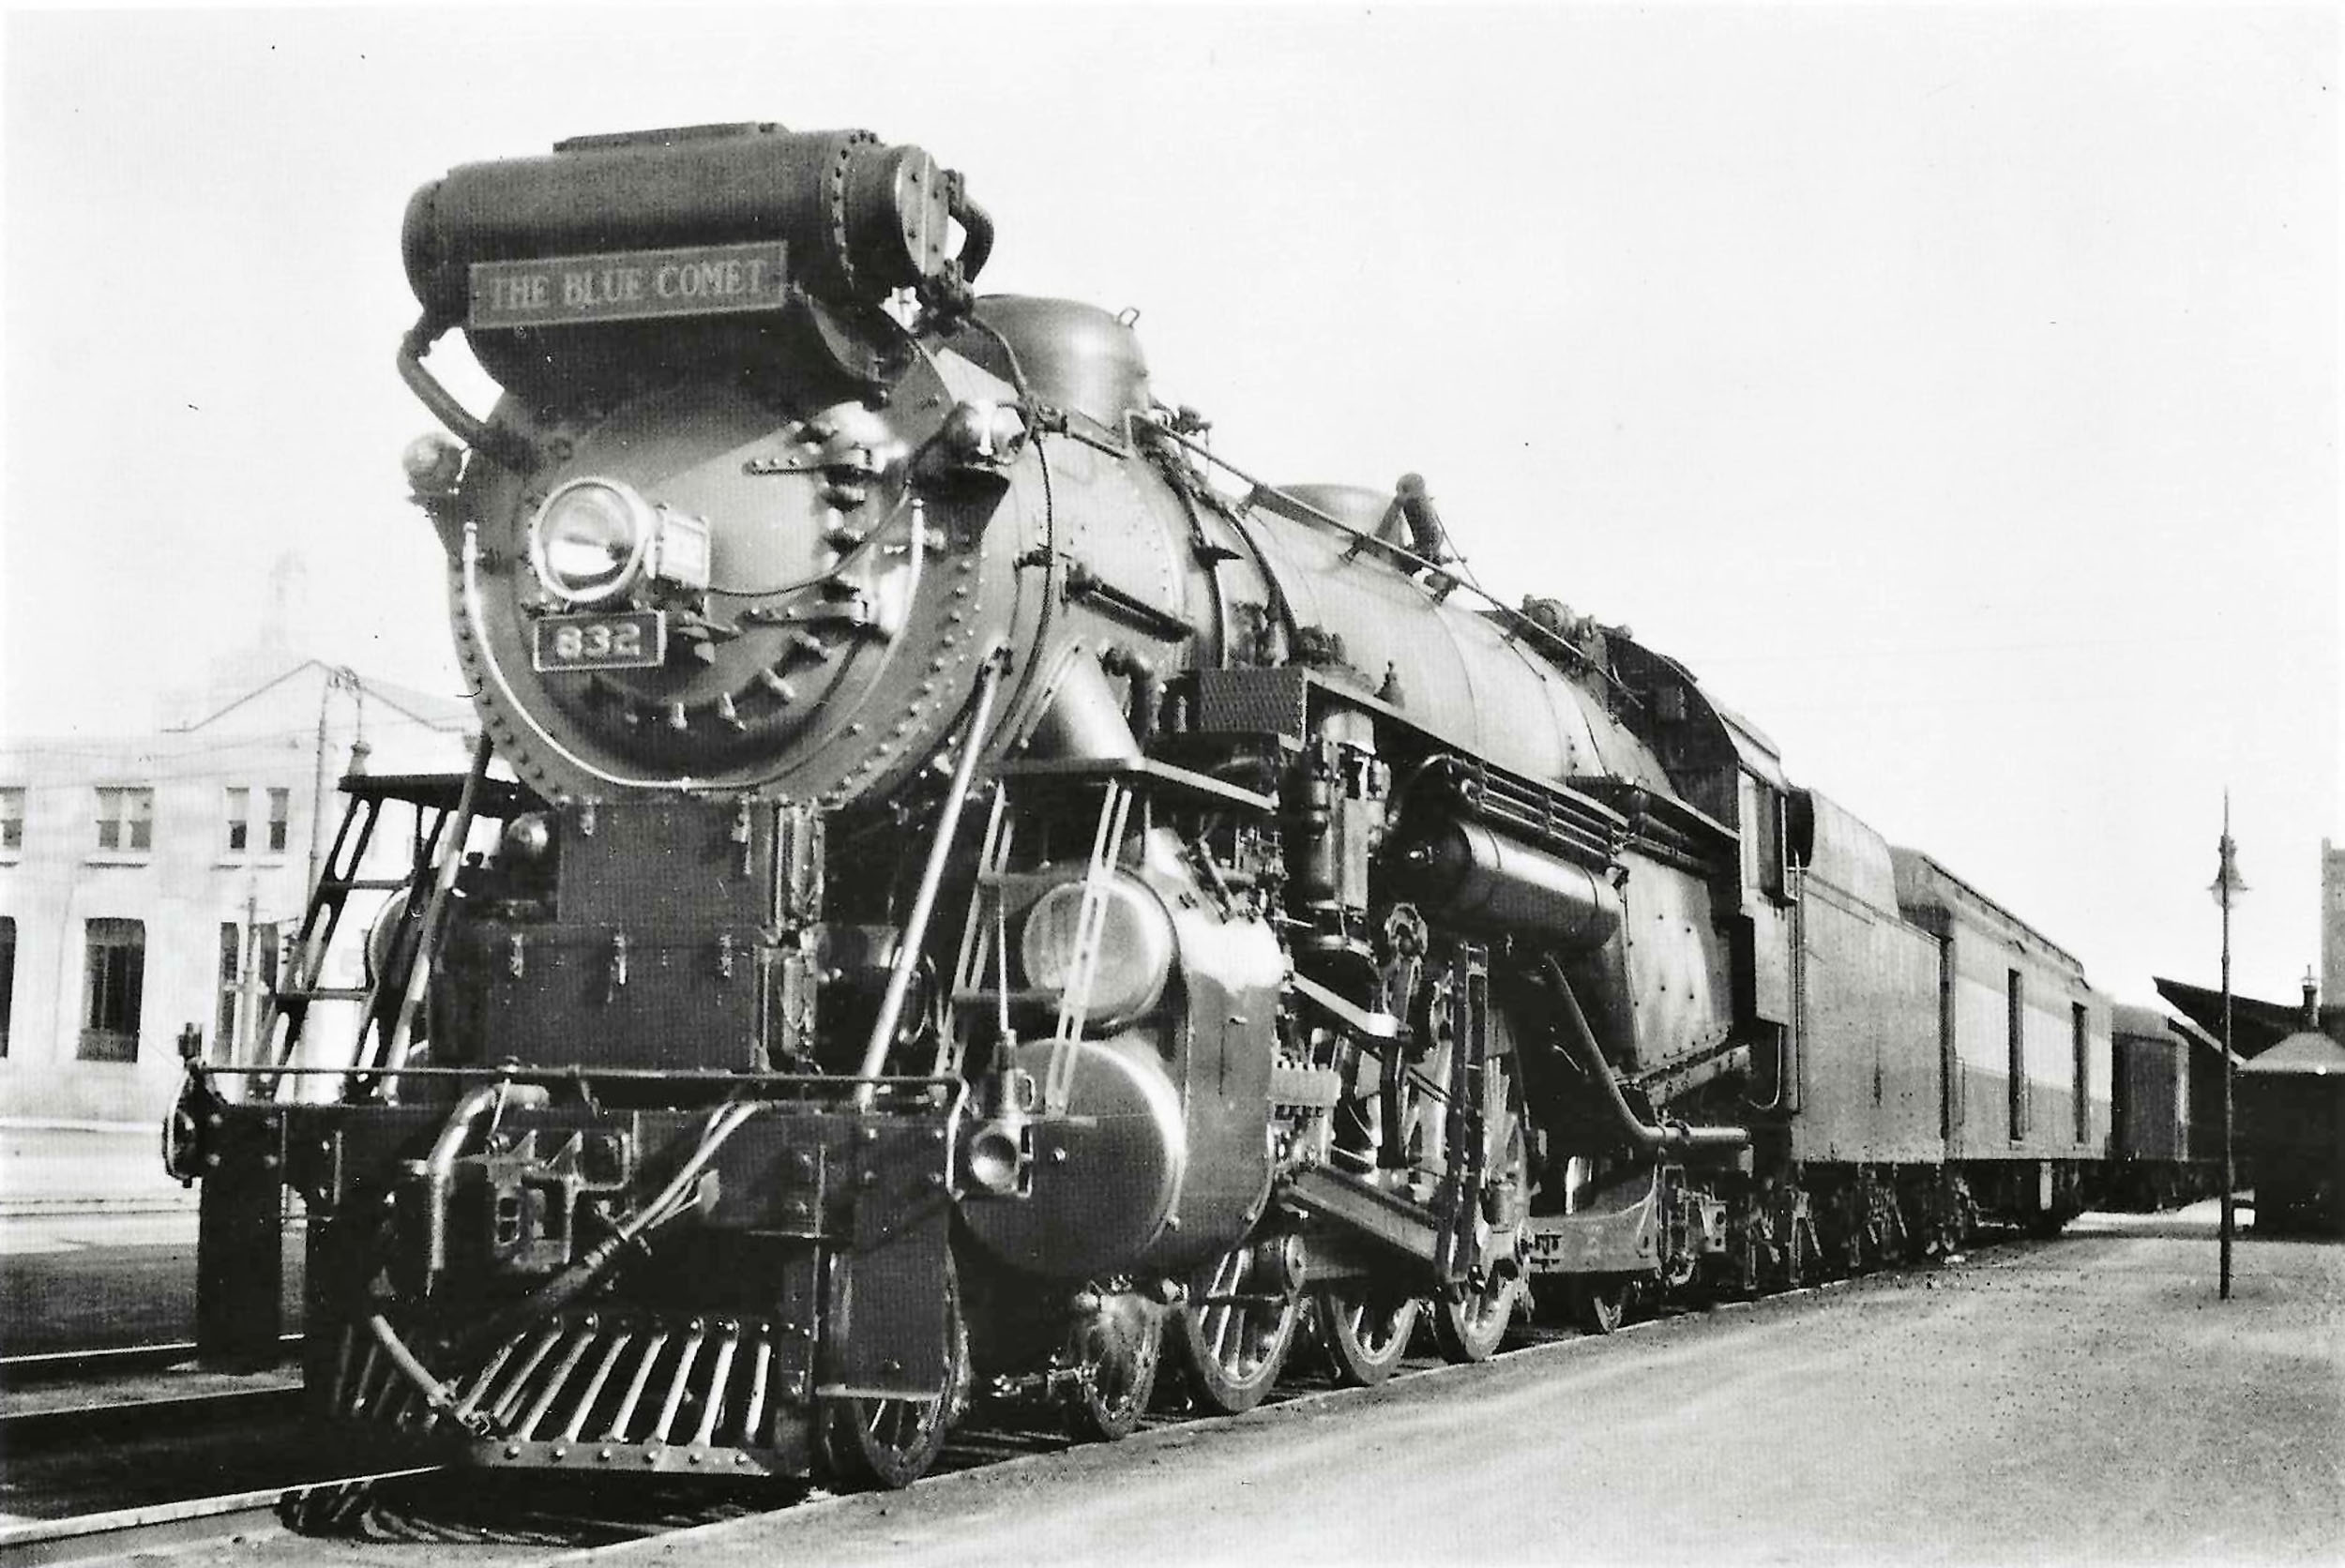
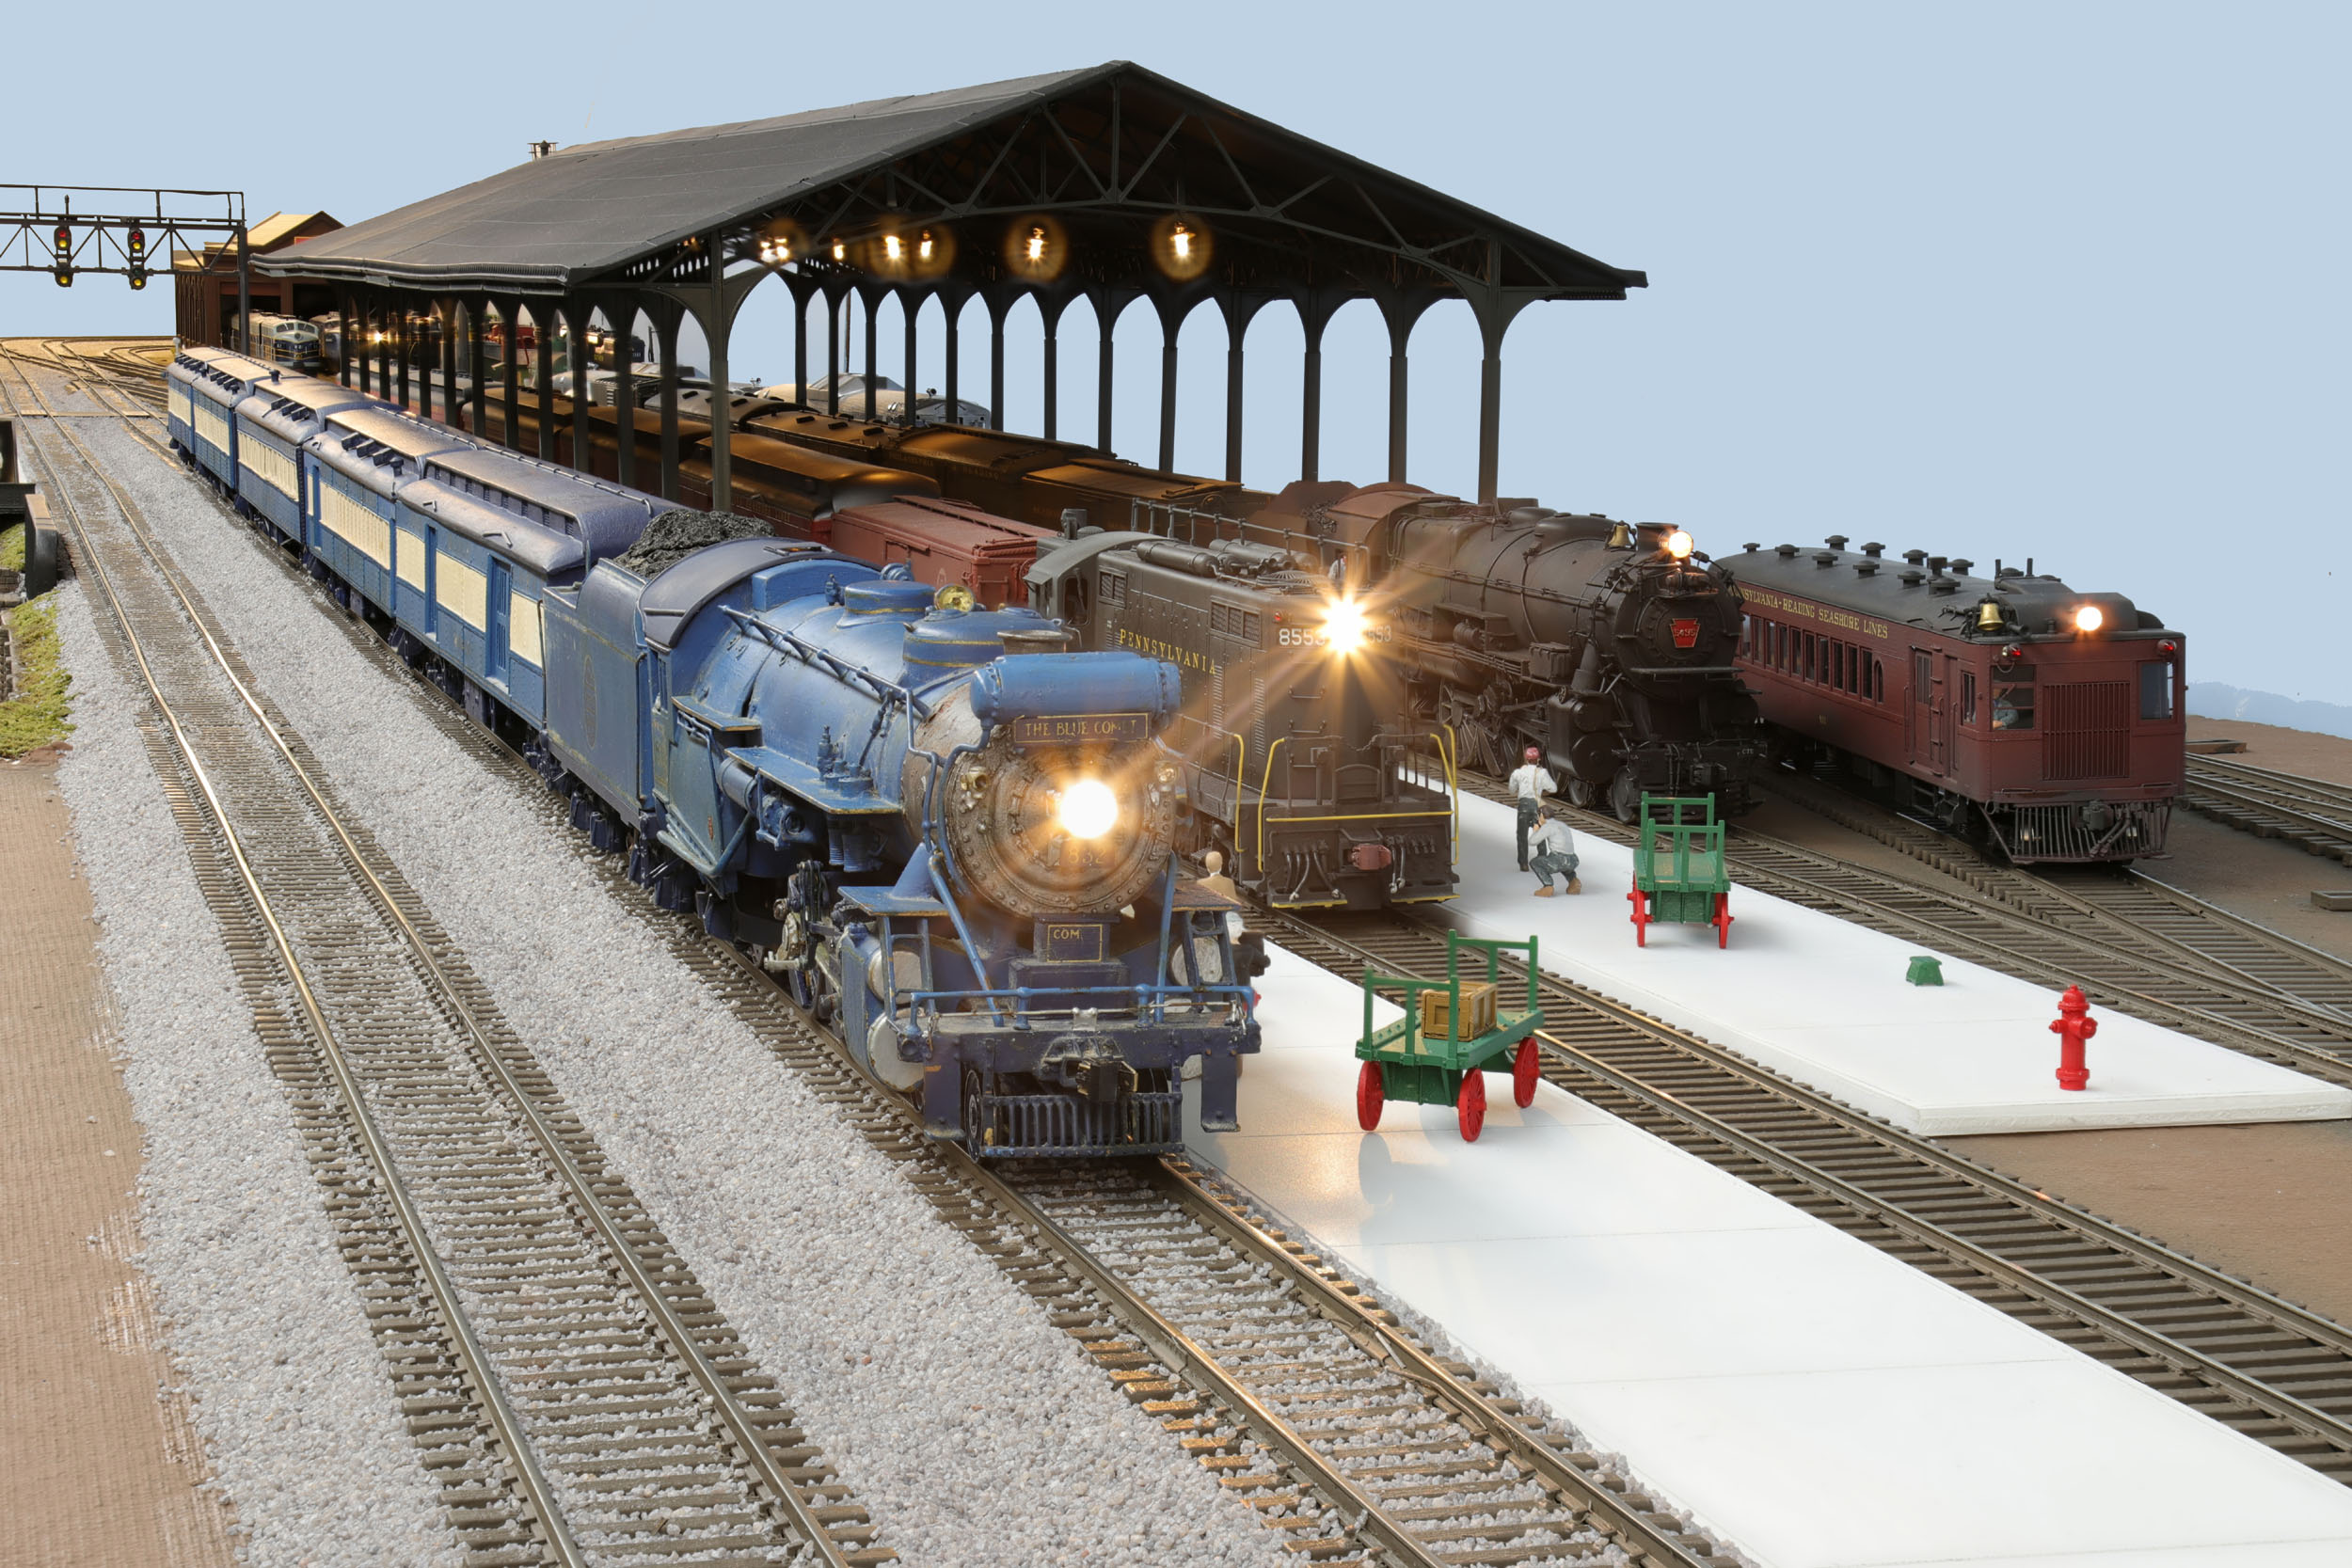
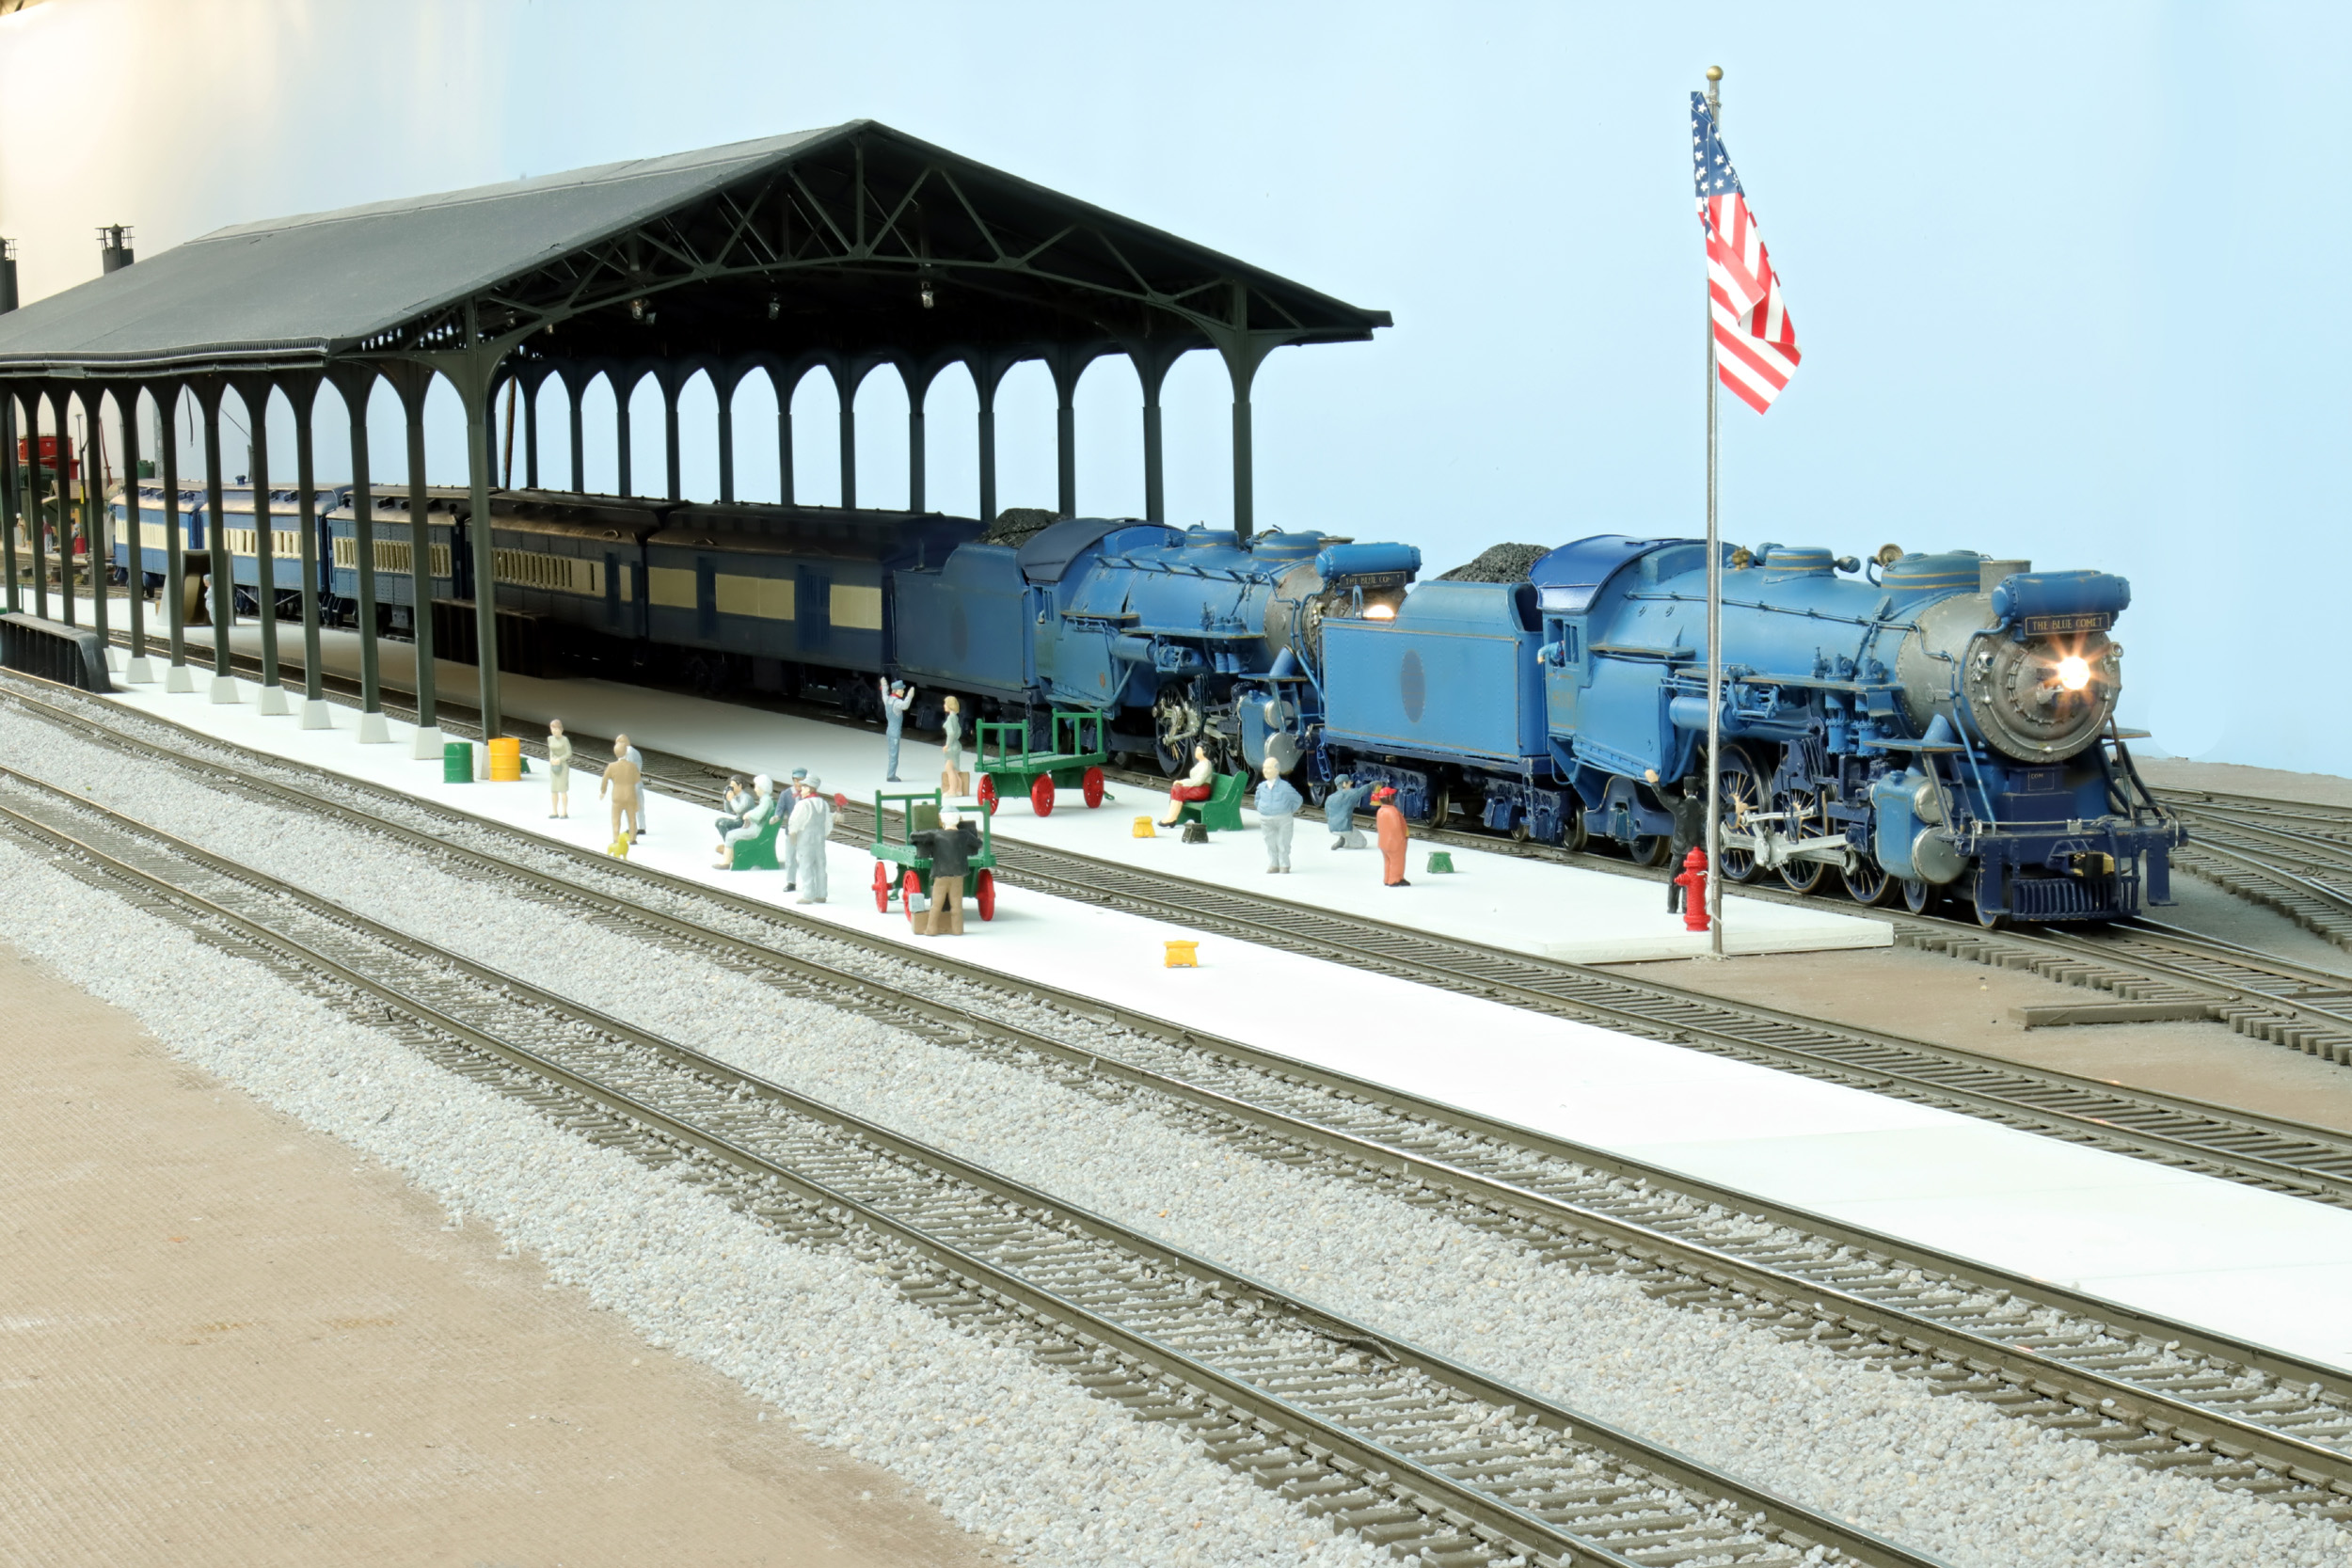
I
took that complete train photo as inspiration of what it will be like when I am done and it is running.
Added
1-29-21
Working
on this started a bit sooner than I expected. I do have the Tru Color Blue
Comet paint but not the loco decals yet. I have learned about more about the
history of the real Blue Comet. I have also had some questions of my answered
about the loco since I took it apart. For the first time I have seen in Frank’s
builds the boiler is a rather heavy bronze casting with the American Flyer cab
and firebox attached. The casting walls
are about ¼” thick. Frank was a real man’s man for transforming this boat
anchor casting into pure S Scale art. Many of the parts attached have holes
drilled through the bronze casting at a significant effort possibly with a lot
of broken drill bits as well.
Updating The Drive
I
am building this to a slightly different standard. I view it as a unit train.
This loco will only pull these cars. It does not have to have killer slow
speed. Getting that with the can motor conversions gets down
to a difficult gear engagement when making the new motor mount. It can
be really time consuming. I tried to keep the giant Pittman open frame motor
but had DCC issues that I still don’t understand. The brushes were seemingly
isolated. The loco ran fine as an elevated bench test but ran uncontrolled when
put on the track with the tender. The tender is insulated from the loco with a
plastic drawbar. The PowerCab did not show there was
a short. I am missing something here but it does not matter because a can motor
conversion fixes the problem.
I
started off using the same can motor I have used in all other Frank built locos
can motor conversions I did in the past including the Reading G1sa I did just 2
weeks ago. http://www.lanestrains.com/S_Scale_Reading_G-1sb_201.htm
This should have been
identical conversion but it somehow was not. The larger diameter of the motor
the more I had to angle the motor to engage the axle gear. This was getting to
about 35 + degrees so I stopped. Again this only has to pull the 5 cars so I
went with a much smaller motor than I originally expected. It was almost a
straight shot to the axle gear. With the heavy cast boiler this motor struggles
a bit to slip but it does. I am not guaranteeing it won’t stall instead of slip
so I just have to watch for it. The steel driver tires are very grippy!
I
made an adaptor shaft from 1/8” brass round stock. The brass shaft is soldered
to the motor shaft. The worm gear is soldered to the brass shaft. The loco is
powered by pickups on the tender only. The loco has no power pick up wired to
the decoder. This is my typical pickup wipers I have made many times. I stopped
cutting grooves in the backs of the wheels because the pickups stay in place.
They do not short.
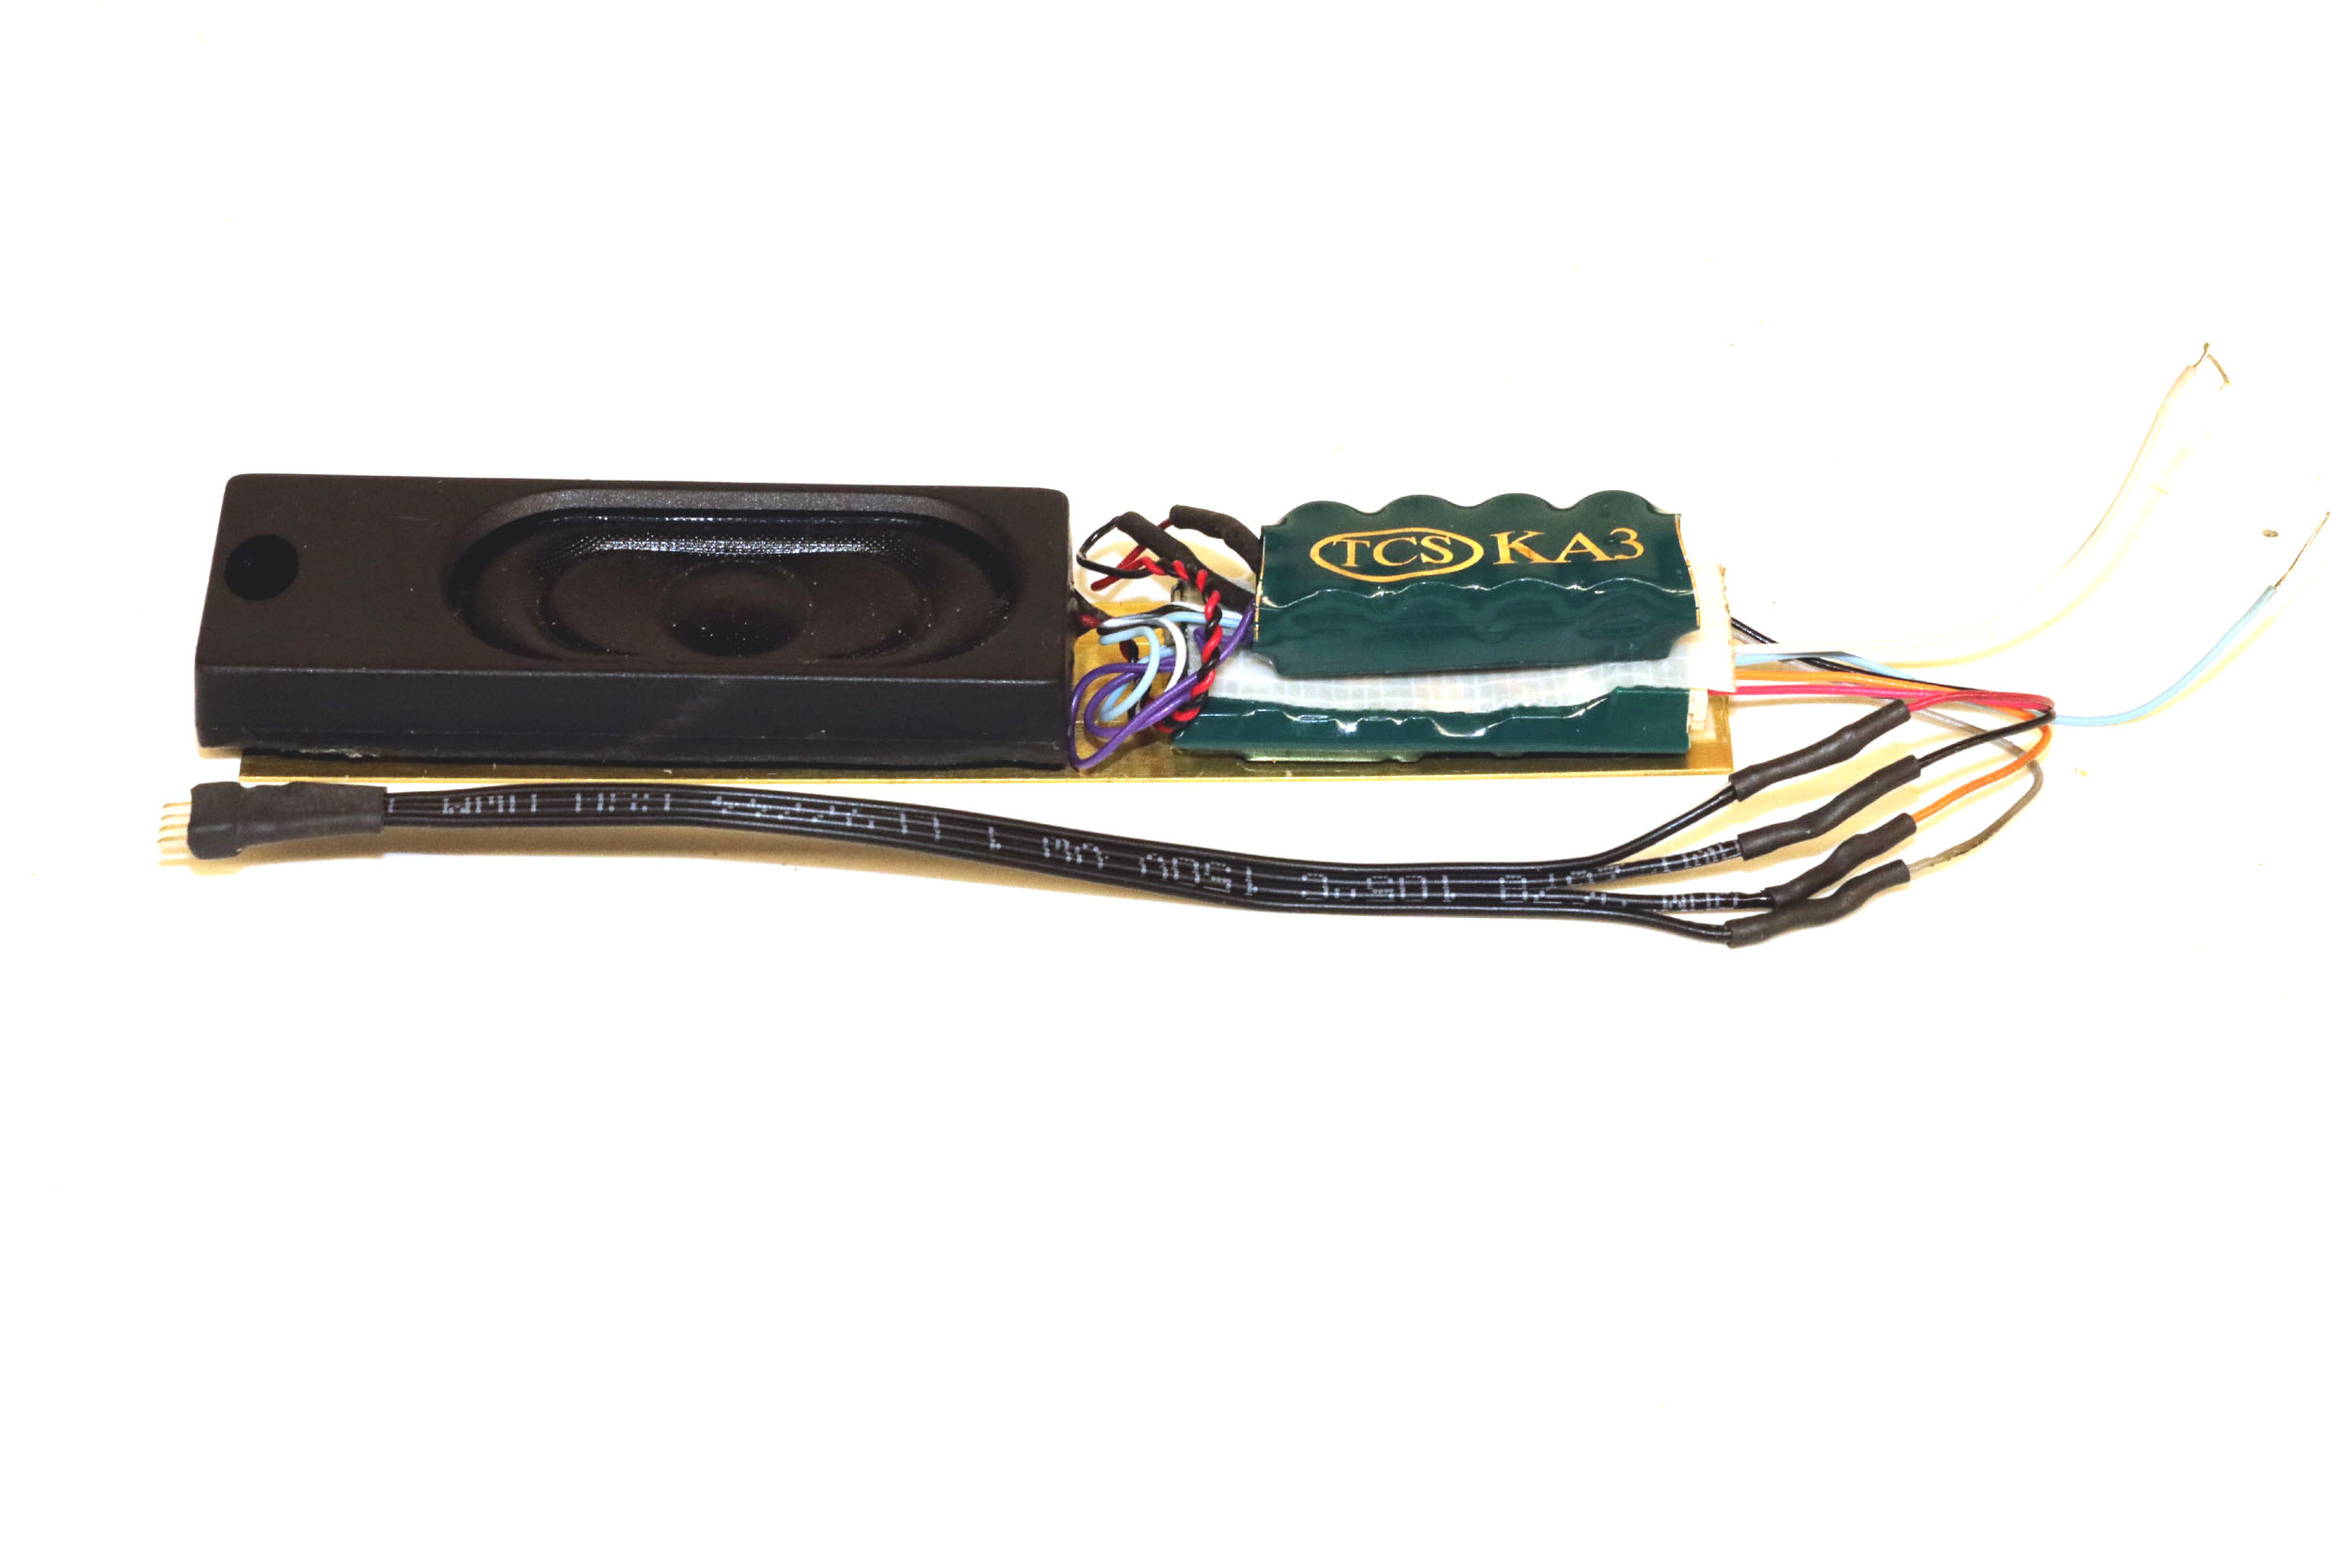
DCC
Since
the boiler is cast bronze for the first time working on a Frank built loco it
is heavy enough to not need to add a boiler weight. There is a significant
amount of clear space in the boiler. But the boiler front is permanently
attached making access more difficult. I decided to just make a slide in
decoder unit with a TCS WOW4 and RailMaster DLG8 speaker on a price of brass
flat stock. It is sort of free range in the boiler but it cannot slide into the
motor or gears. The sound is LOUD. I have the chuff volume set to 2%. Maybe
bouncing off the bronze boiler makes the sounds loud.
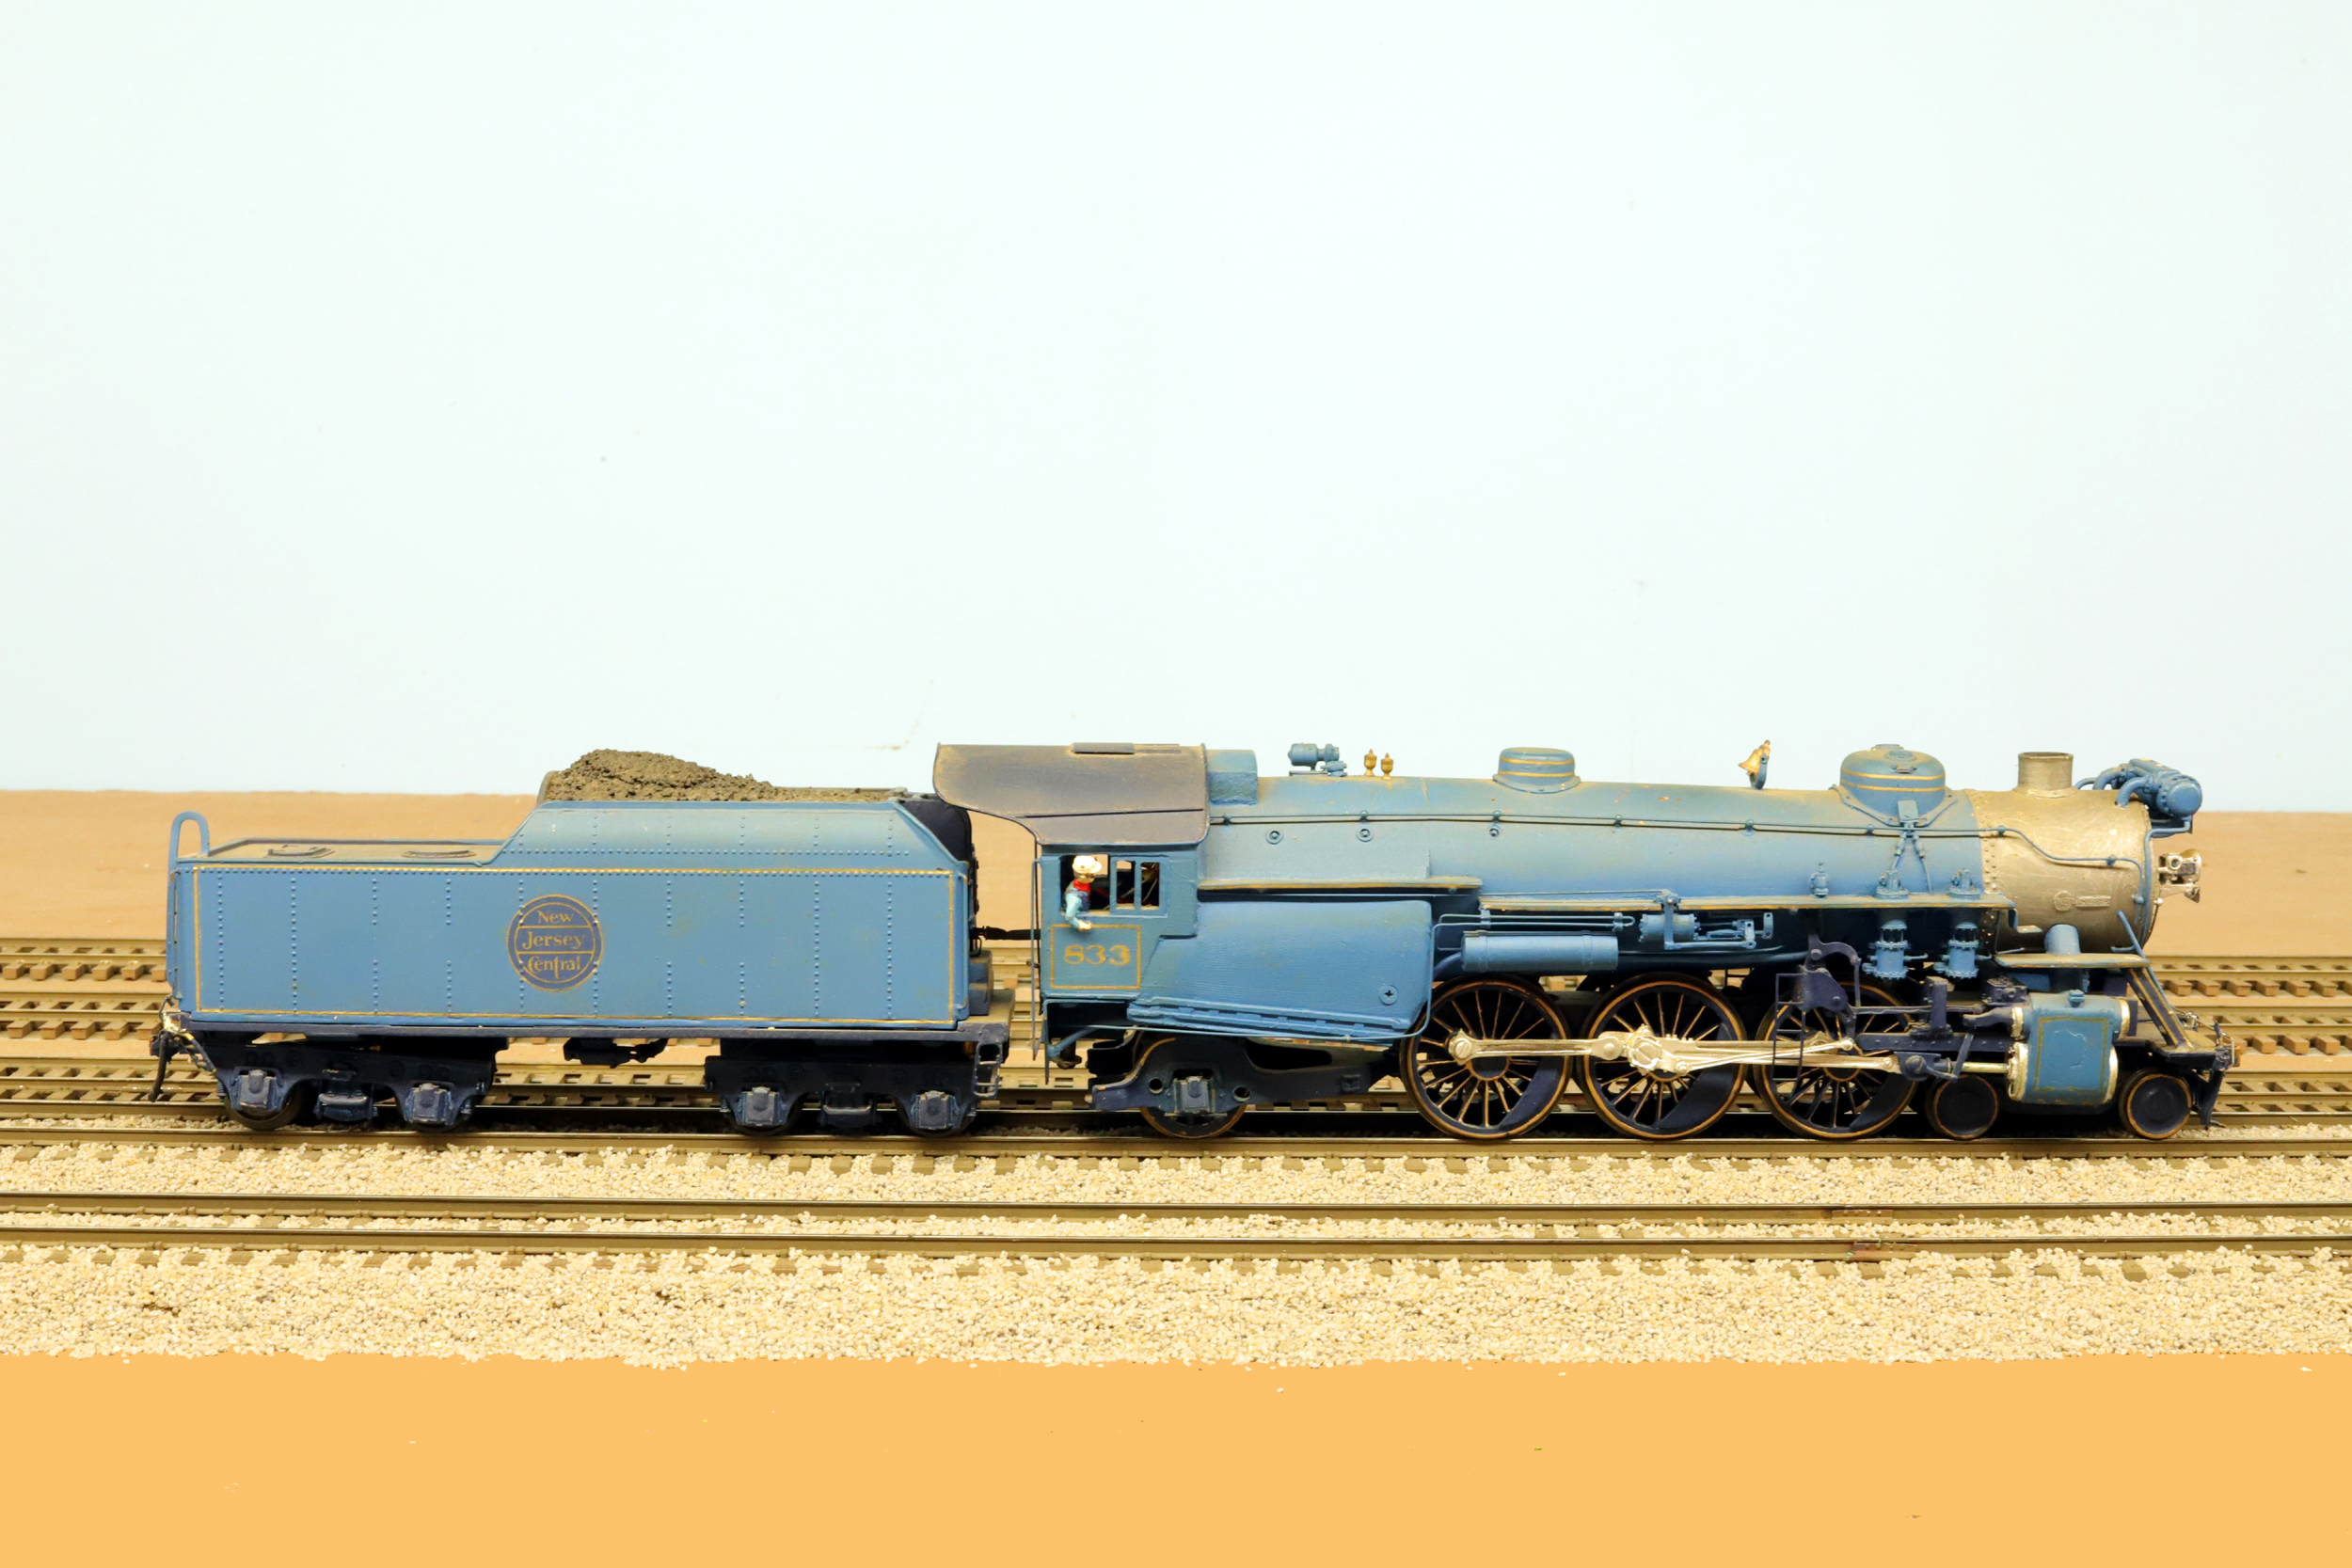
Loco Wheels
The
drivers had to be pulled about .015 total to the
current NASG standard. I replaced the code 125 tender wheels with code 110
Northwest Shortline nickel silver wheels. I replaced the lead truck wheels with
code 110 S Helper Service wheels. I sanded down the trailing truck wheel to
code 110. The drivers remain the only code 125 wheels left. I don’t know why
Frank made the center drivers blind on a pacific. But his layout had some very
sharp curves.
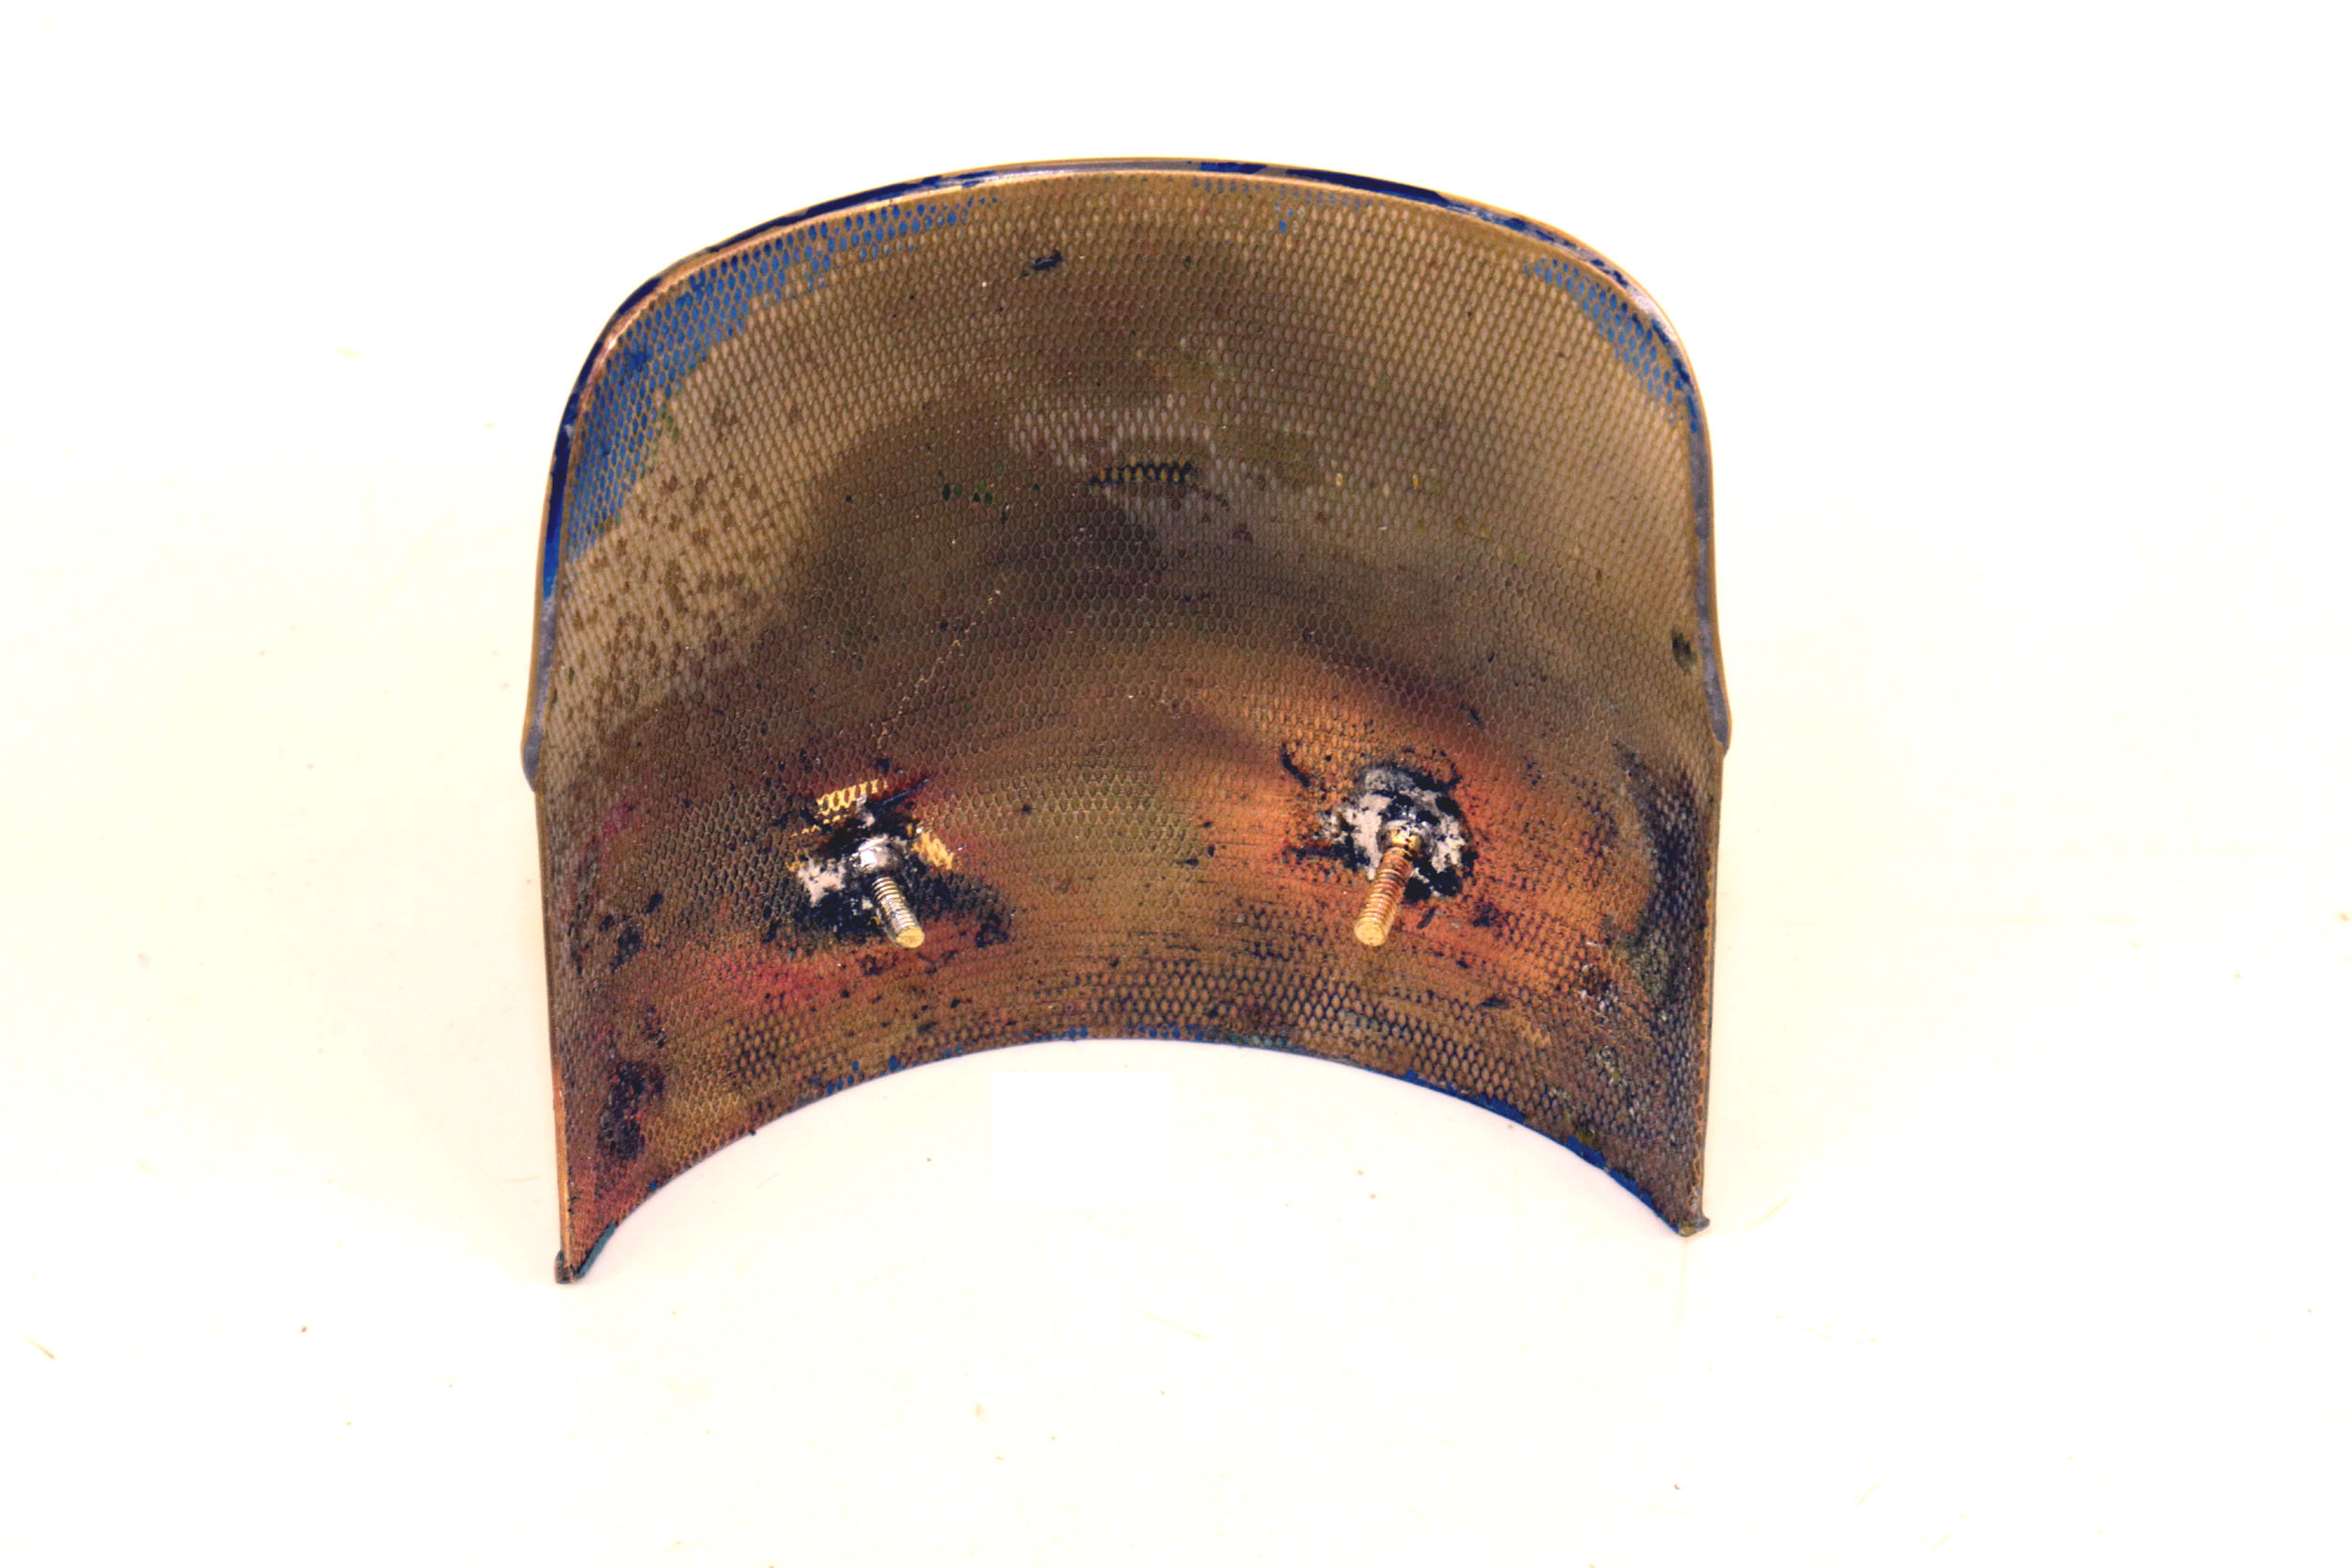
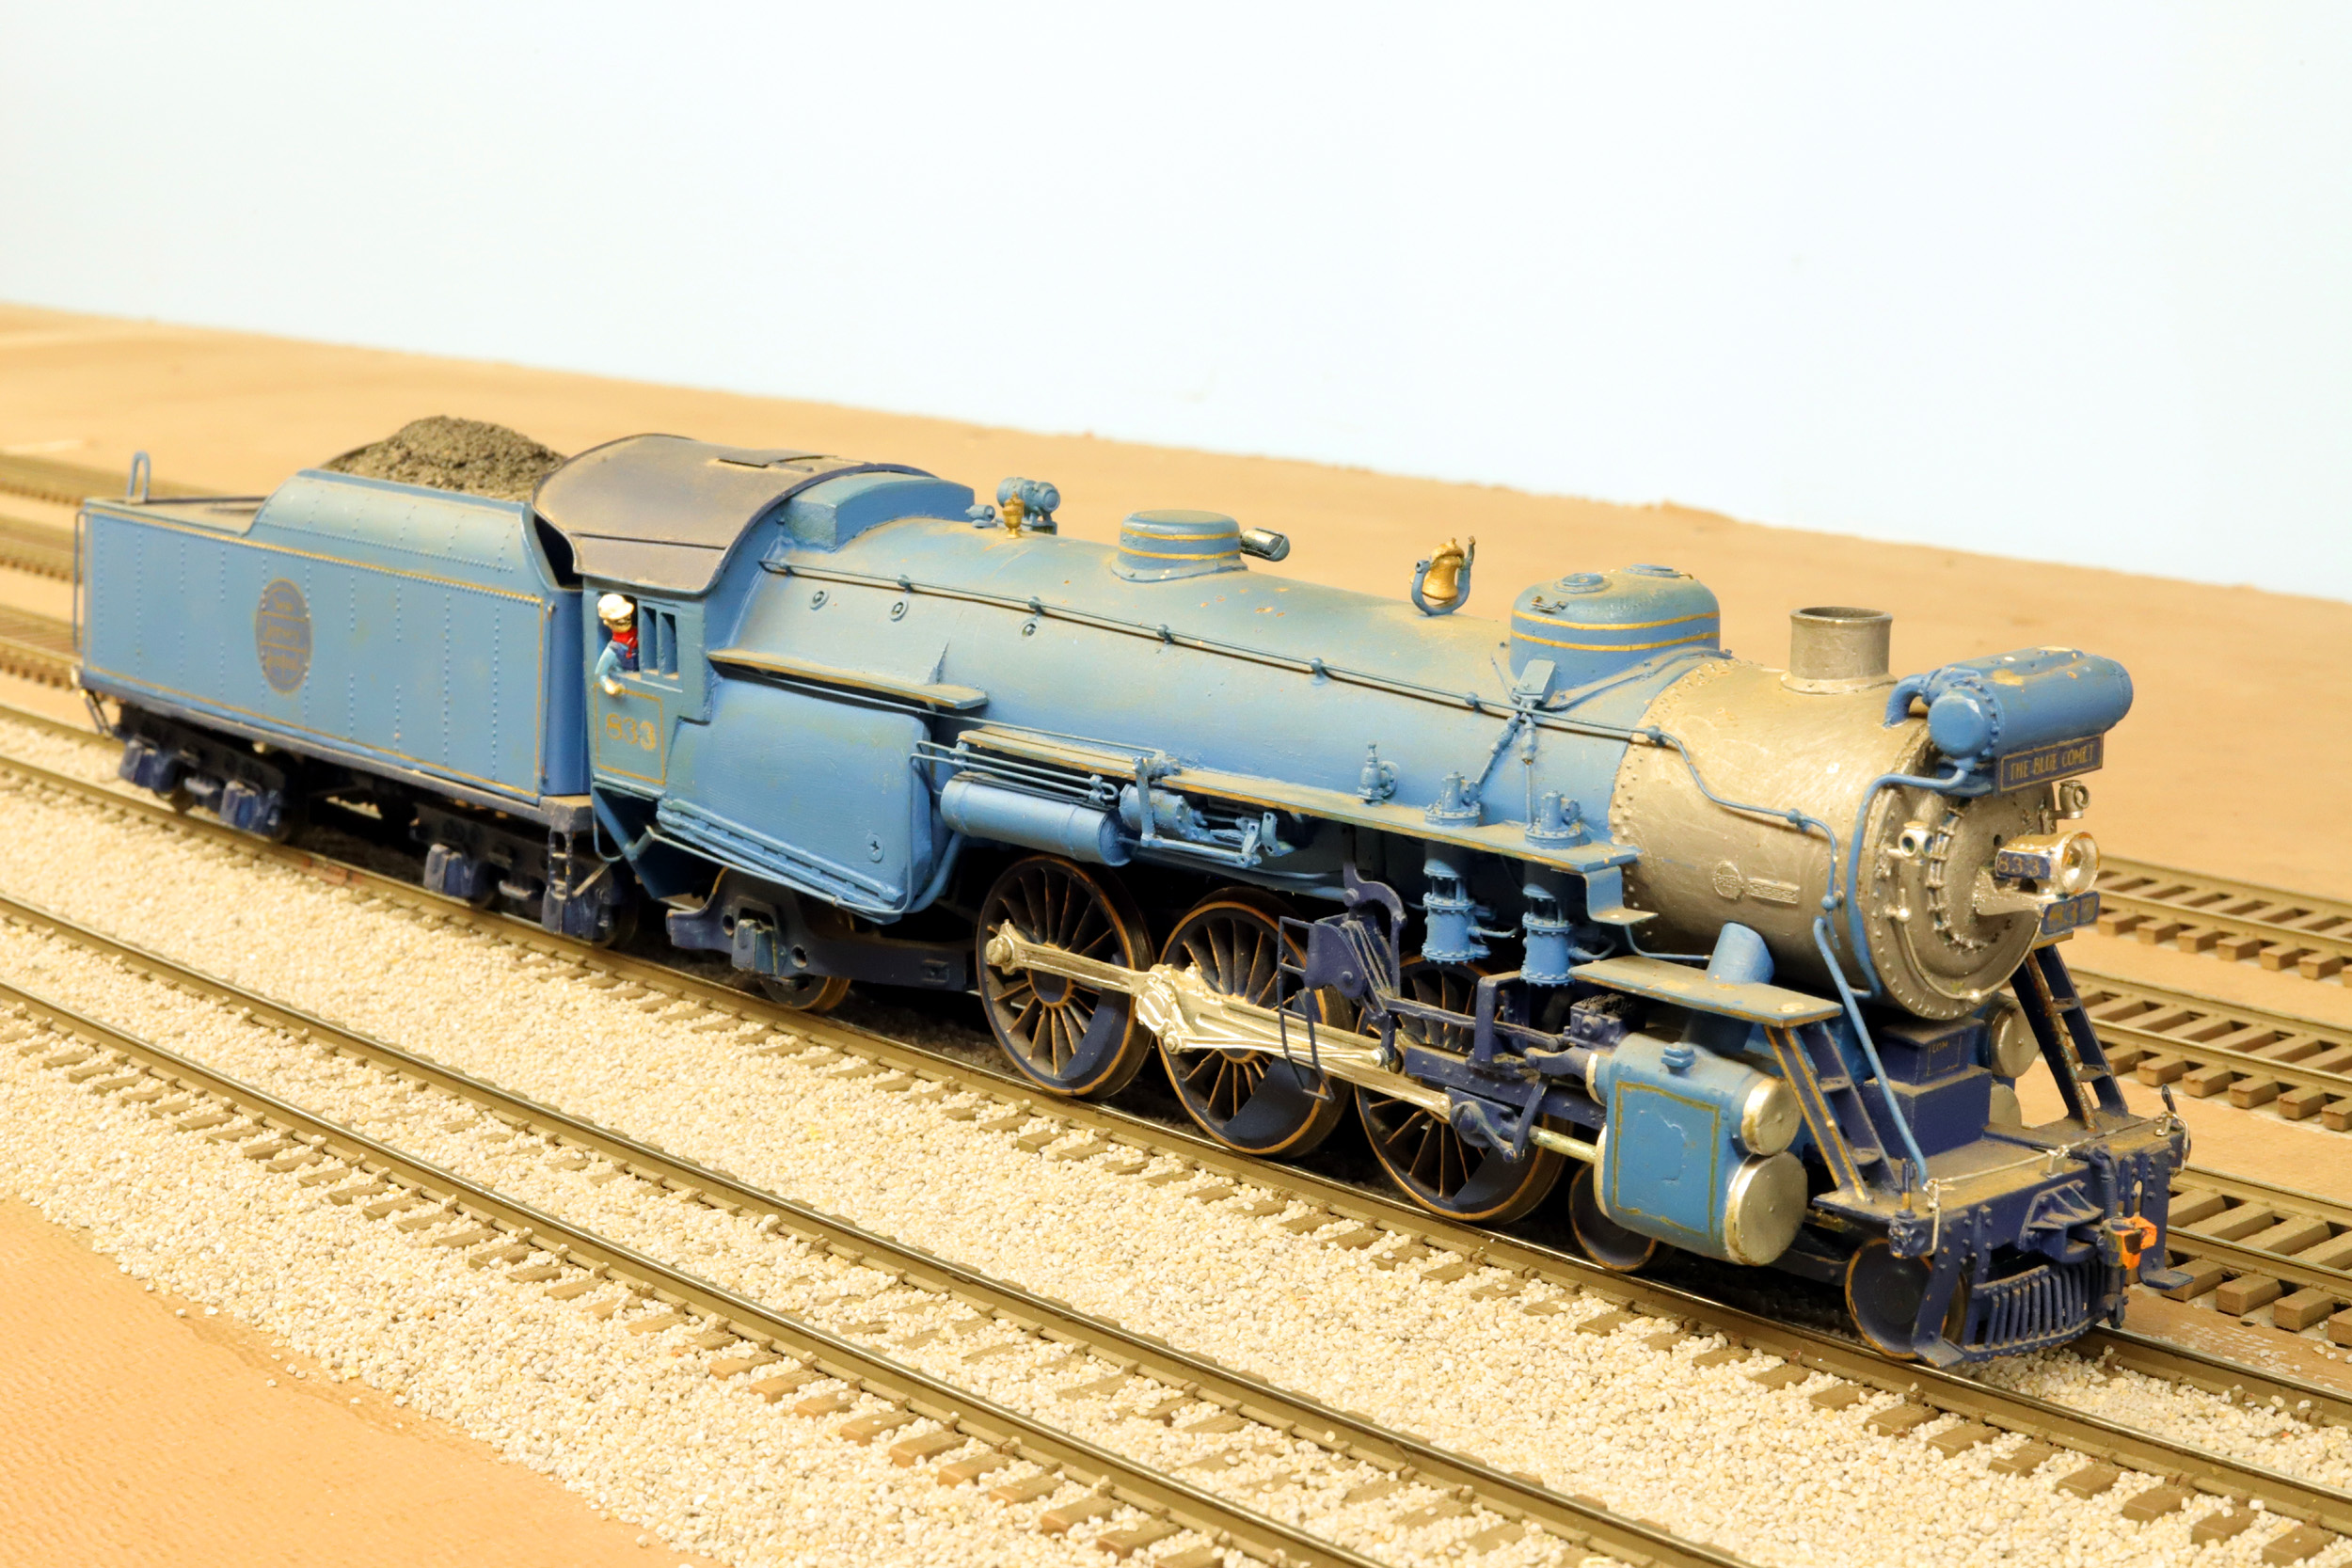
Cab Roof
Frank
chose to cut off the American Flyer roof and cab overhang. He laminated a cast
brass cab roof to the American Flyer cab with ACC or epoxy. The roof was popped
off when I got the loco. I probably could just have glued or used epoxy to put
it back on but that would be too easy. If it popped off once it could happen
again. I wanted a mechanical attachment. As usual I did not know how I was
going to solve my “problem” when I start but it just comes to me eventually.
Involving my lathe or milling machine to my projects just adds to my ongoing
challenge to myself. I soldered 0-80 flat head screws to the underside of the
cab roof as a stud. At first I was just going to use 0-80 nuts but getting a
nut started deep in the cab and using a nutdriver at
those odd angles might not have worked. I drilled and tapped 1/8 brass round
stock for 0-80 and cut a slot across the top to make a “tube nut”. I never saw
1 before but I made 2 of them. They pull the roof down tight. And I did not
have to MASK it to paint!
Added
1-31-21
I
took a new stack photo and shot a short video
. A working headlight makes all the difference for me almost more than a sound
unit. The loco is running pretty well now. I have to sand down all of the car
wheels to code 110 and regauge to NASG standards. The cars also did not roll
well at all. I will lube them all.
Added
2-3-21
Done For Now
I
am happy that this is out of the boxes and running in 1 month’s time, much sooner
than I originally expected. The loco is running really well now. I let it run
for about ½ hour that really helped smooth out the jerkiness the loco once had.
The loco still needs to be repainted. I
am trying to get new decals made. The cars are pretty much done with almost no
touch up paint needed.
I
Diner Repair
The sides on the diner were detached about ¾ of the length of the
car on both sides. Fixing that was 1 of the most difficult stressful repairs I
have ever done. The floor was warped upwards and the sides warped outwards.
Luckily the roof was removable or I could have never fixed this car. A
significant amount of ACC (Zap A Gap Green) was used but it did not stick to
the sides or wood quickly. I had to use Irwin Quick Grip clamps
to hold the sides in place – 1 at a time, with the roof back on to set levels.
How I got this all done without shattering the polyester car side or have any
visible glue marks on the car sides is a miracle.
Car Wheels
The biggest job on the cars was replacing wheels. I wanted to get
Northwest Shortline wheels. 3 weeks after first contacting them about stock I
have not received a reply if they could supply the wheels. So I tried to
recycle the original wheels that I have thrown out wheels just like this in the
past. That meant sanding down the tread by removing .015, then regauging to current and wider NASG standards and
repainting them. I spent HOURS working on the wheels only to find they still
shorted out because the center hub of the wheel was now wider than the tread
and contacted the sideframes. How annoying. What a waste of time. I replaced
all of the car wheels with Downs code 110 36” wheels I
luckily had. Code 110 36” wheels are tough to find right now. The drivers and
trailing truck wheel are original but were worked on. All the rest of the
wheels on the entire train where changed. The couplers were truck mounted on
long shanks. I don’t allow truck mounted couplers so I body mounted the
couplers on the cars.
There is a new YouTube clip of it running here.
I will make a new clip whenever the loco is repainted and done.
Added
7-22-24
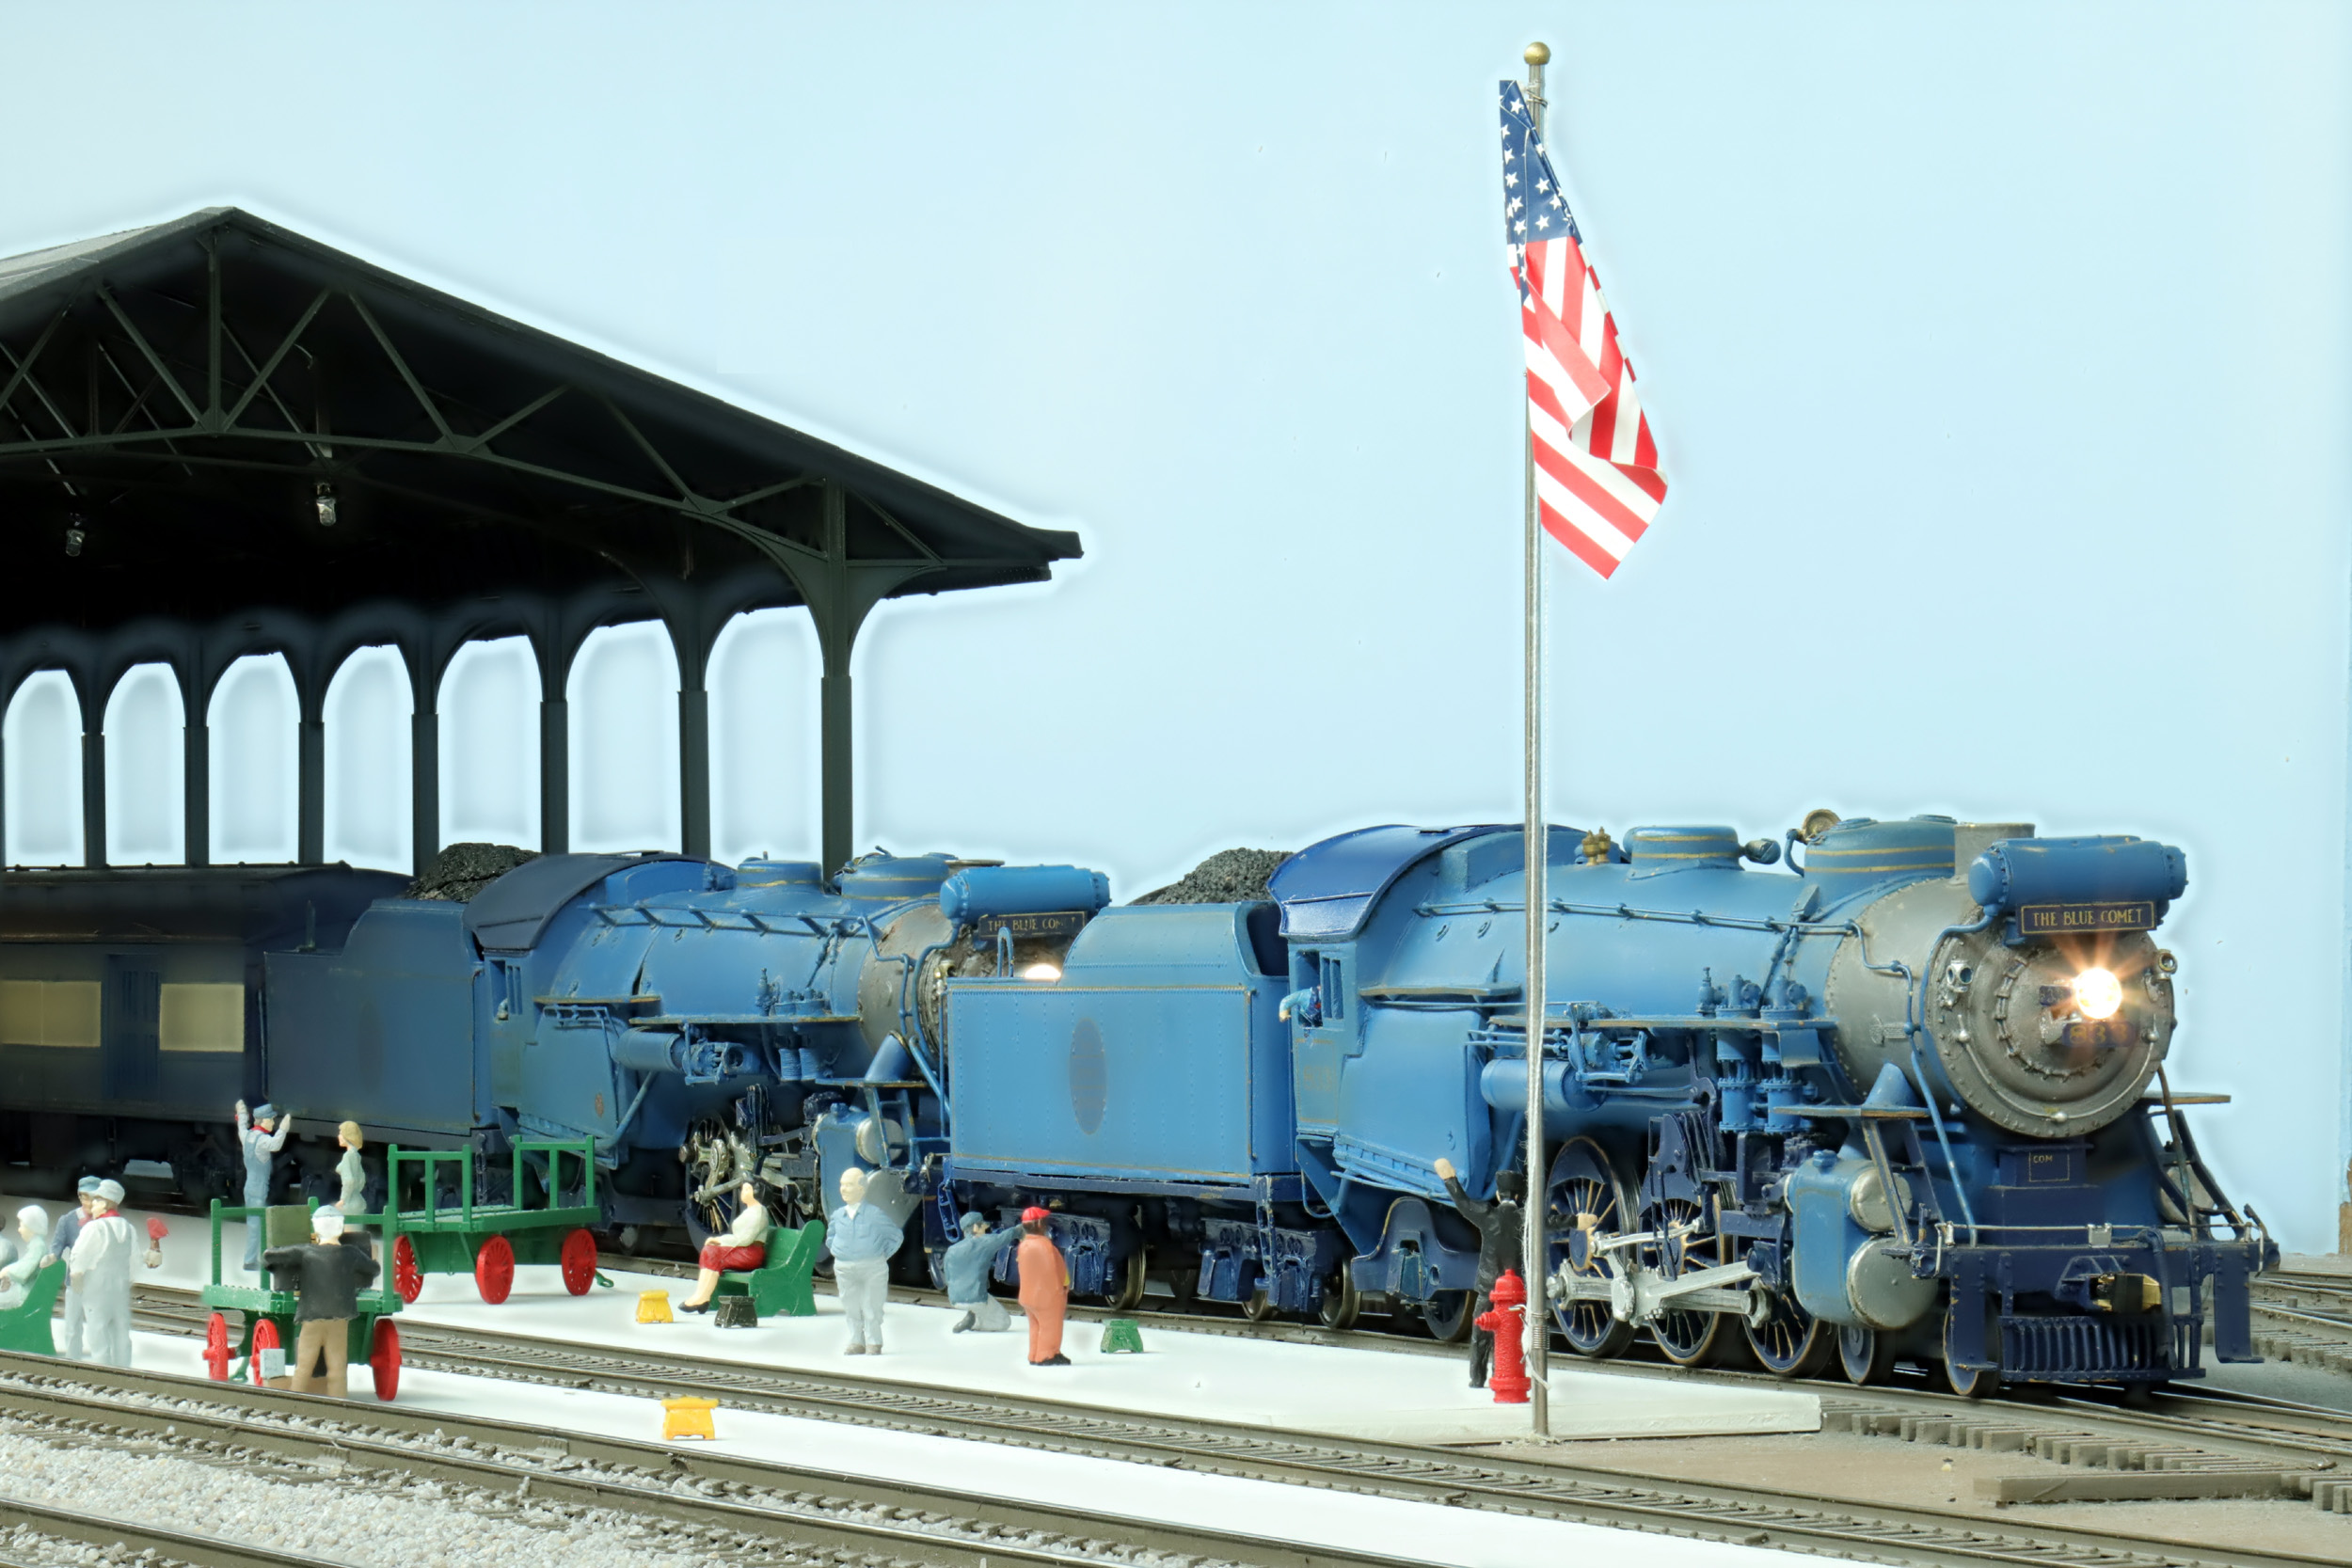
Another
Blue Comet Loco
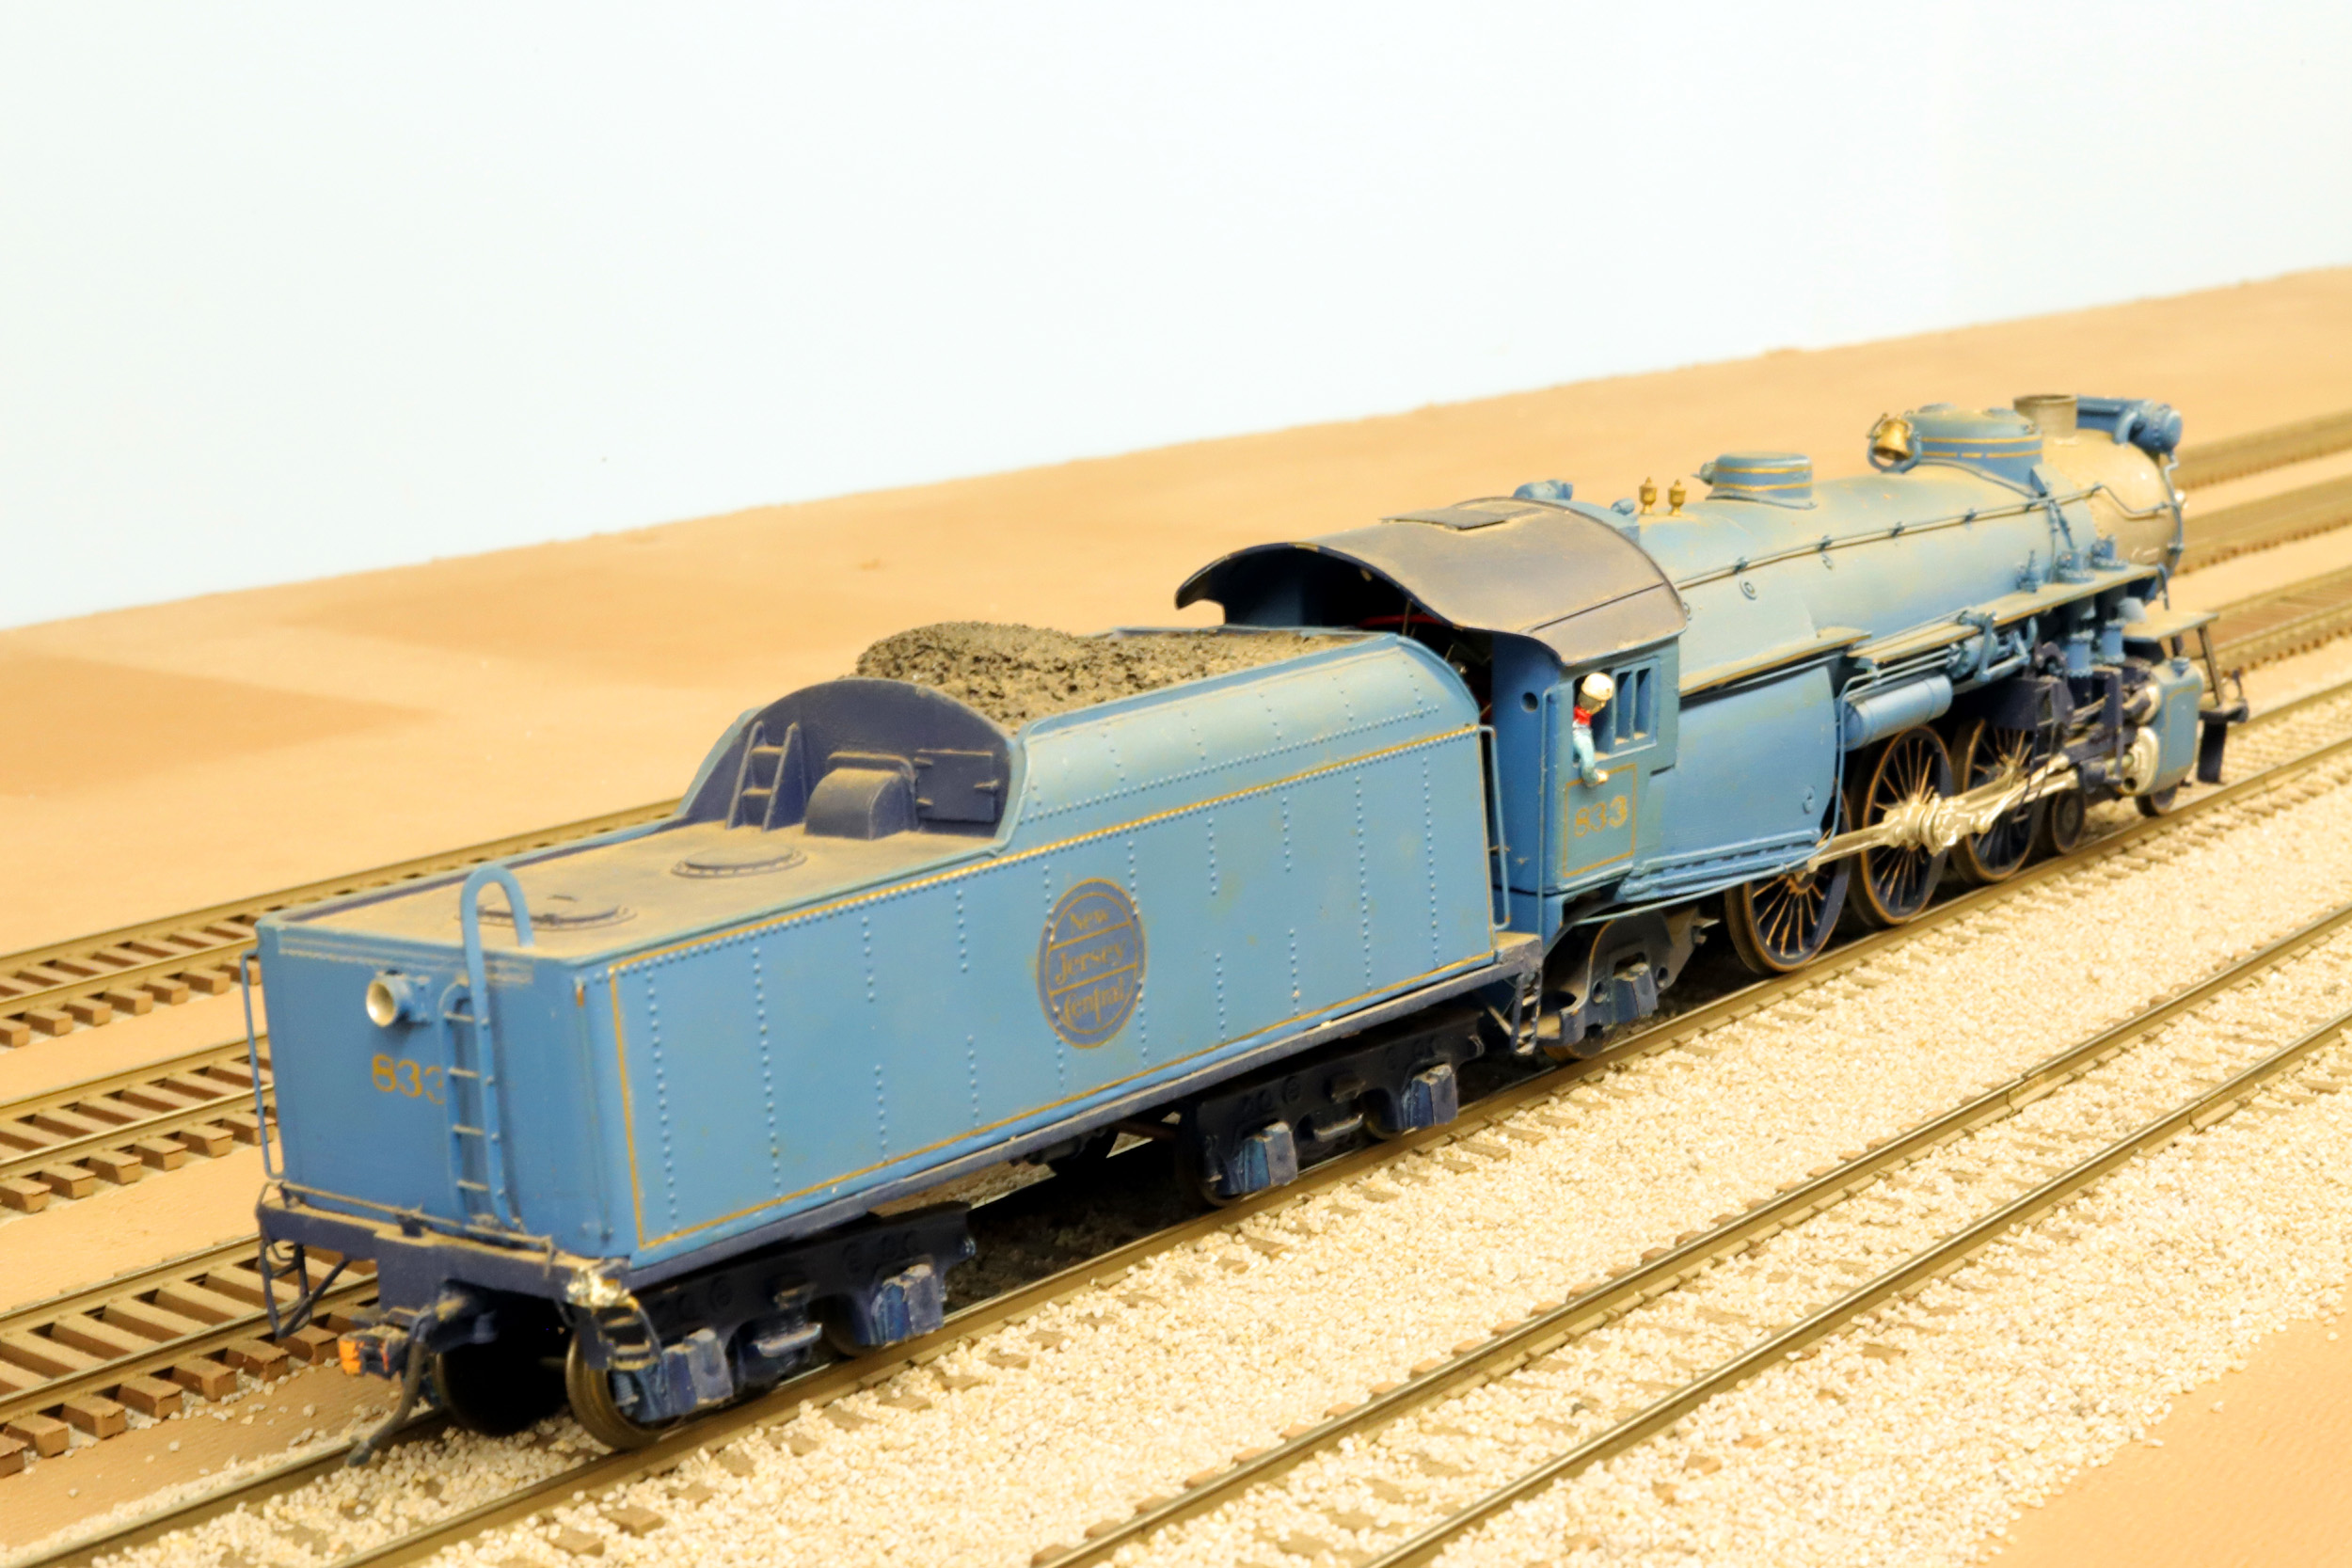
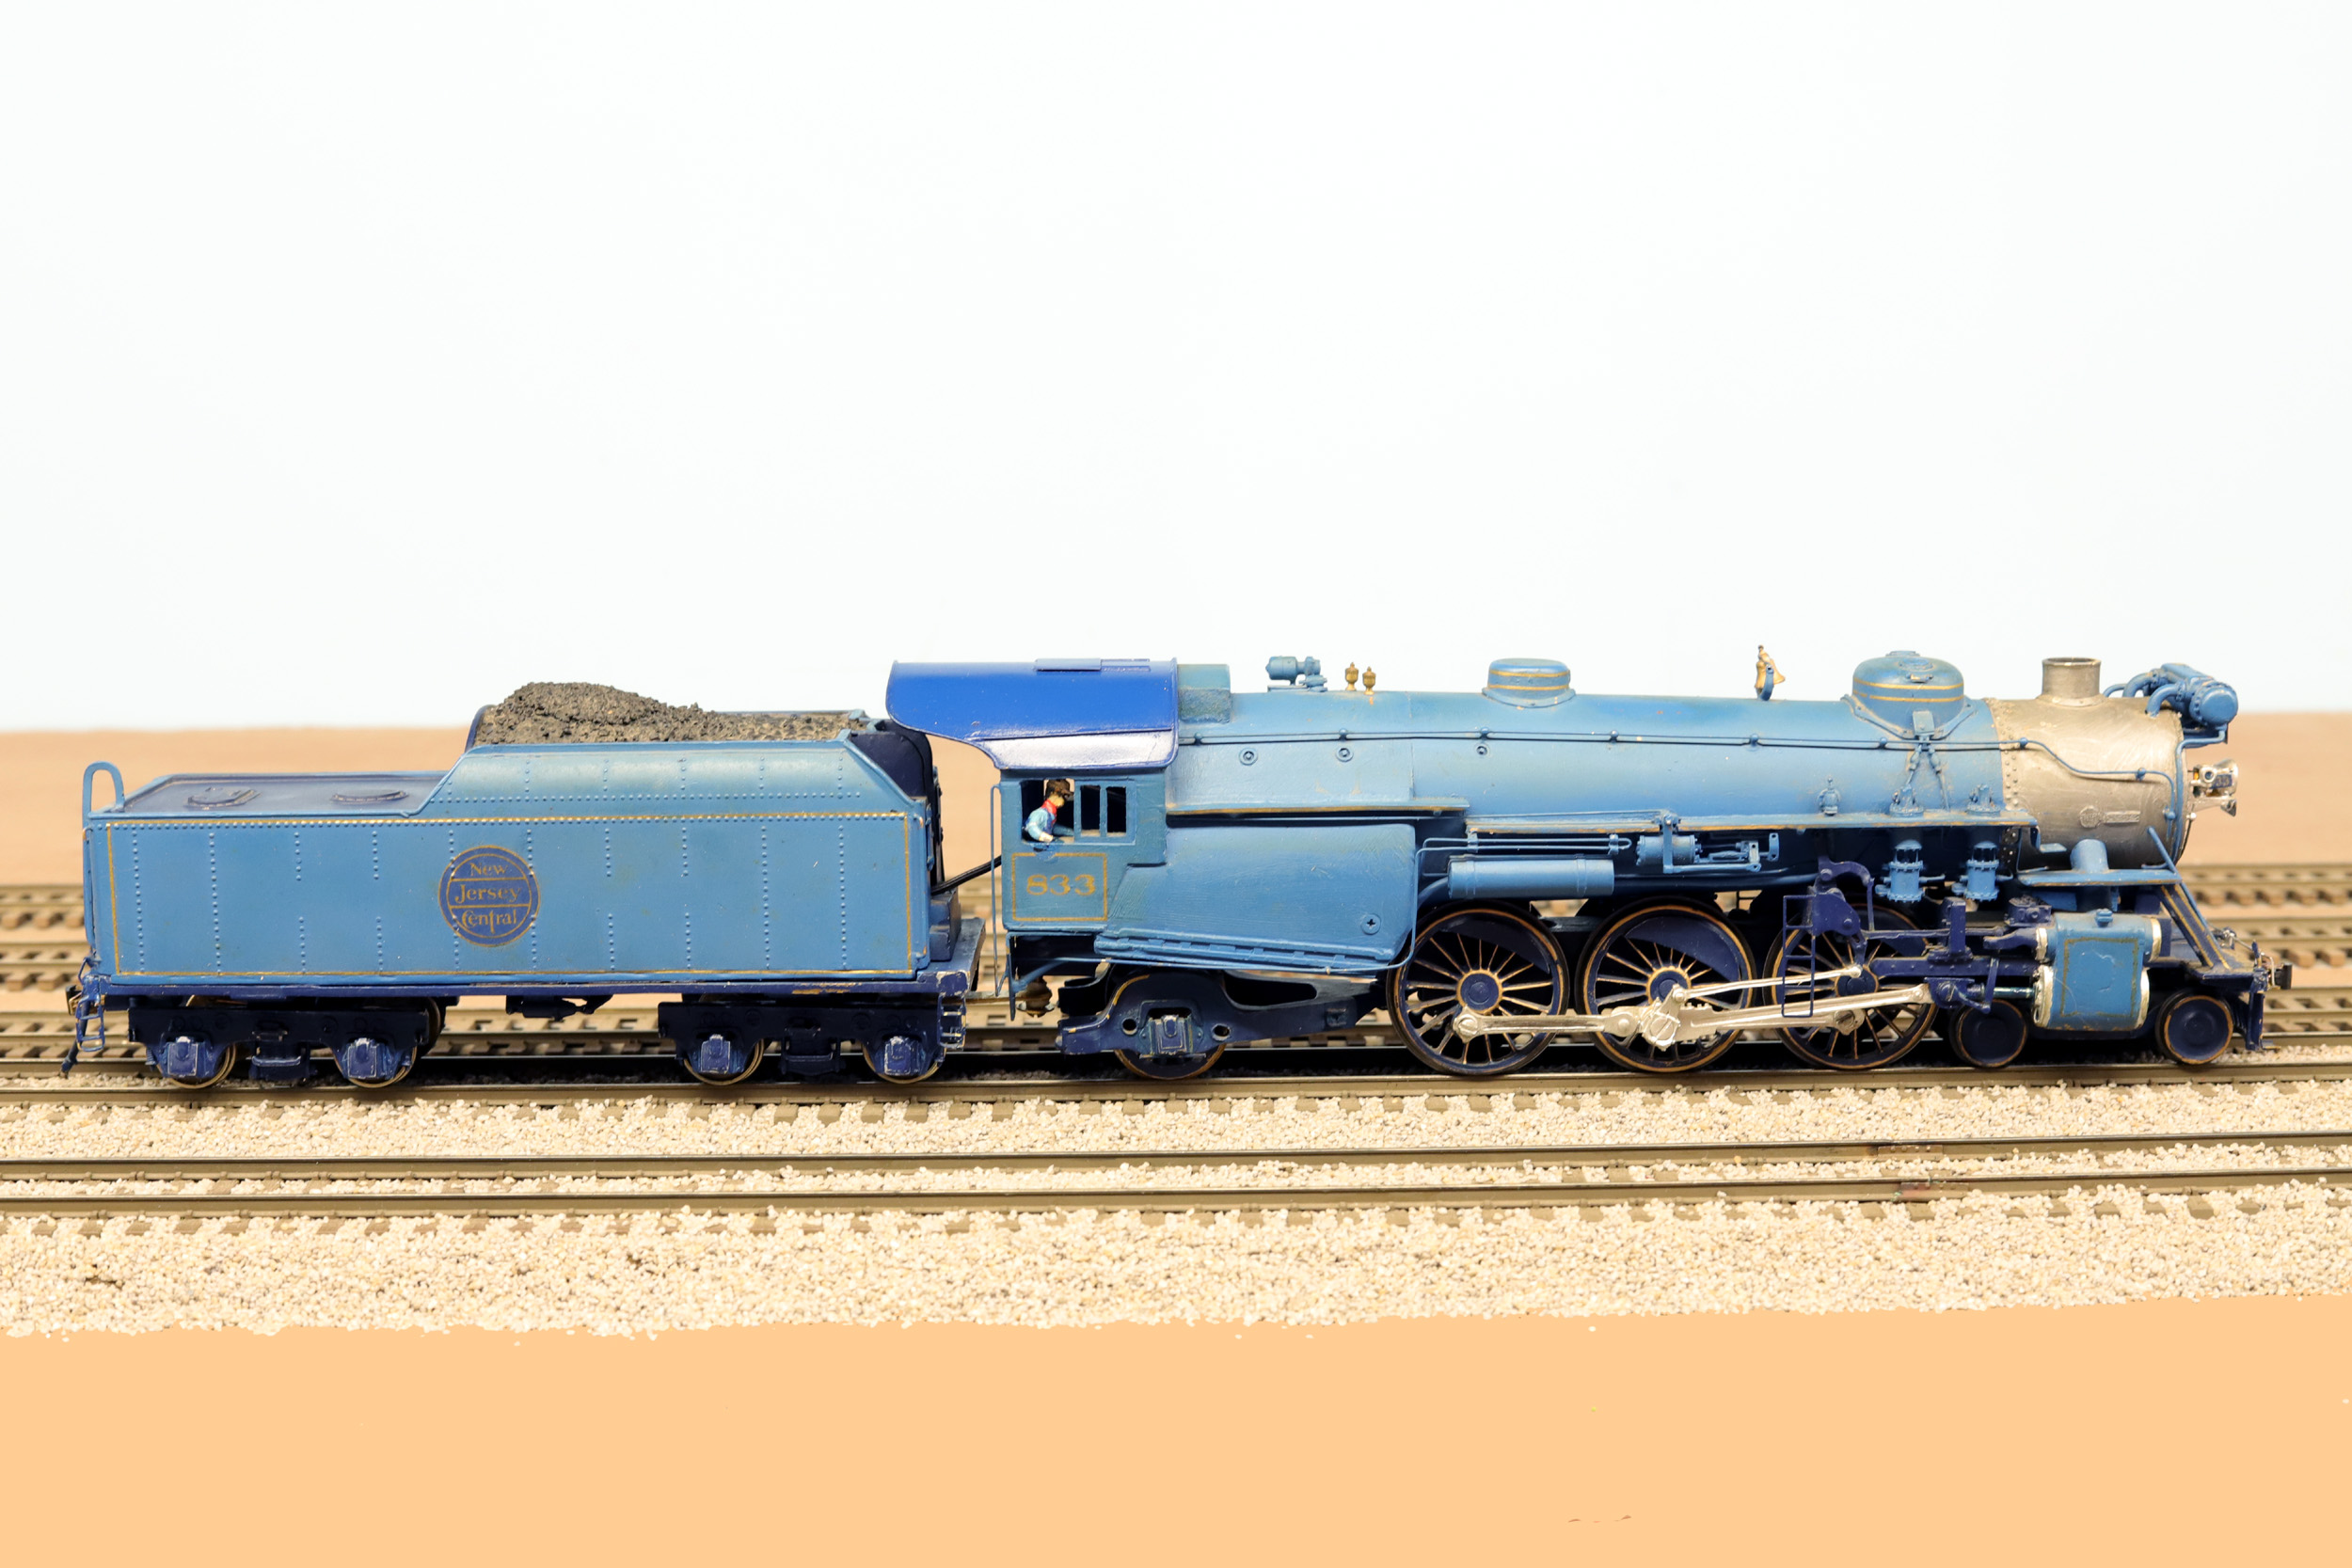
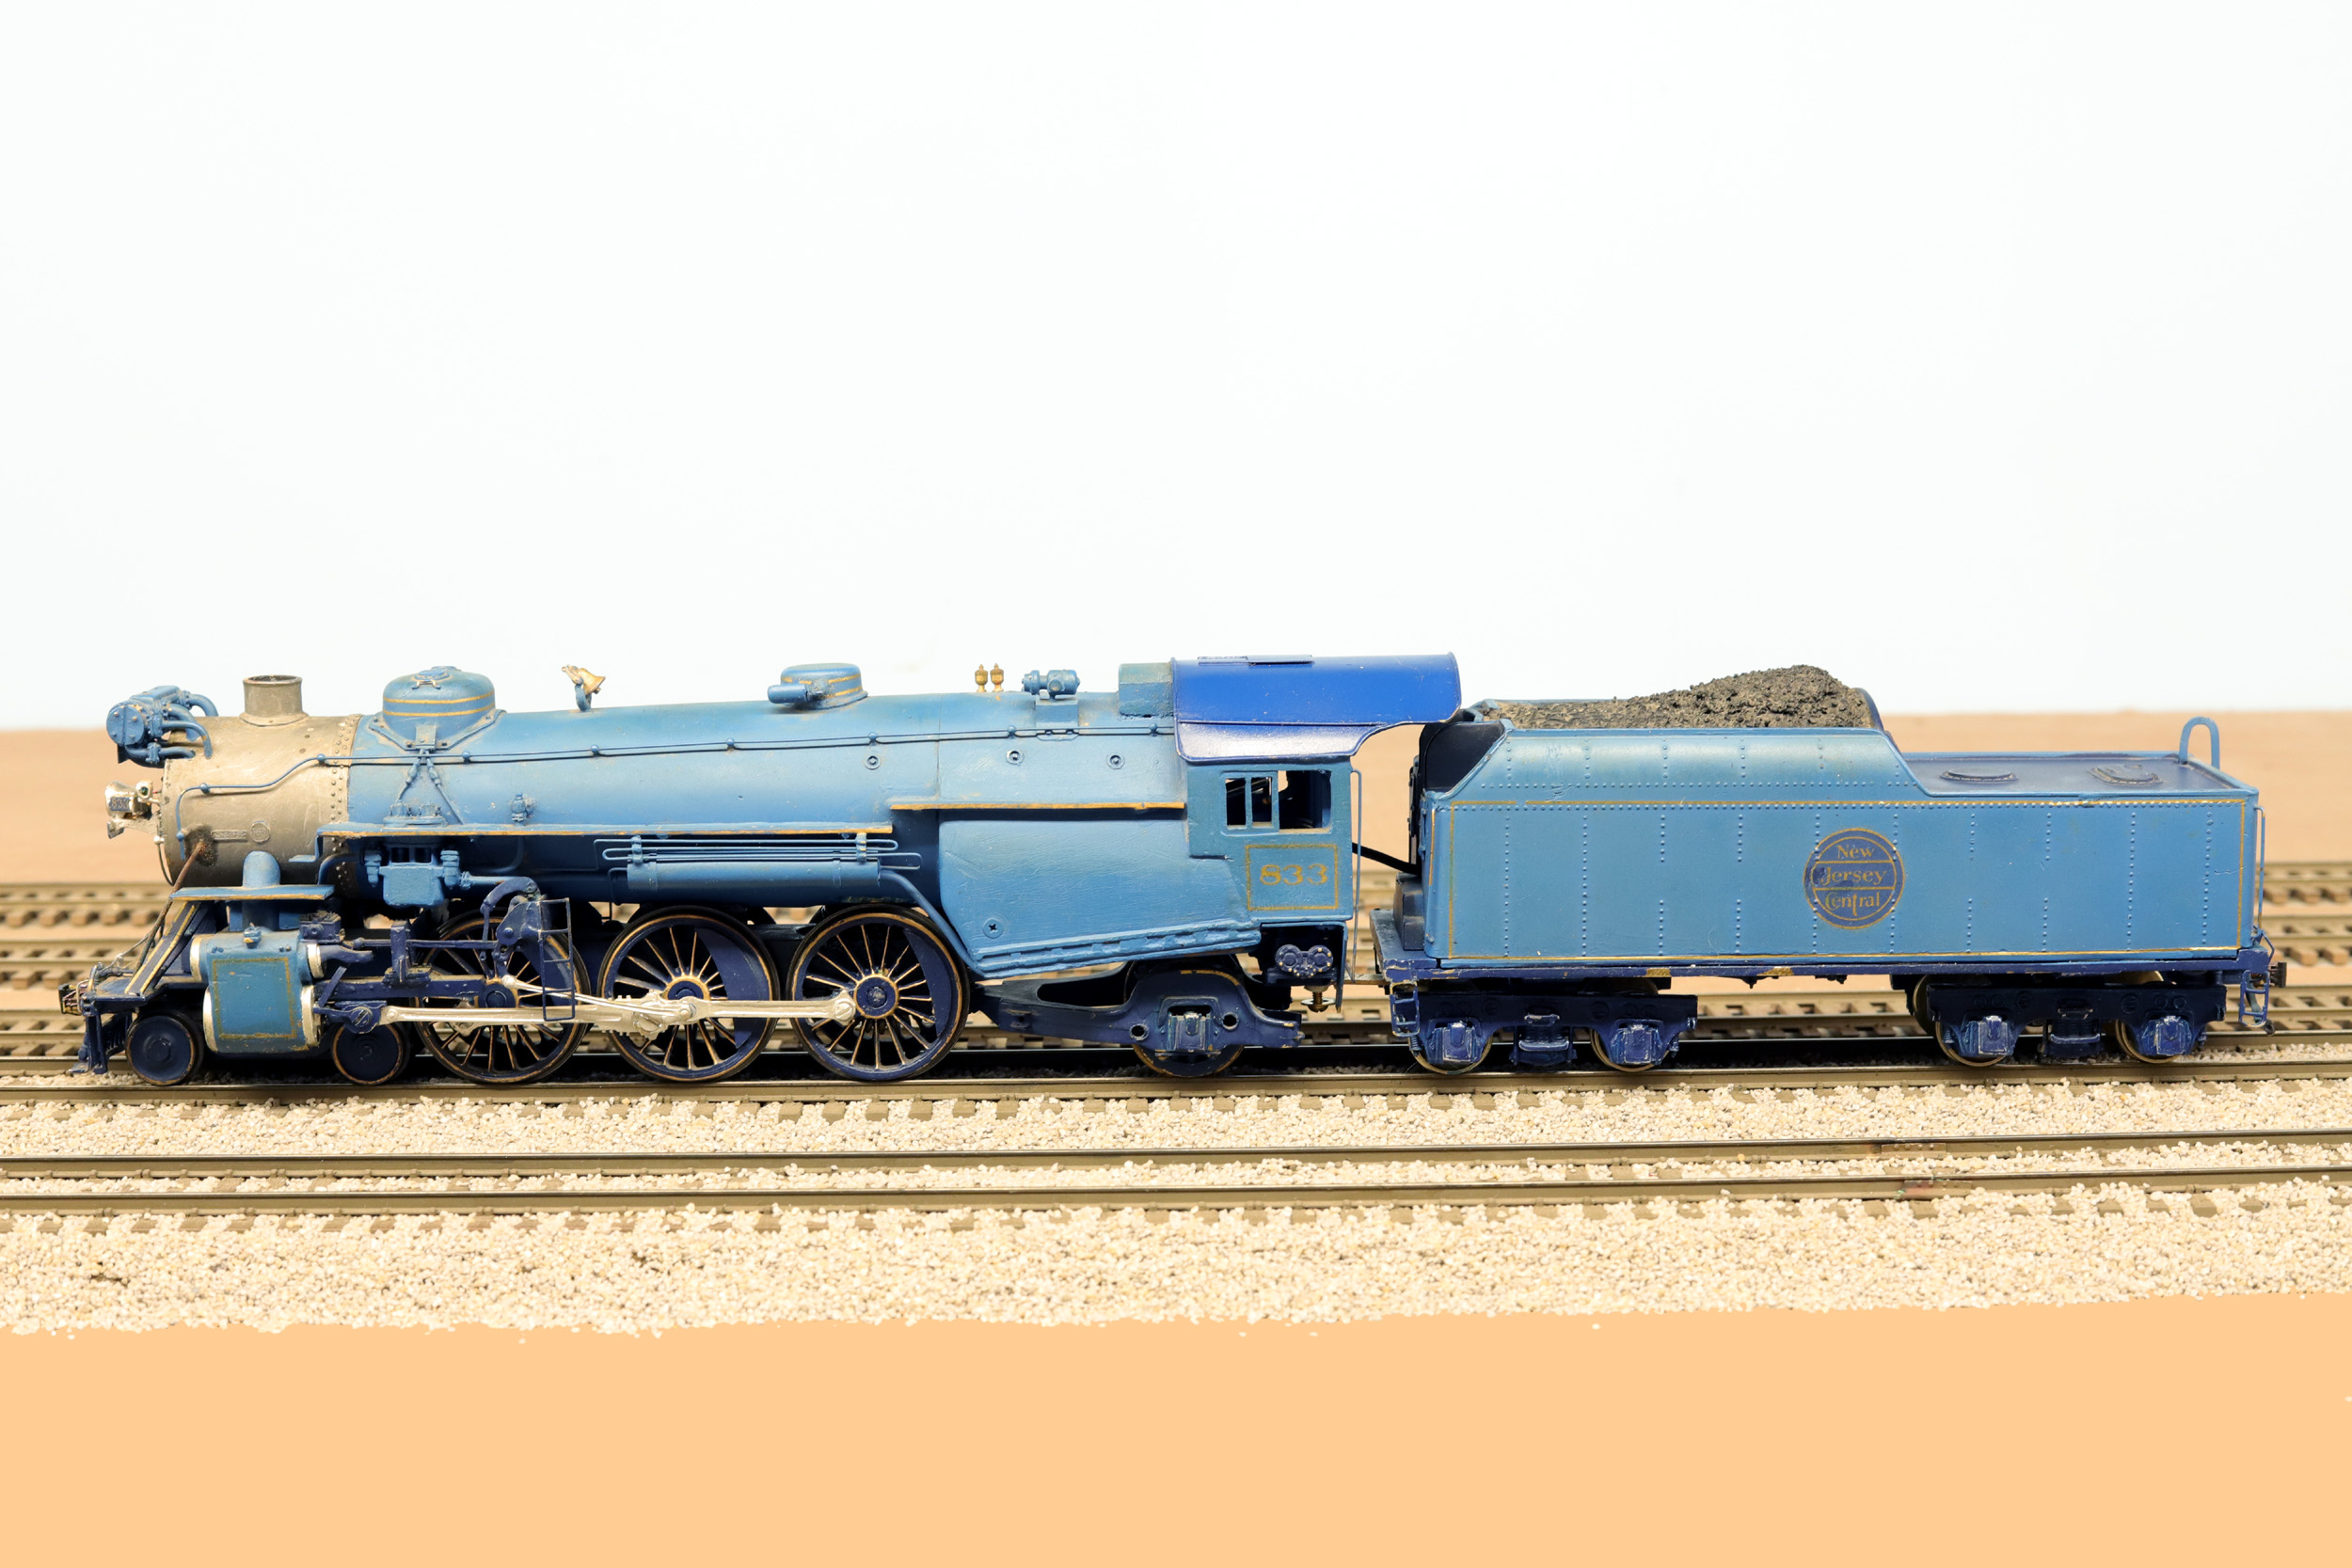
833
This is the second of 2 Frank Titman built Blue Comet loco that I
referenced above. It was originally owned by Don Thompson. Frank built it for
him. I remember seeing it many times at Don’s house in New Brunswick NJ but I
never saw it run. Don’s comments are
below. I got the loco from Jay Soberman on 7-19-24. It was a gift from Jay to
me as well.
I asked Frank to build this loco for me more than 40 years ago!
It was while Robin and I owned Train Stuff! Frank crafted the tender truck
patterns based on a CNJ drawing in one of the Locomotive Builders books! I used
a RTV mold and spun cast in pewter. The lettering was from the late Tony Perless and then he made the dry transfers. The dent in the
cab roof is from falling out of the display case. The tender is Marx’s, the cab
from a AF Atlantic, boiler and brass lost investment
detail parts from SSL&S. In 2013 Mike and I sold S Helper Service and I was
told Robin and I were selling our house of 37 years and moving to a 37’
sailboat. As much as I loved this gem, it would not fit. I gifted it to long
time buddy and S Scale dentist Dr. Jay Soberman.
This loco is significantly different than all other Frank built
locos I have. Maybe because the differences are something Don asked for. All
wheels except for the trailing truck are code 110. This loco has much better
detailing than the loco Frank built for himself. I do not think they were built
together but I have no proof of that.
These
are photos taken as received from Jay
7-21-24

It’s
Alive
Added
7-28-24
Since I had 1 I used a TCS KAM4 decoder just to run the 3MM LED
backup light. I put a resistor across orange and gray to simulate motor load. I
thought it was rather ironic that both cab roofs had to be repainted. They are
not matching at this point. I switched to NWSL nickel silver 36” wheels for the
tender. Just like above the electrical pickup is from the tender only.
The drive rolls very freely but there is still some binding when
the motor is attached. The slow speed running is not as good as 832. This
already had a can motor installed when I got it. I used a 2 amp Tsunami2
because I had 1 I was not using. I would like to install a 22mm x 40 mm Sagami
motor and TCS decoder like 832 has but surprisingly they somehow both come
together and run pretty well at about speed step 5 on the NCE handles even with
a different motor and decoder. The paint is much better on 833 but is still a
bit rough. I am not sure when or IF I will repaint either of them. Just like
832 I am not completely happy with this loco but I am done for now…..
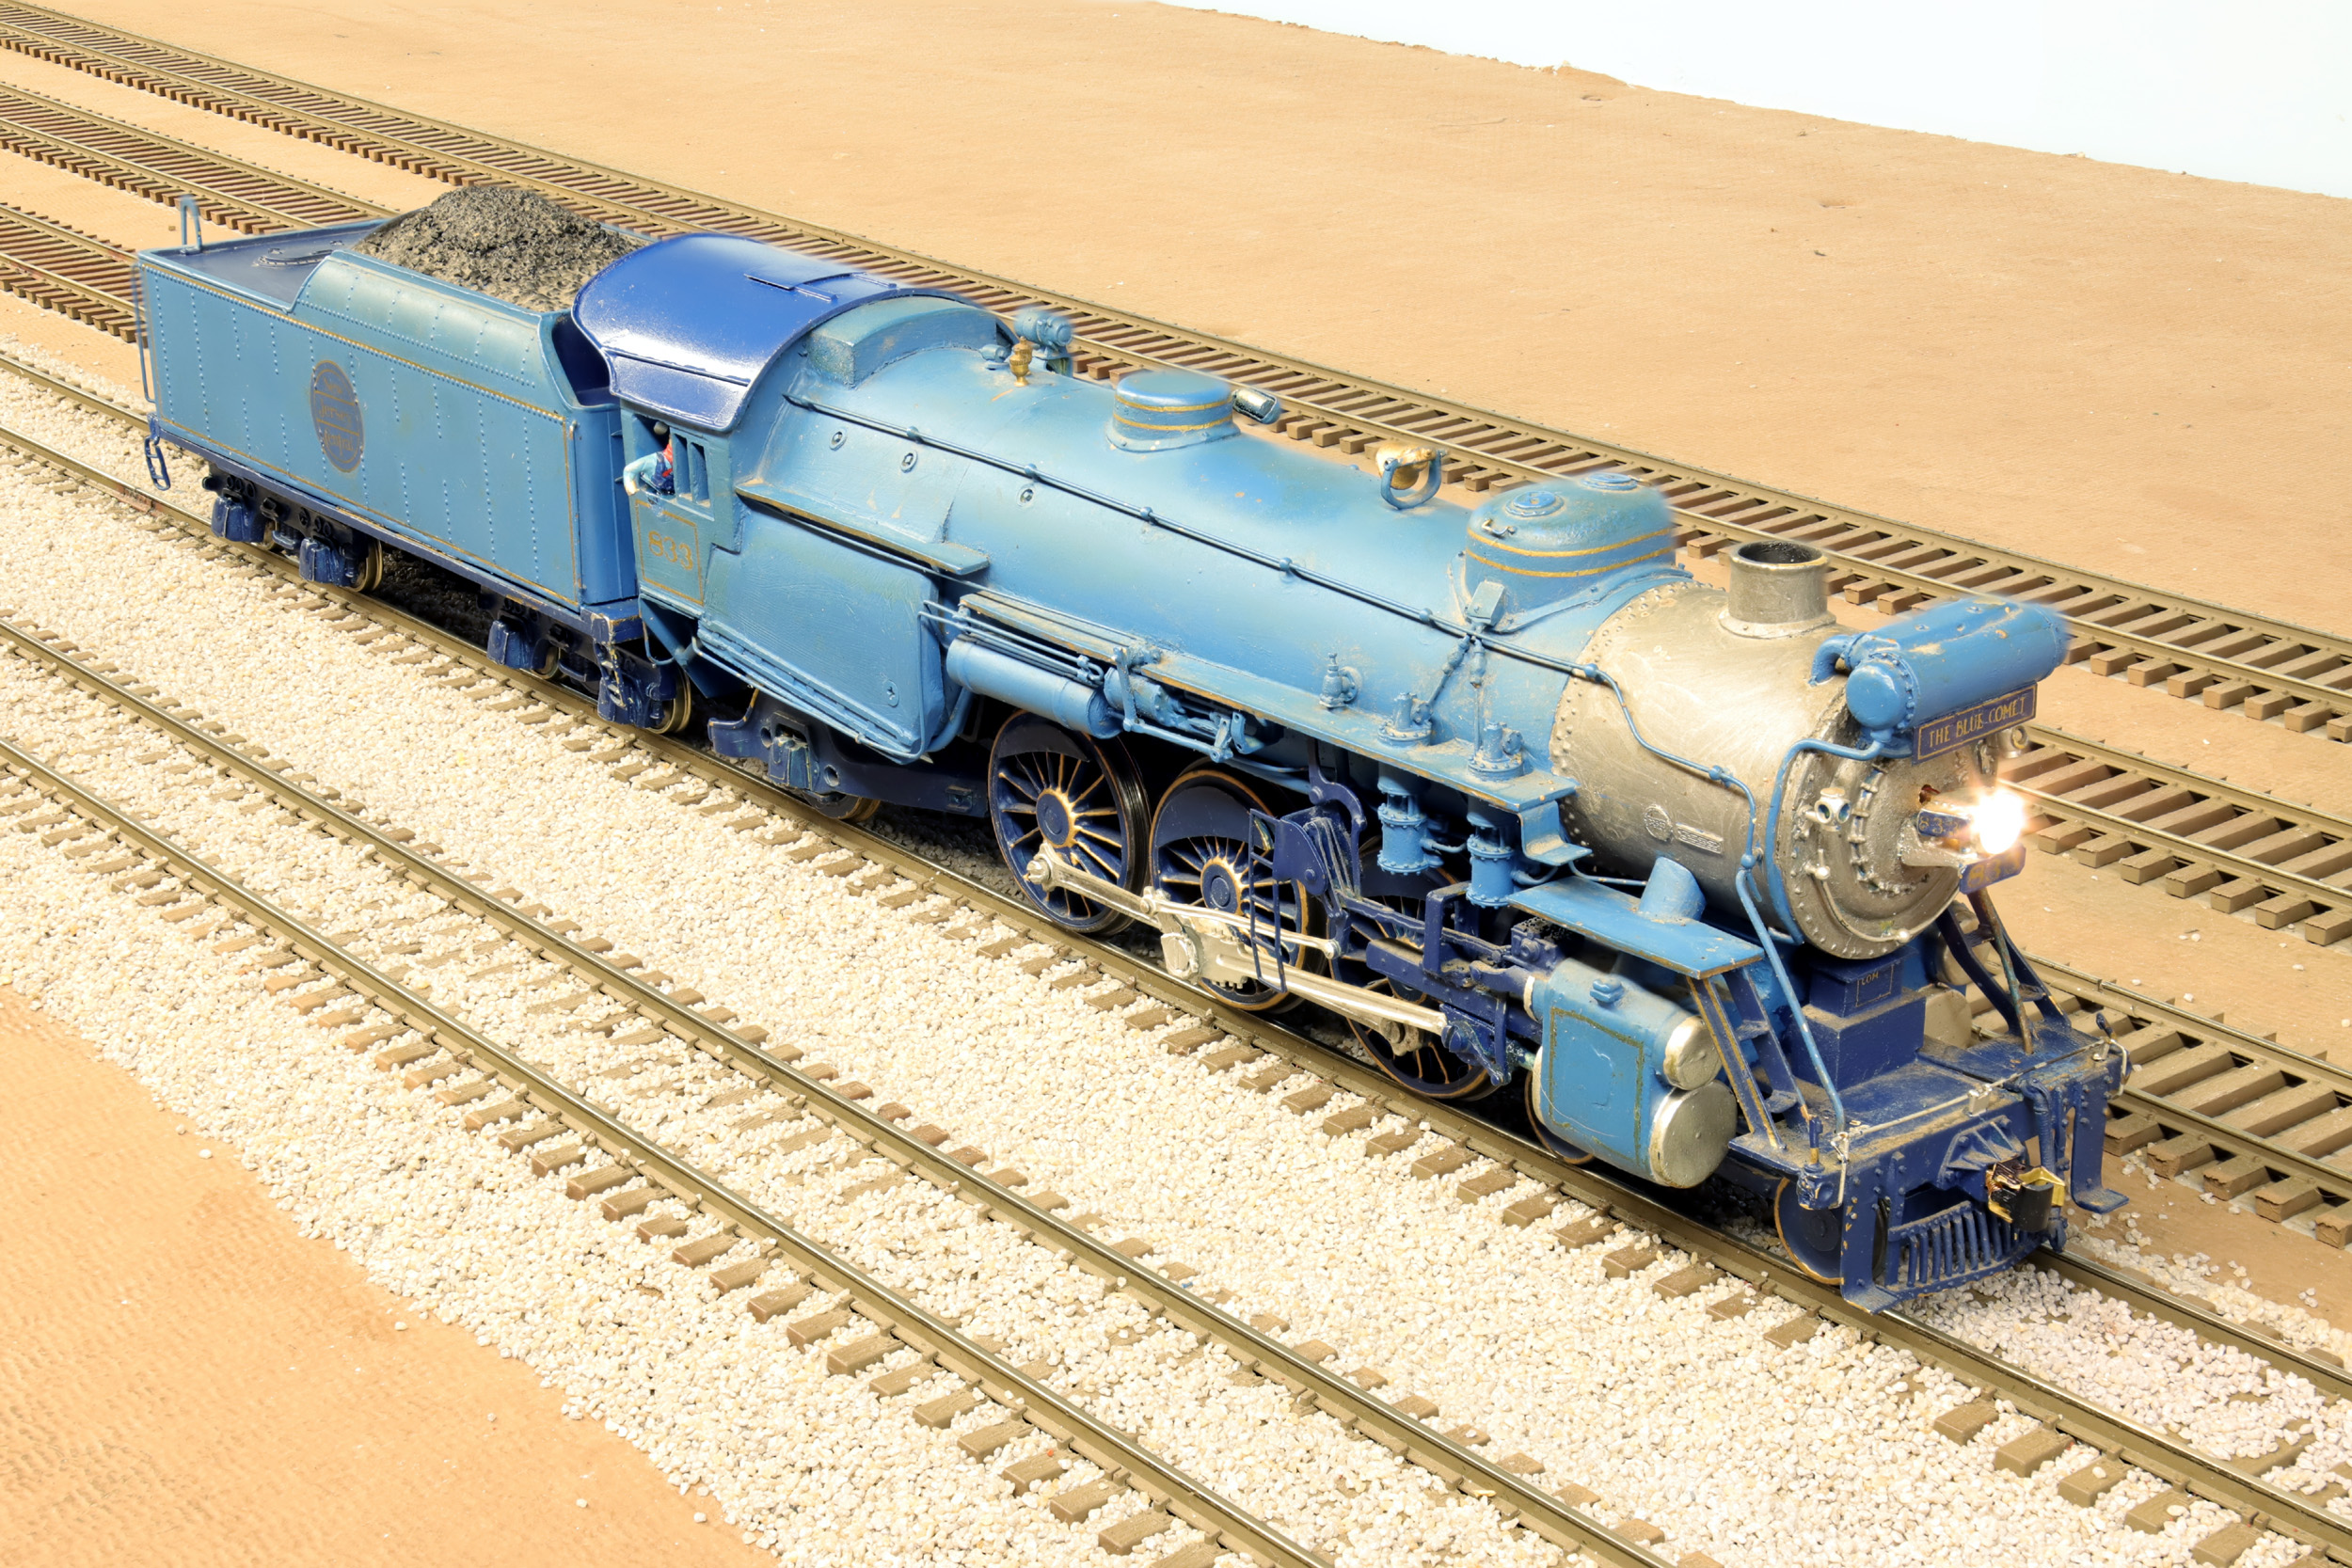
I doubt the Blue Comet would have had 2 locos for 5 cars but they
do look good together.
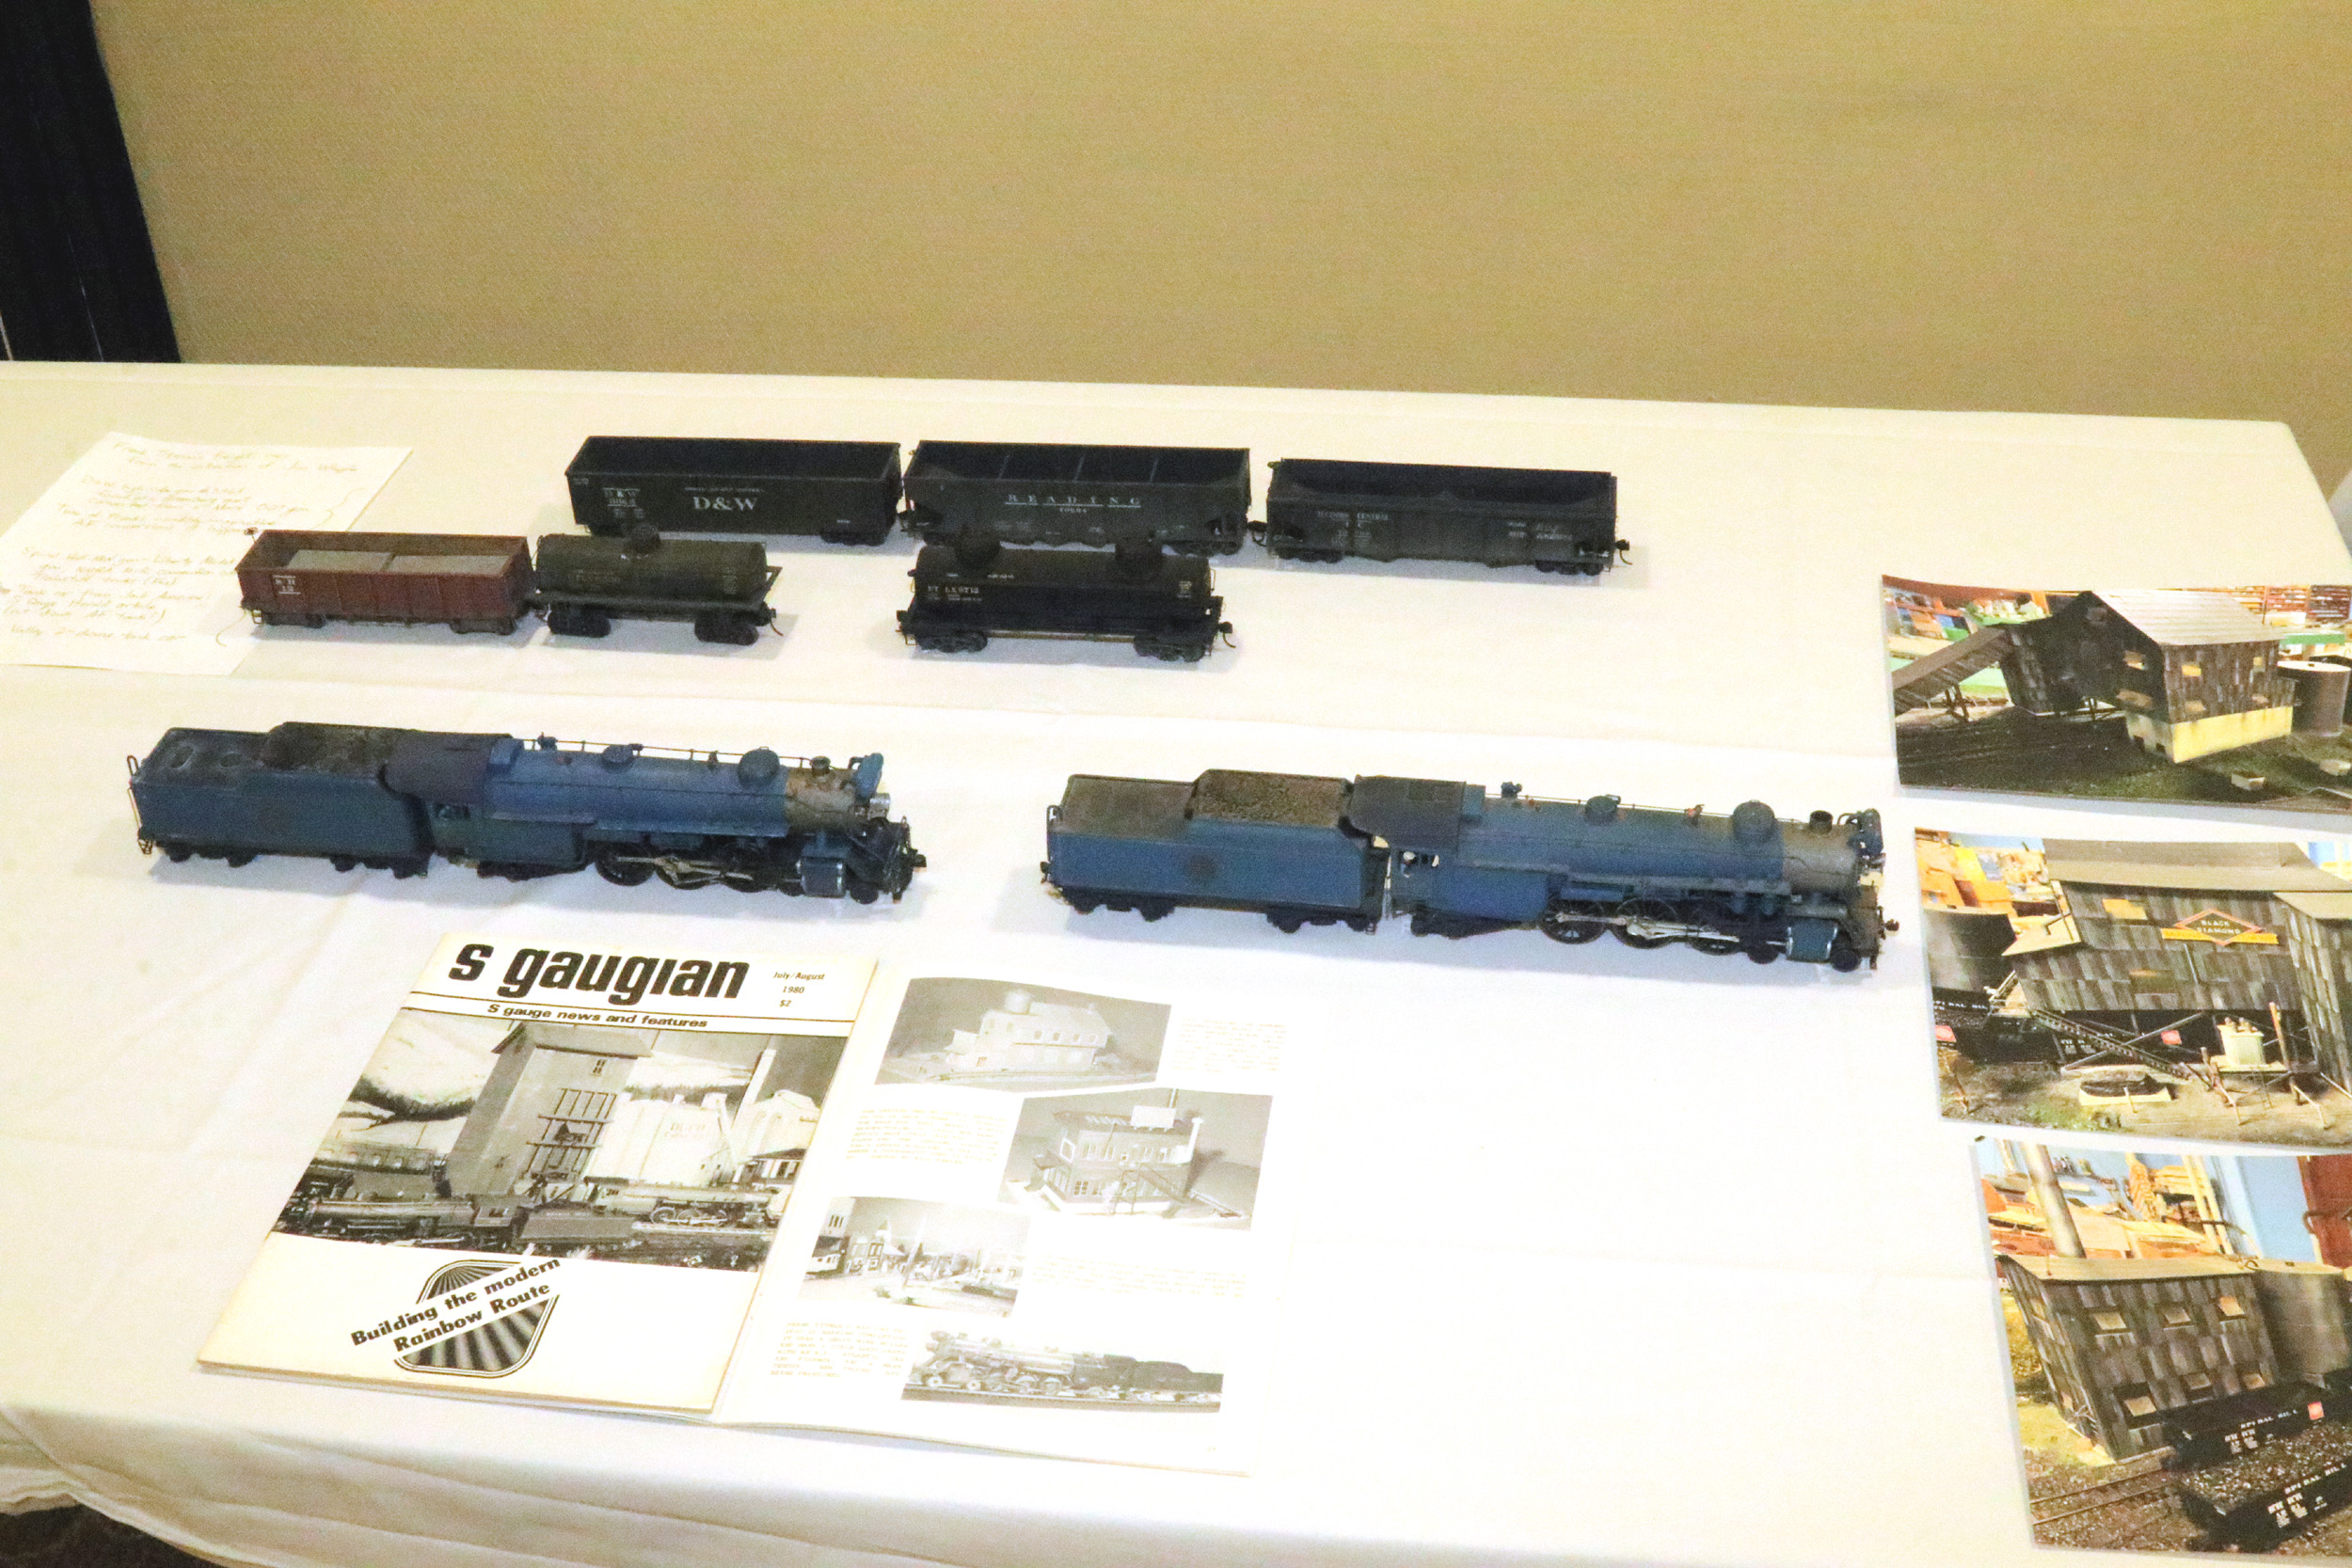
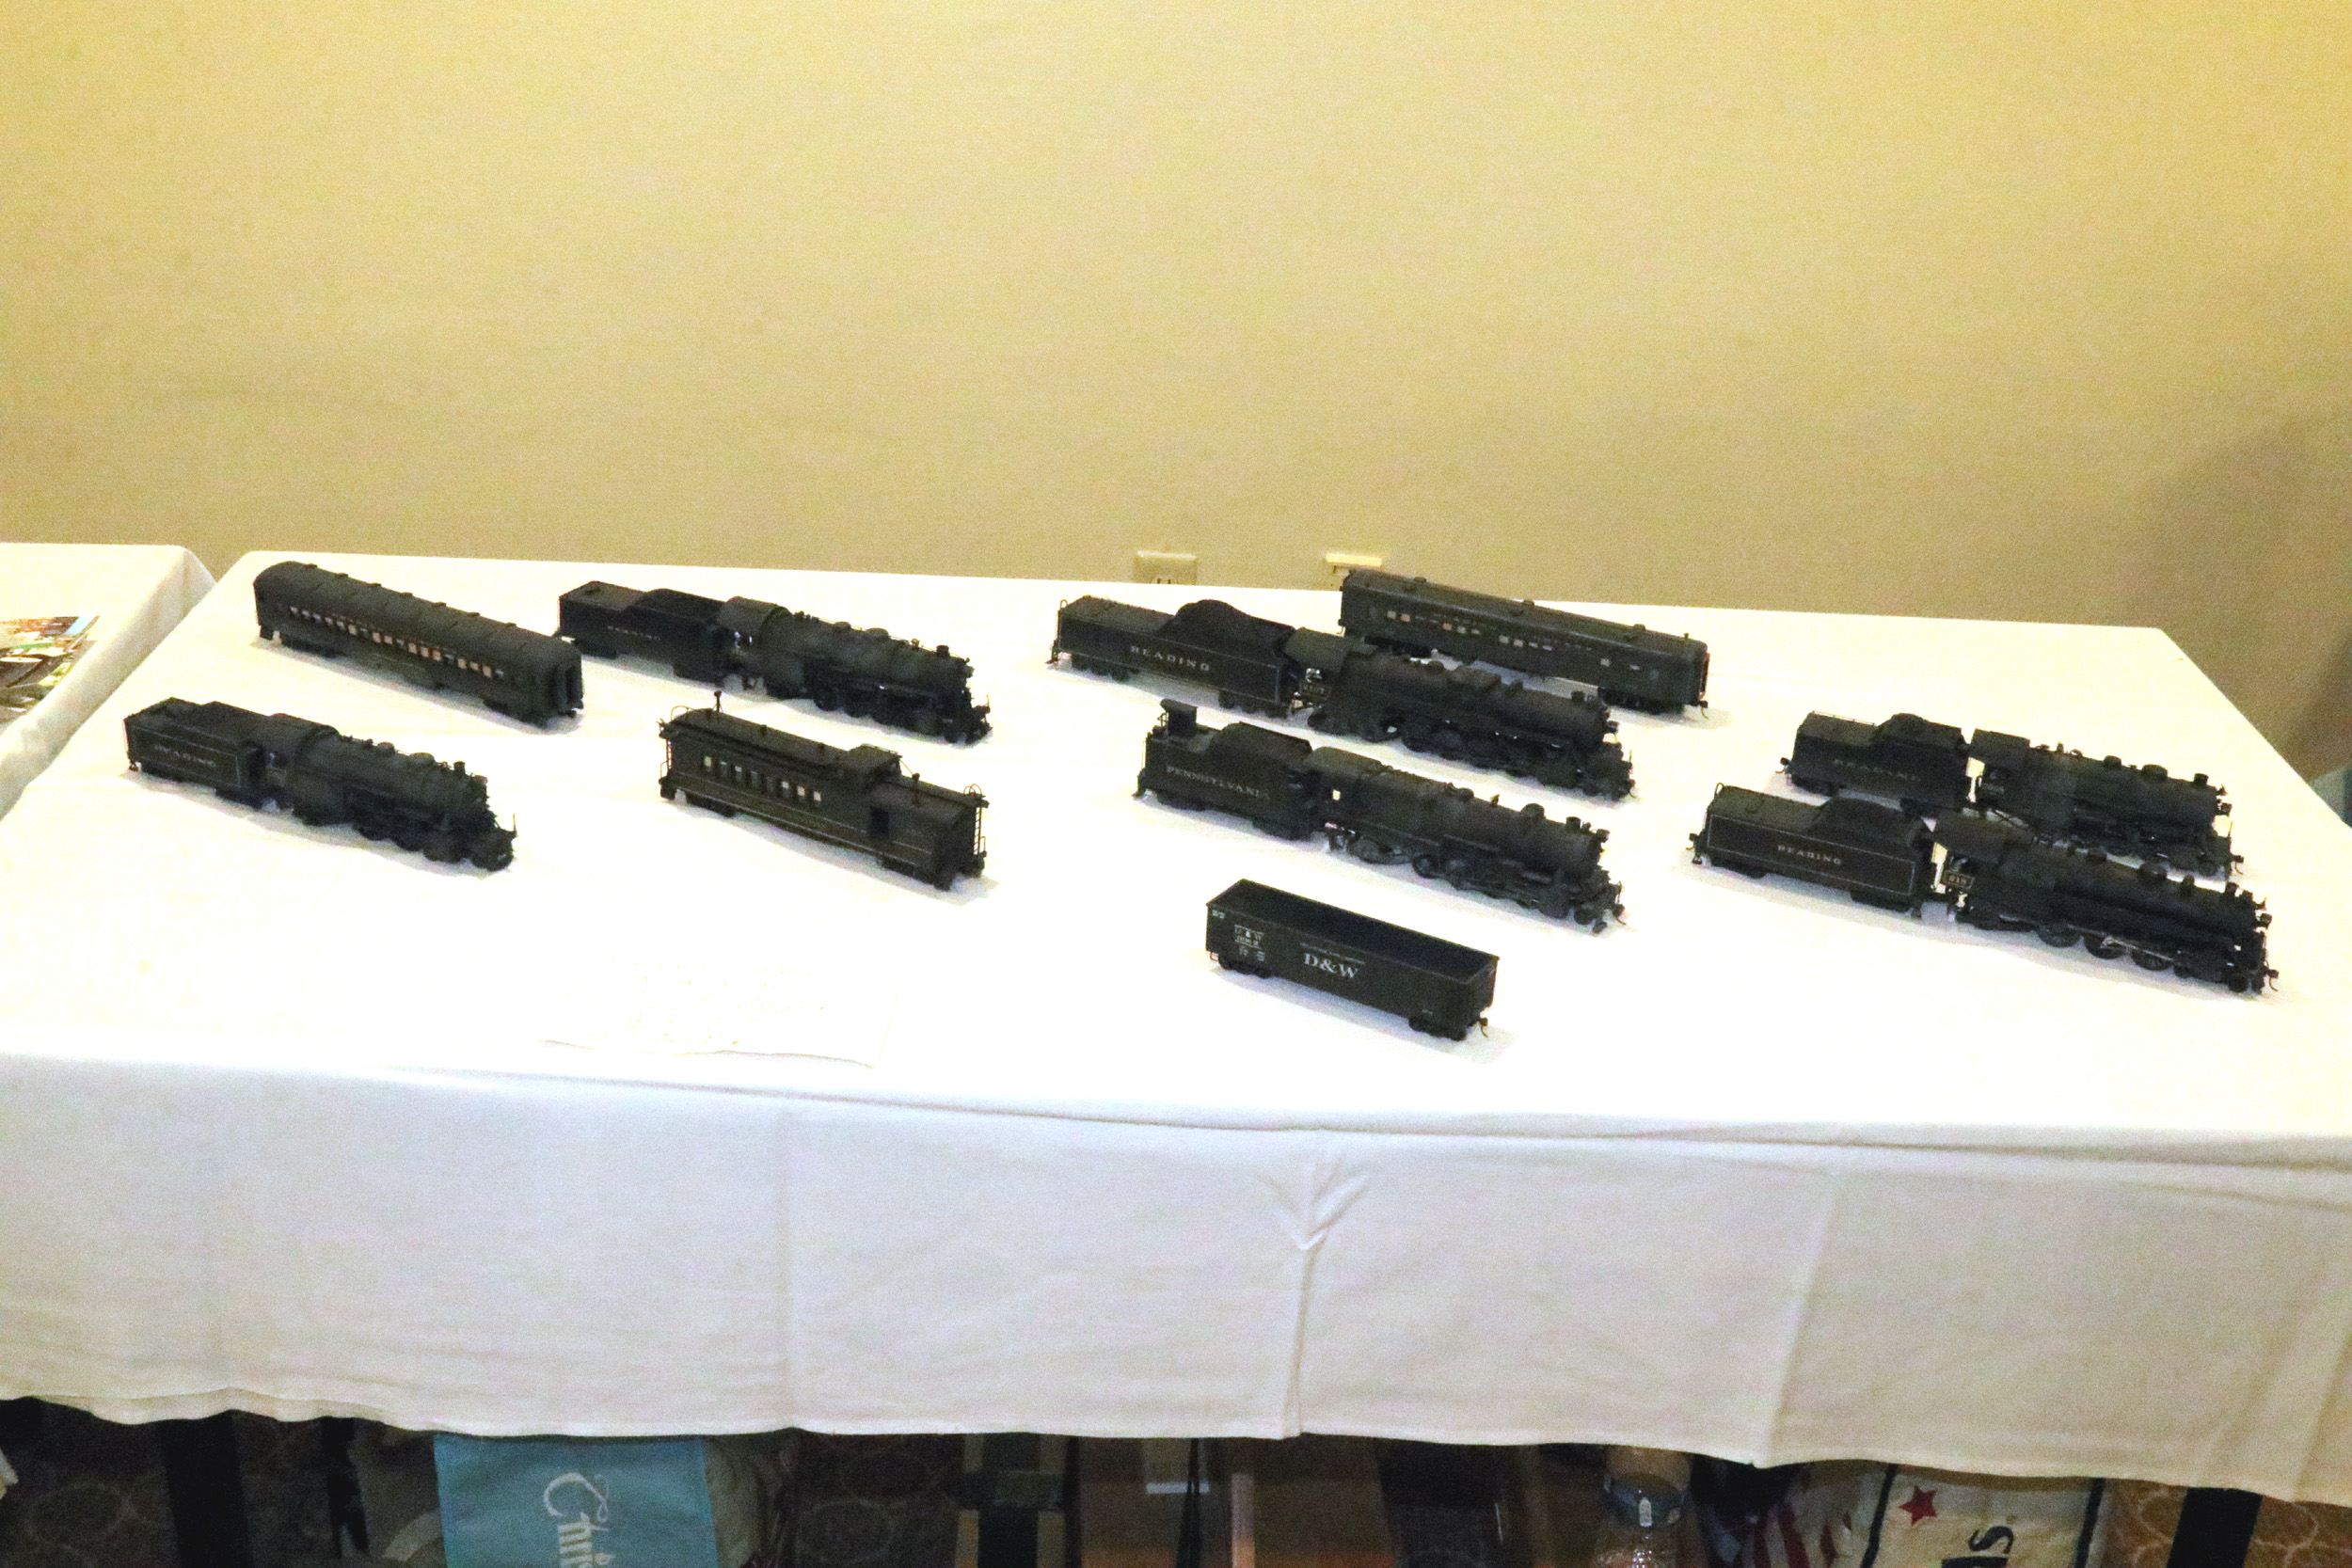
Frank
Titman Tribute
At the 2024 NASG Convention in Harrisburg PA Hugh Sinn and I put
on a display of Frank Titman made trains we own. There are LOTS more “out there”
owned by others now shown here. Jamie Bothwell and Jim Whipple bought a few
other pieces. That is where I saw 833 for the first time.
Updated
7-28-24
All photos and content © Lanes Trains 2005-2026